Monday, 28 June 2010

Creamy Snoek Kedgeree: A Taste of the Cape, with no fake hake

This famous English breakfast dish, a classic of Anglo-Indian cookery, is so easy to make, although it requires good ingredients and some attention to detail. A good kedgeree should, I think, be luxuriously buttery and creamy, and contain plenty of very fresh parsley, a touch of curry powder and a sparkle of lemon. Dry rice, over-boiled eggs or - shudder - gluey pre-frozen fish chunks will put your family off it forever.

I love kedgeree, but rarely make it, because the 'smoked haddock' that we get here in South Africa is awful. In fact, it's not haddock at all, but hake with a fake tan. Incredibly, it's perfectly legal for South African manufacturers to pass off dyed hake as smoked haddock.

'A retail scam' is what consumer journalist Wendy Knowler calls this: 'Both the Department of Health and the SA Bureau of Standards permit the industry to refer to the dolled-up hake as haddock in large print on the front of their packs, as long as the word hake appears in the small print list of ingredients,' writes Knowler in her exposé of this villainous practice.

An excellent alternative to haddock in a kedgeree is smoked snoek. Snoek, a time-honoured staple of Cape cuisine, is delicious when properly smoked; it's inexpensive, sustainable and has an agreeable flaky texture.  Curiously, despite its abundance, snoek isn't something you often see featured on Cape restaurant menus: in this interesting article about snoek, Hilary Prendini-Toffoli explains why.  (And at the end of that article, you'll find four excellent snoek recipes from two of South Africa's best-loved cookery writers, Carmen Niehaus and the late Lannice Snyman).

Living near to Hout Bay harbour as I do, all I need do is nip down to Mariner's Wharf for a pack of their famous oak-smoked snoek, but you might struggle to find it if you live upcountry. It's available in some of the bigger supermarkets, and you can also ask your local fishmonger to order it for you.

My kedgeree contains just a hint of curry powder (Rajah Medium Curry powder has the right, generic taste) . Don't be tempted to add more spice, or you'll overwhelm the delicious parsley-egg-rice flavours. I use plain old Tastic rice, for its bland, milky flavour. Don't skimp on the cream.

Creamy Snoek Kedgeree
300 g smoked snoek, bones removed, and flaked
2 cups (500 ml) uncooked rice
6 cups (1.5 litres) water, for cooking the rice
1 tsp (5 ml) salt
6 extra-large free-range eggs
4 Tbsp (60 ml) butter
a large onion, peeled and very finely chopped
2 tsp (10 ml) medium-strength curry powder
4 Tbsp (60 ml) water
1½ cartons (375 ml) cream
1 tsp (5 ml) finely grated lemon zest
½ cup (125 ml) finely chopped fresh parsley
the juice of a large lemon
salt and milled black pepper
a pinch of cayenne pepper or chilli powder

Painstakingly sift through the snoek flakes with your fingertips to remove any small bones. Set aside.

Put the rice, water and salt in a pan and switch on the heat. Boil over a medium-high heat for 15-20 minutes, or until the rice is cooked. Drain and set aside.

Boil the eggs for 9 minutes, or until the yolks are just cooked.  Run cold water over the eggs, at a slow trickle from the tap, for a few minutes. When the shells are cool, peel the eggs. Chop four of them into small cubes, and cut the remaining two eggs into wedges, for a garnish. Set aside.

Heat the butter in a large saucepan, add the onions and a pinch of salt and cook gently for four to five minutes, or until they are soft and translucent. Stir in the curry powder and cook for another minute. Now add 60 ml water, turn up the heat, and bubble for another two minutes. Turn down the heat.

Tip the cooked rice into the pan and add the cream, flaked snoek and lemon zest, stirring well to combine. When the mixture has gently heated through, add the parsley, chopped egg and lemon juice and season well with salt and pepper. Tip the kedgeree on to a warmed platter and top with the reserve egg wedges. Serve immediately, with a dusting of cayenne pepper.

Serves 6
Print Friendly and PDFPrint Friendly

Saturday, 26 June 2010

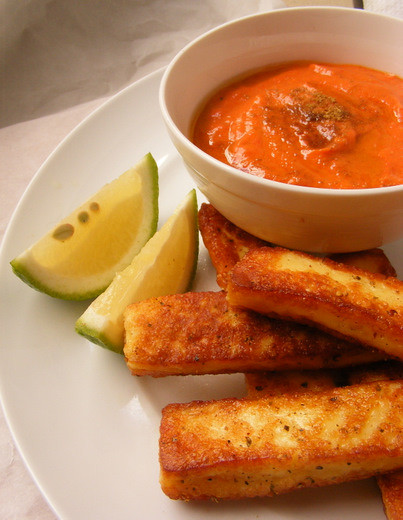
Peppered Halloumi with Red-Pepper Tahina Dip

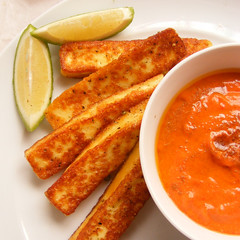
A small amount of tahina adds a velvety texture to this vibrant dip of roast red pepper, olive oil and lemon. Served with a pile of crusty fried halloumi, this makes a great snack with drinks. It's very filling, and just as well, because halloumi is an expensive cheese.

Peppered Halloumi with Red-Pepper Tahina Dip
My Peppered Halloumi with Red-Pepper Tahina Dip
It's also packed with calories, so I don't buy it often (in spite of the implorings of my teen sons, who adore halloumi with bacon and eggs, and can demolish kilos of the stuff if given half a chance).

I was first introduced to halloumi-for-breakfast by my brother-in-law, who is of Cypriot descent, and it was he who showed me how to fry it in olive oil to rustling golden perfection.

He showed me, all right, but it took me a long time to figure out how to get a good result every time. Halloumi's tricky to cook: it burns in an instant, or goes floppy, or melts all over the pan, or toughens to boot leather in a matter of minutes. So how do you get it right?

First, the quality of the cheese is important. Some brands collapse in the pan; others are so saturated in brine that they never get really crisp, so it's worth experimenting with different brands. Woolworths have an excellent halloumi that is just right for pan-frying.


Peppered Halloumi with Red-Pepper Tahina Dip
Serve with lemon wedges.
Second, make sure you pat the cheese quite dry on kitchen paper before you fry it. Third, the oil should be very hot, but not smoking, and you need to watch the cheese like a hawk as it browns very quickly. Don't add too much oil - two tablespoons (30 ml) is enough - and don't overcrowd the pan.

Last, drain the halloumi well on kitchen paper to soak up excess grease, and serve immediately. The quicker you get it onto the plate, the less chance it has to soften up.

This vibrant red-pepper sauce is inspired by a recipe given to my by my aunt, Gilly Walters of Wedgewood Nougat.


Peppered Halloumi with Red-Pepper Tahina Dip

one x 300g block halloumi cheese
milled black pepper
olive oil for frying
lemon wedges

For the dip:
2 large red peppers [bell peppers]
2 large cloves garlic, peeled
2 Tbsp (30 ml) olive oil
4 tsp (20 ml) lemon juice
1 tsp (5 ml) cumin
1 tsp (5 ml) Tabasco sauce
1 tsp (5 ml) tahina
salt and milled black pepper

First make the dip. Heat the oven to 180 ºC. Cut a 2-cm slit in the side of each pepper and push the whole garlic cloves through the slits into the peppers. Place on a baking sheet and bake for 35-45 minutes, or until the peppers are soft and beginning to brown. Don't let their skins blacken.

Remove from the oven, place on a plate, cover, and allow to cool. Tear open the peppers and retrieve the garlic cloves. Pull off the skins and cores and discard the seeds. Place the pepper flesh and garlic cloves in a blender and add the remaining dip ingredients. Process to a smooth paste (add a little more olive oil or lemon juice if the blades are reluctant to turn). Decant into a bowl, swirl with a little extra olive oil and sprinkle with a pinch of cumin.

Cut the cheese into 7-mm thick slices. Pat very dry on kitchen paper. Rub a film of olive oil over the slices and coat generously, on both sides, with milled black pepper. Heat the oil - about 2 Tbsp - in a frying pan. When the oil is hot - a breadcrumb should fizzle vigorously in it - add the cheese and fry, in two or three batches, until golden-brown and crisp. This will take about a minute per side, depending on the heat of the pan.

Drain on kitchen paper and serve immediately, with the dip and some lemon wedges.

Serves 4 as a snack.

Print Friendly and PDFPrint Friendly

Wednesday, 23 June 2010

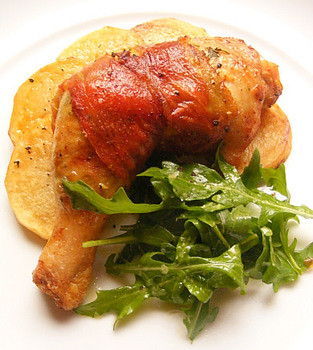
Whole Chicken Legs with Parma Ham & Lemon Herb Butter, and Sauté Potatoes

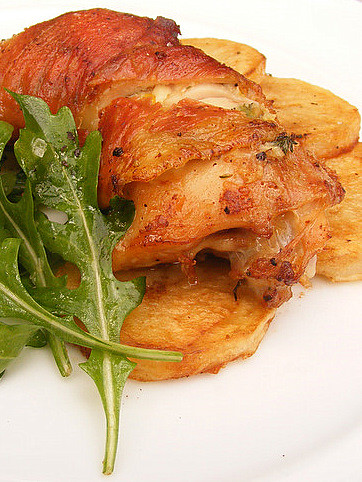
A pungent butter containing garlic, herbs, lemon zest and anchovies gives these chicken pieces a lovely flavour, and keeps their flesh succulent as they cook. The Parma ham is there to help prevent the butter from flooding out, and to add a nice, crisp, salty finish.
Whole Chicken Legs with Parma Ham and Garlic Herb Butter, and Sauté Potatoes
Although they're a bit of a fiddle to prepare, these legs are easy to cook: they're browned for a few minutes in a hot pan, and then quickly finished off in the oven. This is a great lunch or dinner-party dish - double up the quantities as you please - because you can prepare the chicken and potatoes in advance and keep them in the fridge until half an hour or so before you serve them.

You can, at a pinch, use whole chicken breasts on the bone for this dish, but their anatomy is such that the butter tends to leak out. Whole chicken legs (or 'Marylands') are ideal because you can make a small opening under the skin and stuff the butter deep into and around the drumstick and thigh.  Also, dark meat is juicier and so much more flavourful than breast meat. Please see my Cook's Notes (below) for information about how to get your hands on whole chicken legs.

I don't think this dish needs a sauce, but if you are the saucy type, instructions for a simple (and sinfully rich) reduction of wine, stock and cream are at the very end of the recipe. (I'm feeling dead-guilty about this: when I made this dish to photograph, I also made a sauce, and slurped up all but a tablespoon.  That's why there's no sauce in the picture. Look, I was hungry.)

Whole Chicken Legs with Parma Ham & Lemon Herb Butter, and Sauté Potatoes
6 whole chicken legs
2 cloves fresh garlic, peeled
2 whole anchovy fillets, from a tin or bottle
1 T (15 ml) finely chopped rosemary needles
1 T (15 ml) fresh thyme leaves
2 T (30 ml) finely chopped fresh parsley
the finely grated zest of a lemon
5 T (75 ml) softened butter
milled black pepper
a pinch of flaky sea salt
6 slices of Parma ham
a little vegetable oil for frying

For the potatoes:
6 medium potatoes, peeled
3 T (45 ml) olive oil
2 T (30 ml) butter
salt and milled black pepper

Trim the chicken legs - especially the thigh sections - of any excess fat. Crush the garlic using a mortar and pestle (or chop very finely). Add the anchovies and pound to a paste. Now stir in the rosemary, thyme, parsley, lemon zest and butter. Season with a few grinds of black pepper, but don't add extra salt - the anchovies are salty enough. Push two fingers under the skin of each chicken portion, at the junction of the thigh and drumstick, and carefully loosen the flesh from the skin and its membrane, to make two pockets: one deep into the drumstick, and the other into the thigh. Divide the butter into six portions and spread it inside the pockets, smoothing the skin so that the butter is evenly distributed. Season the chicken pieces with a little salt and black pepper.
Whole Chicken Legs with Parma Ham and Garlic Herb Butter, and Sauté Potatoes
Place a piece of clingfilm on a chopping board and rub a light film of olive oil over its surface (this prevents the ham from sticking). Put a piece of Parma ham on the clingfilm. Place a chicken piece, skin-side down and crossways, on the ham, then lift both ends of the ham up and over the middle of leg, pressing it down to secure. Now pick up the clingfilm and wrap it tightly around the chicken. Repeat with the other five pieces. Place the chicken in the fridge for 20 minutes - or longer, if you're making this in advance - for the butter to firm up.

To prepare the potatoes: peel and cut into disks 7mm thick. Drop into a big pot of rapidly boiling salted water, cover, and cook for 4-6 minutes, or until you can poke the tip of a sharp knife through one of the slices, with the potato offering just a little resistance. Drain in a colander, spread the slices on a tray covered with kitchen paper and allow to dry out for 20 minutes, or longer if you're preparing this in advance.

Preheat the oven to 180ºC. Heat a little vegetable oil  in a large frying pan. Brown the chicken, in batches of two: When the oil is very hot, place the chicken, skin side down, in the pan. Cook for 2½-3½ minutes, or until the ham and skin are golden brown and crispy. Turn the chicken over and cook for another 2 minutes. Place skin-side up on a baking sheet while you brown the rest. (If you're making a sauce - see below - set the frying pan to one side.)

Bake at 180ºC for 16-20 minutes or until the chicken is cooked through (see Cook's Notes, below). While the chicken is baking, fry the potatoes: heat some of the olive oil, over a brisk flame, in a large frying pan. Season the slices with salt and pepper. Arrange the slices (you'll need to do this in three batches) in the frying pan, and sizzle for a few minutes, or until golden brown and beginning to crisp. Flip the slices over and fry the other sides. Add a nut of butter to the pan, and toss well to coat. Set aside and keep warm while you finish frying the the remaining potato slices.

Serve the chicken pieces and potato piping hot, with a leafy green salad (rocket, watercress and similar dark leaves are perfect) dressed with olive oil, lemon juice and salt.

Serves 6


To make a sauce: When you make the flavoured butter for the chicken, add an extra 2 T (30 ml) butter to the mixture.  Stir the mixture well, remove the two extra tablespoons, and place in the fridge, on a plate. Reheat the frying pan in which you fried the chicken pieces. When the fat begins to sizzle, pour in half a cup (125 ml) of white wine. Cook over a fierce heat for three minutes, stirring and scraping to dislodge any golden residue.  Add 3/4 cup (180 ml) good chicken stock. Allow to bubble briskly for ten minutes, or until the sauce has reduced by half. Stir in 3 T (45 ml) cream, and cook gently for another three minutes. Finally, stir in the cold butter, a few knobs at a time.  The sauce will thicken slightly. Season with a little black pepper and serve with the chicken.

Cook's notes:
  • You won't often see whole legs on a supermarket shelf, so order them  in advance from your butcher, or buy whole chickens and cut off the Marylands yourself.  (This is really, really easy to do, and whole chickens are so much cheaper than pieces. You can keep the breasts and wings for another dish, and make an excellent stock from the rest of the bones. Here are easy instructions for cutting up a chicken.)
  • How long your chicken legs will take to cook through will depend on their size, and the efficiency of your oven. After sixteen minutes, remove one of the legs from the oven and poke a sharp knife-tip into the deepest, underside part of the chicken thigh. If the juices run clear and the flesh next to the bone is very hot to the touch, the chicken is ready. If there is a trace of pinkness, and the flesh is merely warm, put the chicken legs back in the oven for another five to ten minutes. 
  • Please don't leave out the anchovies. Even if you loathe them, they're an essential savoury ingredient, and I promise that you won't taste a hint of fishiness in this dish.
Print Friendly and PDFPrint Friendly

Saturday, 19 June 2010

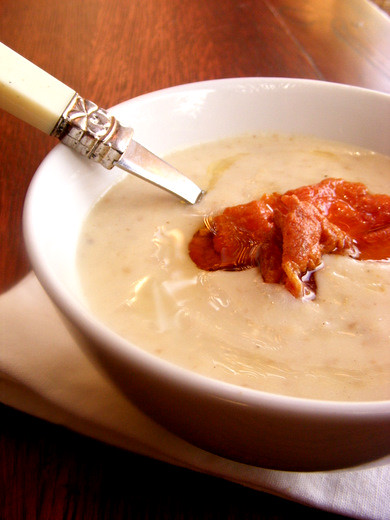
Creamy New-Potato Soup with Frizzled Parma Ham

Creamy New-Potato Soup with Frizzled Parma HamI hardly ever peel a potato these days: first, I can't be bothered. Second, all the finest flavour of a potato lives in its skin, and just underneath it. There are, admittedly, a few dishes that need potatoes to be peeled - good, fluffy, buttery mash and rustling, crunchy roast potatoes are great examples - but I reckon that standing over a sink flaying the skins of potatoes for a stew or slow-cooked casserole  is just madness, and a waste of time.

But a potato soup is a different matter.  I wanted a good, earthy taste to this soup, but I didn't want leathery flecks of potato skin to ruin the texture. The solution was to use some beautiful new potatoes - bought from my local supermarket - which had thin, delicate skins that would disintegrate easily into the blitzed-up soup.

This soup tastes like liquid Pommes Dauphinoise: creamy and soft, with hints of nutmeg and butter.  It's easy and quick to make, but take care not to over-process the soup when you liquidize it, or it may become gluey.  A rich home-made chicken-stock is essential:  a supermarket stock cube or stock powder will not do.  You can make a good stock quite easily from an inexpensive pack of chicken wings and a few vegetables and herbs (here are my tips for making a quick stock; scroll to the end of the post for the recipe).

If you can afford it, do buy a few slices of genuine Parma ham for the top of this soup, from your local deli. It's wildly expensive, I know, but you'll only need six slices, which won't amount to much in cash. If you can't find Parma ham, fry a couple of slices of streaky bacon until they are very crisp, and crumble them over the soup.

Creamy New-Potato Soup with Frizzled Parma Ham

2 T (30 ml) olive oil
2 T (30 ml) butter
2 bay leaves
2 large onions, peeled and chopped
flaky sea salt
30 new [baby] potatoes, wiped
about 4 cups (1 litre) good chicken stock
2 cups (500 ml) whole milk
a big pinch of freshly grated nutmeg
½ cup (125 ml) pouring cream
finely ground white pepper, to taste
flaky sea salt

To serve:
2 tsp (10 ml) vegetable oil
6 slices of Parma ham (or streaky bacon)
a little fruity olive oil

Heat the olive oil and butter in a big pot over a moderate flame.   Add the chopped onions, bay leaves and salt, and fry gently for six or seven minutes, or until the onions are softened and translucent, but not browned.  In the meantime, finely slice the new potatoes, skins and all. Add them to the pot, turn up the heat a little, and cook for three minutes, turning frequently. Now pour in just enough chicken stock to cover the potatoes. Simmer, uncovered, for 30 minutes - top up with a little more stock, if necessary - or until the potatoes are completely tender.  Add the milk and nutmeg, and simmer for five more minutes.  Transfer the mixture to the jug of a liquidizer (or use a stick blender) and blitz until smooth.  If the soup is too thick for the blades to turn freely - this will depend on the potatoes you used - add more hot stock, milk or water to thin it down.  Do not over-process, or the texture will be ruined.  Return the soup to the pot, stir in the cream, season with white pepper and salt, to taste, and gently reheat.

Heat the oil in a frying pan, over a high flame. When the oil is very hot, carefully drape the Parma ham slices over the base of the frying pan. Let them sizzle for 45 seconds, then turn them over. When the ham begins to shrivel and crisp, remove it from the pan and drain on kitchen paper for a few minutes.

Swirl the olive oil over the top of the soup, top with the frizzled ham, and serve piping hot.

Serves 6 Print Friendly and PDFPrint Friendly

Thursday, 17 June 2010

Essential food-blog housekeeping, plus top six recipes ever on this blog

Thyme-roasted garlic chicken, with a red-wine and cranberry gravy... no, I kid. That's the way I usually start off a post on this blog, as I introduce my latest recipe (as any food blogger knows, the first paragraph of any post is hugely important: it needs to sum up the recipe and its ingredients in just a few words and, more important, entice the reader to scroll down for more).

But I have no recipe for you today, just a notice that I am going to be doing some housekeeping on this blog. I've tinkered with the CSS settings on the template for this blog so many times over the years - and I'm no expert - that the site has become a bit clunky, rather outdated and, most annoying of all,  slow to load, with all its widgets, badges and gizmos**.

Over the next few days, I'll be cleaning up the look of Scrumptious South Africa  to bring you a new, streamlined site. Please bear with me while I bash my forehead on the keyboard and gnaw off my own knuckles.

I've considered, many times, moving this blog to another, sexier platform (I long to be on Wordpress) or schlepping it, lock, stock and photograph, on a Wordpress platform, to my own registered domain (www.scrumptious.co.za).  But the truth is that I don't have time to faff around with this, and I can't afford to pay someone to do it for me.  On a technical note: exporting the text of this blog to Wordpress isn't a big deal, but the photographs are a nightmare, because they're stored all over the place.  Over the years, I've tried several different hosts for my photographs, in a quest to find a service that doesn't crunch and blur them. I have some of the originals on my internal hard drive, but many of them disappeared into the land of lost photographs when my external hard drive crashed last year.

So, for now, I'm going to stick with blogger.com, and devote two days to some arduous housekeeping, during which this site will resemble a bomb crater.

Are you wondering why there's a picture of potato wedges at the top of this post?

Over the last few days, I've been reviewing the traffic on this website since its inception (a very interesting exercise, and something I urge you to do if you're a food blogger), and here are the six recipes and/or posts that have attracted the most attention.  I find these results intriguing, not least because two out of the six top recipes (ginger beer and braaied fillet) don't feature photographs of the finished product.  It's common wisdom among food bloggers that a photograph is essential if your post is to have any authority or popularity (and I wholeheartedly agree), but these results seem to say otherwise. Is it possible that detailed, clear instructions for well-loved, oft-searched-for recipes are perhaps just as important as a mouth-watering photograph?  I'd appreciate your thoughts on this, and I'd also like to know which recipes on your food blog are perennial favourites.

Here are the top six, in no particular order:
** Gizmos: I've put several food-bloggie badges and 'partnerships' on this site, such as FoodBuzz, and none of them bring any significant traffic. Most of the traffic I get is from random Google searches and from Foodgawker.com, Facebook's Networked Blogs, Twitter, and referrals from fellow food bloggers. 
Print Friendly and PDFPrint Friendly

Saturday, 12 June 2010

I-Love-You Chicken Pie from South Africa

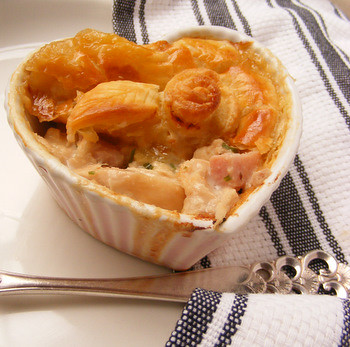
A silky creamy filling, with an intense chickeny flavour and delicate hints of mustard, nutmeg and wine, makes this luxurious pie the perfect dish for impressing friends, or for showing your family just how much you love them.

I-Love-You Chicken Pie from South Africa
That's why I've called it I-Love-You Chicken Pie.  (And also, I was at a loss for good ideas for naming this recipe. Do you know that 'chicken pie' is among the most frequently searched-for recipe titles on the Internet?Google it yourself, and you'll be rewarded with three-and-a-half  million results).

The 'South Africa' in the title is there because this really is our moment, isn't it?  A frenzied excitement and an outpouring of national pride is the best way to describe the atmosphere in our country over the past few days, and I am loving every minute of it!

I've made dozens of chicken pies, of various sorts, over the years, but I've often found that they don't have the full-bodied chicken taste I expect from a good pie.  The reason? Simmering whole chickens in water doesn't produce - in a short time at least- a stock of sufficient intensity and flavour.  So, after some experimenting, I've come up with this method: the chickens are roasted, at a moderate temperature, in a shallow bath of water and wine, with the usual flavourings.  Once the cooked chicken has been stripped off, the bones and skin are returned to the bath, and cooked briskly on the stove-top to concentrate the flavour and produce a small amount of really chickeny stock. This is a long recipe, which takes time, but I reckon the effort is worth it.

I-Love-You Chicken Pie from South Africa
It may seem like an extravagance to use two whole chickens for a single pie, but you can boil up the bones for a second time, with fresh vegetables, to make a few litres of good stock for a soup or stew.

I use bought puff pastry for this pie because I honestly can't be fagged to make my own, but it would be superb with a really good home-made pastry.  The ready-made sort we get here in South Africa (Heinz's Today Ready-Rolled Puff Pastry) is not great - it tends to crack as you unroll it, and it doesn't have much puff in it. But it's convenient.

This pie, like all stews, tastes better the day after it's made. Use a large pie dish, or make individual pies, as you please. The ham is entirely optional: if you use it, use a good-quality smoked ham, and ask your deli to cut off a chunk, so you can cube  it it yourself.  Other good additions to this pie are little nuggets of fried pork- sausage meat (squeeze the filling from pork sausages, roll into balls and brown in oil), frozen peas, and hard-boiled eggs.

I-Love-You Chicken Pie from South Africa 

For the chicken and stock:
2 whole free-range chickens
2 carrots, thickly sliced
a stick of celery, sliced
6 parsley stalks (reserve the leaves)
10 peppercorns
2 bay leaves
3 whole cloves
a large, unskinned onion, quartered
a large sprig of thyme
a lemon
2 cloves garlic, peeled
4 cups (1 litre) water
1½ cups (375 ml) white wine
1 tsp (5 ml) salt

For the sauce and pie:
4 Tbsp (90 ml/90g) butter
100 ml flour
1½ cups (375 ml) milk
¼ tsp (1.25 ml) freshly grated nutmeg
2 tsp (10 ml) Dijon mustard
1 Tbsp (15 ml) brandy
5 Tbsp (75 ml) cream
4 Tbsp (60 ml) chopped fresh parsley
a generous squeeze of fresh lemon juice
salt and milled black pepper
250 g cooked, smoked ham, cubed
a sheet of prepared puff pastry
an egg, lightly beaten

Preheat the oven to 160°C.  Place the chickens in a large, deep metal roasting pan. Add the carrots, celery, parsley, peppercorns, bay leaves, cloves, onion, thyme and salt. Squeeze the lemon over the chickens, then push the squeezed-out halves, together with the garlic cloves, into their cavities. Pour the water and wine into the pan. Place in the oven and roast, uncovered, for an hour and twenty minutes, or until the chickens are cooked through.

Remove the chickens from the pan, first tipping them neck-side down to drain any juices back into the pan. Discard the lemon halves. Allow the chickens to cool for 20 minutes. Remove the flesh from the bones, and tear it into strips the size of your little finger. Put all the skin and bones back in the roasting tin. Place the tin over a moderate flame and simmer for 20-30 minutes. Strain the liquid into a jug and place in the fridge to cool. Remove any fat from the top of the stock and measure out two cups (500 ml). (You can skip this step, but the stock will be fatty.  If you're in a hurry, skim the fat off the hot stock with a spoon. Alternatively, you can use one of these brilliant fat-separating jugs). Set aside.

In the meantime, make a white sauce. Melt the butter in a saucepan over a high heat. When the butter stops foaming, tip in the flour and stir vigorously to make a paste. Allow to bubble for a minute or two, but do not allow to brown. Now tip in all the milk and, using a balloon whisk, stir wildly to disperse any lumps. Continue stirring constantly until the mixture becomes smooth and very thick. Now beat in the reserved two cups of stock. When the sauce comes to the boil, turn down the heat and allow to bubble gently for three minutes. Remove the saucepan from the heat and stir in the nutmeg, mustard, brandy, cream, parsley and a spritz of lemon juice. Season to taste with salt and pepper. Cover the surface of the sauce with clingfilm and allow to cool to lukewarm.

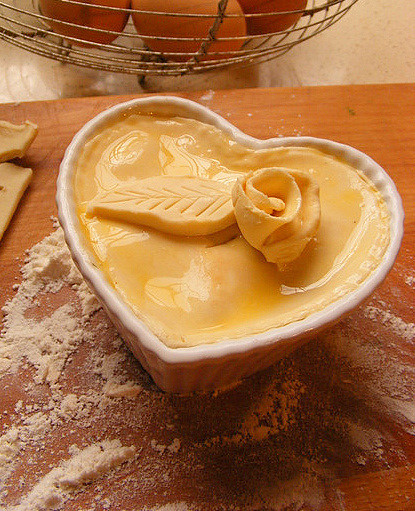
Mix the sauce with the chicken strips and cubed ham, and place the mixture in a pie dish about the same size as your sheet of pastry. Very lightly roll out the pastry on a floured surface (don't stretch it or enlarge it by more than about a centimetre on all sides). Place the pastry on top of the filling, and cut away any excess. Seal the edges by pressing lightly with your fingers. Decorate the pie by crimping the edges and using any trimmings to make leafy decorations. Cut a 1-cm slit in the middle of the pastry. Brush the pie all over with the beaten egg. At this point, you can place the pie in the fridge to bake later, or the next day.

Preheat the oven to 180°C. Bake the pie, in the middle of the oven, for 30 minutes, or until the pastry is crisp and golden,and the filling is bubbling (reduce the cooking time if you are making individual pies).

Serves 8. Print Friendly and PDFPrint Friendly

Thursday, 10 June 2010

Caramel-Dipped Naartjies on Kebab Sticks

Arguably the most famous of South African stadium foods, naartjies (tangerines) have long been associated in this country with watching rugby matches. A bulging bag of naartjies (pronounced 'nar-chees') is what fans take along with them to watch their provincial side - or the famous Springboks - in action. To thwart no-alcohol rules, naartjies are sometimes spiked in advance, using a hypodermic syringe, with brandy, vodka, witblits or mampoer (potent moonshine, often made with peaches).

Naartjies have no association, as far as I know, with soccer matches, but my series of scrumptious soccer snacks would not be complete without a mention of this most delicious winter fruit.

Caramel is always tricky, and it doesn't like moisture, so there are three important points to bear in mind when making these. First, the fruit segments must be dried out overnight, which will allow excess surface moisture to evaporate, and make the skin slightly papery.

Second, the segments must be dipped to only five-sixths of their length, so that the caramel comes nowhere close to the hole where the kebab stick has been pushed in.

Finally, please note that the caramel remains hard for a maximum of 35 minutes (and I tested these at sea level, with relatively high humidity), after which it begins to soften.

This caramel does not set glass-hard, but cools to a nice crack with a tiny bit of chew. This recipe is adapted from a recipe for toffee apples from Inspired by Sugar by Lesley Faull (1965), which is one of the most treasured items in my collection of vintage cookbooks.

Caramel-Dipped Naartjies on Kebab Sticks

6 large naartjies [tangerines, clementines]
1 cup (250 ml) light brown sugar
2 Tbsp (30 ml) golden syrup
1 Tbsp (15 ml) lemon juice
1 Tbsp (15 ml) water

Peel the naartjies and divide them into segments very carefully, making sure not to puncture their skins.  Spread the segments on a large plate and place, uncovered, in the fridge overnight. Push a slim wooden kebab stick into the end of each segment.

Gently heat the caramel ingredients in heavy saucepan, stirring now and then until the sugar has dissolved.  Bring to the boil and cook briskly, without stirring, until the caramel reaches 155°C . If you don't have a sugar thermometer, place a droplet of the caramel into iced water: it should snap cleanly in half.  Remove the caramel from the heat.

 Dip five-sixths of each segment into the caramel, avoiding the hole where the stick has punctured the flesh.  Lean the sticks up against a plate or upturned box, and allow to dry. If the caramel becomes too thick during the dipping process, gently warm it over a low flame.

Serve within half an hour.

Makes about 40.

Try some of the other recipes from this series:

Mini Pita Breads with Spicy Meatballs and Hoummous
Mini Bunny Chow with Butter Chicken 
Cape-Malay-Style Curried Lamb Kebabs with Apricots
Potato, Cheese and Chilli Phyllo Triangles
Steak Kebabs with a Monkey-Gland Dipping Sauce Print Friendly and PDFPrint Friendly

Wednesday, 2 June 2010

South African Food Blogger Explosion, and the thorny Freebie Question

When I started this blog three years ago, food blogs were reasonably plentiful.  Reasonably, I say, because, on a global scale, food blogging was a lesser-known, rather niched activity. Less than a handful of South African - or indeed African -  food blogs existed at the time.

Much has changed. Food blogging is the flavour du jour, if not du decade. The Internet is bulging with hundreds of thousands of food blogs, ranging from professional, beautiful and instructive sites, through charming, chatty food diaries, to some of the most dreadful and dire food nightmares you can imagine.

In the last eighteen months or so, the rise of South African food blogs - pioneered six years ago by my mate, London-dwelling South African Jeanne Horak-Druiff of Cooksister -  has been meteoric.  There are, to my knowledge, well over 120 South African food and wine bloggers posting recipes and restaurant reviews on the Net, on Facebook and on Twitter.  And, as they have attracted more fans, these blogs have become very popular, and somewhat influential.  In fact, I would go so far as to say that there has been a minor storming of the food-blog world from South African food bloggers.  Not a tempest, but maybe a little whirlwind.

This is so heartening, especially given the fact that South Africa is about to be catapulted into the limelight during the 2010 Fifa World Cup. It's also encouraging because South African food deserves to be highlighted: it's about time that the spotlight falls on our beautiful  fresh produce, our superlative wines, our creative cooks, our excellent restaurants and our extraordinarily rich culinary heritage  That razor-tongued restaurant reviewer and gourmand A.A.Gill, in several columns on the subject of South Africa, has often indignantly wondered why South African cuisine - and in particular, Cape Malay cuisine -  has not become famous, and the next big trend.

Well, A.A., one tries.  Certainly, I've tried hard enough on this blog to promote South African foods, and after three years of hard slog, my blog is attracting traffic and interest I didn't dare to dream of three years ago.

Which brings me to my next point.  As any successful food blogger knows, more popular and visited your blog becomes, the more often you're begged for mentions.

So here's the freebie question.  The marketeers, publicity agents and pee-ars of South Africa - and further afield -  have just twigged on to the fact that local food bloggers attract an audience. In the last month alone I've had 42 press releases from various publicists, begging me to take note of their product.  These releases range from a heads-up about a new product, to lavish invitations to free lunches, to 'urgent' queries for my physical address so I can take delivery of the latest liqueur, cookie or boxed cereal.  Or apron, oven gloves, bottle of wine, and so on. All manner of exciting products are dangled before my eyes.

I refuse these - with reluctance - because I want my blog to be independent, and because I see myself first as an impartial journalist and second as a cook and food writer.  I'm not saying that accepting free products, or going to launches and openings,  is any way dodgy: on the contrary, I'm always keen to read consumer opinions of products, and reviews of new restaurants. However, what I would like to say is that I think it's incumbent on a food blogger to declare, upfront, that whatever product, service or meal you're reviewing was offered to you for free.

And I add this piece of advice:  if you're a successful food blogger, you are only so because of your talent and originality.  Don't under-sell yourself.  If a manufacturer, or his publicist, wants you to do a write-up on their product, don't do it for free.  Charge them. Sure, it's nice that they sent you a free sample, but the fact is that they didn't do this out of a sense of love and altruism, and genuine admiration for your blog.  They sent you that sample because they wanted free advertising.

In short: decide what you want your blog to be.  And stick to that formula.

And finally, having said all that, I declare that I won't, henceforth, be featuring any Verlaque products on this blog because they've appointed me, in my capacity as a professional journalist, as a consultant for their brand. Print Friendly and PDFPrint Friendly