Showing posts with label garlic. Show all posts

Sunday, 11 May 2014

Two Scrumptious Low-Carb Cheese, Nut & Herb Pestos

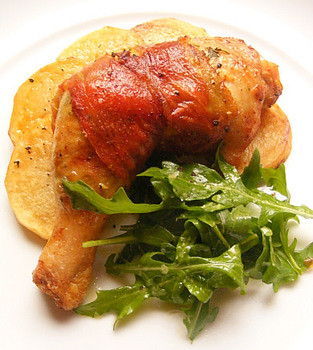
Feta, Blue Cheese, Herb & Toasted-Walnut Pesto with
Griddled Courgettes (recipe below). 
One of the things I miss most on my low-carb regime is glorious garlicky hummous.  Although hummous has a relatively low glycaemic-index ranking and load - depending on how much tahini it includes - it is still fairly packed with carbohydrates, so I avoid it these days.

Over the past few weeks I've been experimenting with combinations of cheese, nuts, herbs, garlic and olive oil to create vibrant low-carb pastes packed with singing flavours.

Because these pestos contain both nuts and cheese, they're crammed with calories, but all you need is a single dollop to add beautiful aroma and crunch to steamed fresh green beans or broccoli or griddled sliced courgettes.

You can also serve these as a dip with hot and cold crudités, or dobbled on flash-fried chicken or fish fillets If you're not on a low-carb regime, try tossing these through hot pasta, or spreading them over hot toasty ciabatta bread (with a topping of roasted tomatoes or some melty mozzarella) to make scrumptious bruschettas.

First, a gorgeous nutty pesto with fresh Mediterranean flavours.  I know this looks a bit like window putty, but I promise you won't be disappointed by the punchy flavours of this easy and versatile sauce.


Low-Carb Pesto of Roast Aubergine, Macadamia Nuts,
Feta, Lemon & Rosemary. This nutty pesto is delicious
 with steamed green beans lightly dressed with olive oil 
and lemon juice.
Low-Carb Pesto of Roast Aubergine, Macadamia Nuts, Feta, Lemon & Rosemary

1 large aubergine [eggplant or brinjal]
½ cup (125 ml) macadamia nuts
a big pinch of flaky sea salt
2 'wheels' (about 140 g) feta cheese, crumbled
1 Tbsp (15 ml) finely grated lemon zest
the juice of a medium lemon
1 tsp (5 ml) very finely chopped fresh rosemary needles
1 small clove garlic, peeled and finely grated
½ cup (125 ml) extra-virgin olive oil
salt and milled black pepper 
a pinch of smoked paprika or cayenne pepper, for dusting [optional; see Cook's Notes, below.]

Heat the oven to 200 ºC.  Put the whole aubergine directly onto a middle rack of the oven.  Let it bake for 40-50 minutes, or until it is very soft and slightly shrunken.  Remove and set aside to cool for 25 minutes.  

Now toast the macadamias. Heat a frying pan over a medium-low heat and dry-roast the nuts for three to four minutes, tossing and turning them frequently, until they are a light golden colour and freckled here and there with dark-brown spots. 

Put the macadamias, still warm, into the jug attachment of a stick blender, or into a food processor fitted with a metal blade. Add a big pinch of flaky sea salt and press the pulse button repeatedly to process the nuts to fairly big crumbs. Don't over-process them, or they may turn into an oily paste. Tip the crumbled macadamia nuts into a mixing bowl.  

When the aubergine has cooled, cut it in half lengthways and use the blade of a knife to scrape out all the flesh, seeds and all. Tip this flesh into your food processor, and discard the tough outer peel of the aubergine.

To the food processor, add the feta cheese, lemon zest, lemon juice, rosemary, garlic and seven tablespoons (105 ml) of olive oil.  Process until you have a fairly smooth paste.  If the blade is reluctant to turn, add a tablespoon or two of warm water. 

Scrape this mixture into the bowl containing the macadamia crumbs and stir well to combine.  Season to taste with salt and pepper.

Tip the pesto into a glass lidded jar and pour the remaining tablespoon of olive oil over the top to seal it and prevent oxidisation.

To serve, pile the pesto into a small pretty bowl, and drizzle with more olive oil.  Grind some pepper over the top, and dust with smoked paprika or cayenne pepper. 

Keeps for a week in the fridge, and freezes well.

Makes about 1½ cups. 

Cook's Notes: 
  • When I make this, I dust it very lightly with smoked paprika, which adds a final flavour flourish. Do use smoked paprika sparingly, though, as its pungency can overwhelm the other flavours.
  • I love the crunch and interesting meaty texture of macadamias, but if you can't find these where you live, try using blanched almonds instead.  
  • You can roast the aubergine a day or more in advance, and keep it in the fridge until you're ready to use it. 
  • If you'd like to add some extra colour to this pesto, whizz it up with 4 tablespoons (60 ml) of chopped fresh parsley.


Feta, Blue Cheese, Herb & Walnut Pesto with Griddled Courgettes

See picture at the top of this post. 

50 g (about 25) shelled walnuts
a small bunch (about 40 g) fresh flat-leaf parsley, roughly chopped
half a pillow-pack (about 40 g) fresh wild rocket, roughly chopped
1/3 cup (80 ml) extra-virgin olive oil
2 Tbsp (30 ml) fresh lemon juice
a small clove of garlic, peeled and finely chopped or grated
a small block (40 g) creamy blue cheese, crumbled
one 'wheel' (70 g) feta cheese
milled black pepper
24 young courgettes [zucchini or baby marrows], rinsed to remove any grit

To serve: 
olive oil and fresh lemon juice, for sprinkling
salt and milled black pepper

First toast the walnuts. Place them in a frying pan over a medium-low heat and dry-roast them for a minute or two, tossing frequently, and watching them like a hawk as they burn quickly.  When they are hot, and smelling pleasantly nutty, take the pan off the heat.  Remove 6 toasted walnuts and set them aside for your garnish.  Tip the remaining nuts into the jug attachment of a stick blender, or into a food processor fitted with a metal blade. Process the nuts to a rough crumb, and set aside.

Remove the stalks from the parsley and add the leaves to the food processor along with the rocket, olive oil, lemon juice and garlic. Process to a fairly fine paste. Don't worry if the blades won't whizz freely - the next step will sort this out.

Add the blue cheese bits and process the mixture till smooth. You will find that the mixture magically smooths out into a soft paste.  But if the blades still won't turn freely, add a few drops of warm water.  Now add the feta and process again.  Season with plenty of black pepper.  You shouldn't need to add any salt, but go ahead and add a pinch or two if necessary. If the mixture needs a little more acidity, add a drop or two more of lemon juice.

Scrape the mixture into a small serving bowl or glass jar and cover with a thin layer of olive oil. Seal with clingfilm and refrigerate.

To prepare the courgettes, slice them lengthways into 'leaves' 3 mm thick.  I do this using a mandolin, which produces perfect shavings. If you don't have a mandolin, you can use a very sharp knife, held with its blade horizontal to your chopping board.

Put a large griddle pan or a frying pan over a high flame until it's blazing hot, add a lick of olive oil and fry the courgettes slices for 2-3 minutes on each side, or until they are tiger-striped, toasty and just soft. Tip the slices into a bowl and sprinkle with olive oil and a squeeze of lemon juice, plus salt and pepper to taste.

Serve hot with spoonfuls of the pesto, and the crumbled toasted walnuts you set aside earlier.

Makes about ¾ cup of pesto. With the courgettes, serves 6. 

Cook's Notes: 
  • If you'd like to give this pesto even more fragrance, add a small handful of fresh basil. 
  • This is very good with pan-fried beef, lamb or ostrich steaks.
  • You can freeze this paste in a small lidded box.  Let it defrost overnight in the fridge. 


Print Friendly and PDFPrint Friendly

Thursday, 5 September 2013

Low-Carb Slow-Cooked Courgettes & Cherry Tomatoes with Melty Feta

Vegetables cooked to a tender mush are frowned upon these days, and I have to agree with the general sentiment that bright, fresh and tender-crisp is the way to go. I very seldom cook any plant to the point of disintegration but, then again, there are a handful of vegetables that are sublime when subjected to long, slow seething, among them aubergines, fennel, leeks, onions, waterblommetjies and tomatoes. And - as you will see in this this recipe - courgettes!

Slow-Cooked Courgettes & Cherry Tomatoes with Melty Feta Wheels
Slow-Cooked Courgettes & Cherry Tomatoes with Melty Feta Wheels.


Courgettes are meek veggies packing very little punch in the flavour department, but I love them in all forms - shaved raw into salads, grated and tangled into fritters and quiches, pencilled into stir-fries, and pan-fried in thick coins, all ready for a simple dressing of olive oil, lemon and salt.

They're also gorgeous when carefully cooked to a state of silken collapse: just think of the best ratatouilles of your life!  In this recipe, I've added cherry tomatoes, which are blistered in a very hot pan before they go into the oven.

This is good piping hot, with wheels of peppered feta, and it's also delicious cold as a snack or starter: see my Cook's Notes at the end of this blog post for further tips.


Slow-Cooked Courgettes & Cherry Tomatoes with Melty Feta Wheels
A simple but intense baked tomato sauce. Try this with halloumi cheese
instead of feta!


Slow-Cooked Courgettes & Cherry Tomatoes with Melty Feta 

3 Tbsp (45 ml) olive oil
1 kg cherry tomatoes
a large sprig of thyme
2 fat cloves of garlic, peeled and finely chopped or grated
5 Tbsp (75 ml) dry white wine
1 kg courgettes [baby marrows/zucchini]
salt and milled black pepper
3 'wheels' or squares (about 220 g in total) of feta cheese, patted dry on kitchen paper
baby mint or basil leaves, or fronds of fresh dill (see Cook's Notes)
extra olive oil, for sprinkling


Slow-Cooked Courgettes & Cherry Tomatoes with Melty Feta Wheels
The tomatoes are first blistered in a
frying pan, then roasted with the
courgettes.
Heat the oven to 180 ºC. Place a large roasting tray over a fierce heat on your hob and add the olive oil. When the oil is very hot - but not yet smoking -  add the cherry tomatoes and cook them, tossing the pan energetically, for a few minutes, or until their skins begin to blister and peel. Add the thyme, garlic and wine, stir well, and cook for another minute or two. Remove the tray and set aside.

Rinse the courgettes to get rid of any grit, top and tail them and cut them into 5-cm lengths. Add them to the roasting pan and mix everything together. Season to taste with salt and pepper. Cover the pan tightly with tin foil and bake at 180 ºC for 30 minutes. Now remove the foil, give the veggies a good stir and turn the heat down to 160 ºC, fan on (or to 170 ºC if your oven has no fan).

Cook uncovered for another 65-75 minutes, or until the tomato sauce has reduced and slightly thickened (see Cook's Notes, below). Add the feta to the tray, turn the heat up to 220 ºC, fan on, and blast for another 5-10 minutes, or until the feta is soft and bubbling. Drizzle with a little fruity olive oil, scatter over the mint or basil leaves, and serve immediately, with hunks of bread.

Serves 6 as a side dish; 4 as a main course. 

Cook's Notes
  • The tomatoes need to cook down slowly to a deep, intense sauce. If the sauce seems watery, leave the veggies to bake for a little longer.
  • This dish needs a topping of young herb leaves, but I advise that you choose just one type of herb, because clean, simple flavours are important here. Mint and basil are good, and it's also lovely with small snippings of fresh dill.  
  • You can bake the dish well ahead of time and keep it, covered, on your counter top. Add the feta wheels when you reheat the tray in a very hot oven. 
  • This is a great served cold as a topping for bruschetta: dollop it onto toasted ciabatta slices and add cheese: nuggets of goat's milk cream cheese, or Parmesan shavings, or milky slices of excellent mozzarella.    


Print Friendly and PDFPrint Friendly

Monday, 27 August 2012

Wine-Braised Baby Fennel in Crisped Prosciutto

My trusty camera was stolen two weeks ago when thieves broke into our house and helped themselves to our valuables, so I've had to use my Samsung cellphone (which has an astonishingly good camera) to take this photograph. Apologies if it's not an image of the highest order - but it's not bad for a cell phone, is it?

I'm excited about this - it's a splendid dish, ideal for serving on its own as a warm starter, or as an accompaniment to grilled fish or roast chicken, or even as  finger food for a party.

Baby fennel bulbs are in high season in South Africa right now, and I eagerly add them to my basket whenever I see them. Not a great shopping strategy, to be honest, because my family have always been doubtful about fennel: "It tastes like liquorice, Mom", they complain. "Eeeu."

I'm happy to report that they changed their minds when I put this dish on the table yesterday. The bacon addicts that they are, they loved the crisp wrapping of prosciutto, the silken/stringy, delicate taste and texture of the little fennel bulbs, and a dressing as intense as the finest soy sauce.

Rosemary, with its strong resinous taste,  may seem like a strange choice of herb to go with fennel, but it works beautifully as a subtle background note.

This is not worth making unless you can find really small and tender fennel bulbs, and some proper Italian prosciutto.  Although, having said that, I wouldn't mind wrapping these up in some streaky bacon rashers and throwing them on the braai.

I suppose you could sprinkle micro-herbs all over the top of these to make them look cheffy. Or not.

Wine-Braised Baby Fennel in Crisped Prosciutto

12 small fennel bulbs
2 Tbsp (30 ml) olive oil
¾ cup (180 ml) dry white wine
4 Tbsp (60 ml) water
2 whole garlic cloves, peeled
a small sprig of fresh rosemary
6 wide slices of good Italian proscuitto, or 12 if they are narrow slices
extra olive oil, for frying
a squeeze of lemon juice
milled black pepper

Trim the fennel bulbs, top and bottom, and peel off any tough outer leaves. Put them in a single layer in a large pan and add the olive oil, wine, water, garlic cloves and rosemary. Press a circle of greaseproof baking paper onto the surface of the bulbs and place a tilted lid on top of the pan.  Cook, over a medium heat, at an energetic bubble, for 10-15 minutes, or until the fennel feels very tender when you poke it with the tip of a sharp knife. Take off the baking paper and lid, turn the heat up and cook the bulbs until the liquid in the pan has reduced to about two tablespoons.

Remove the fennel bulbs from the pan using a slotted spoon, and place on a plate. Set the pan containing the liquid aside. Cut the prosciutto slices in half and use these pieces to wrap each each fennel bulb in a 'miniskirt', as shown above.  Heat a little olive oil in a new pan or on a griddle, and when it is very hot, fry the wrapped bulbs for about 2 minutes on each side, or until the ham is crisp and golden, and the fennel bulbs are beginning to 'catch'.  Arrange the the bulbs on a warm platter.

Put the frying pan containing the cooking liquid back onto the heat, warm it through for a minute or two  and then add a generous squeeze of lemon juice, plus a good grinding of black pepper. You shouldn't need to add salt, as the ham is salty enough on its own.  Turn off the heat and drizzle the dressing over the fennel bulbs. Serve immediately, piping hot or just warm.

Serves 4. 


Print Friendly and PDFPrint Friendly

Monday, 25 July 2011

Home-made Double-Creamy Garlic, Lemon and Herb Yoghurt Cheese

Strained yoghurt cheeses (such as labneh) are usually flavoured after the yoghurt's been thoroughly drained in cheesecloth hung over a bowl, but I thought I'd try adding garlic, lemon zest and fresh herbs right at the beginning.  I find that fresh garlic tends to trample all over the delicate, milky flavour of soft white cheeses, so I figured that by adding it - and the woodier herbs and lemon - to the yoghurt before I drained it, the tastes would mingle and mellow over a few days. They did.

Home-made Double-Creamy Garlic, Lemon and Herb Yoghurt Cheese

This is a beautifully silky cheese that's good topped with a generous slosh of grassy olive oil and some fresh thyme and marjoram leaves (I also added a few fresh rosemary flowers). Serve it with hot toast, melba toast, bruschetta or salty crackers, or add large dollops to the top of a quiche or vegetable tart. Alternatively, you can roll it into little balls and coat these with cracked black pepper, herbs, toasted sesame seeds, spices or spice blends (such as za'atar), or whatever takes your fancy.

I added some fresh cream (hence the 'double-creamy' in the title) but this isn't essential. Do use a full-fat, thick, natural Greek yoghurt.

I thought this cheese would be ready in two days, but it was three days before it was firm enough for my liking.  If you're going to hang it for longer than two days, or the weather is very hot, put it in the fridge. If your fridge has wire racks, clip the knot of the cloth to the rack with a few clothes pegs and place a bowl underneath. If your fridge has glass shelves, put the cloth in a sieve set over a bowl.

Home-made Double-Creamy Garlic, Lemon and Herb Yoghurt Cheese 
1 litre full-cream natural Greek yoghurt
½ cup (125 ml) cream
the finely grated zest and juice of one lemon
3 small cloves of garlic, peeled and finely grated
a small (thumb-length) sprig of rosemary, very finely chopped
few sprigs of thyme, leaves stripped and lightly bruised
1 tsp (5 ml) salt

To serve:
olive oil
salt and milled black pepper
fresh thyme and marjoram leaves, or herbs of your choice

In a large bowl, lightly whisk together the yoghurt, cream, lemon zest, lemon juice, garlic, fresh herbs and salt. Place a piece of cheesecloth or muslin (or a fine clean tea towel or napkin) in a sieve and place it over a bowl. Tip the yoghurt into the cloth, gather up the corners and tie them into a knot, or secure them tightly with an elastic band.

Home-made Double-Creamy Garlic, Lemon and Herb Yoghurt Cheese
Hang the cloth over a bowl or a sink (see my notes above) for two to three days, or longer, if you'd like a very firm cheese. The longer you leave it, the stiffer it will be. Gently squeeze and massage the cloth every now and then to encourage the liquid from the inside of the 'ball' to run out.

Tip the cheese onto a board and, using a large spoon or palette knife, mix it well. Season to taste with salt and pepper and tip into a serving bowl. Pour some olive oil over the cheese and scatter with fresh herbs.

Serves 8-10 as a starter or snack  Print Friendly and PDFPrint Friendly

Sunday, 3 July 2011

Double-Craggy Garlic Bread with Herbs, Lemon and Peppered Cream Cheese

Garlic bread was one of the first eating sensations of my childhood, and I hold it personally responsible for my life-long addiction to both garlic and melted butter. It's not something I make often (I make weak stabs at keeping my family's diet wholesome), but I do think this great classic of the Sixties and Seventies needs to be given the respect it richly deserves. I've called my new version 'double-craggy' because the bread is sliced in a grid formation, and I've done this - licking my lips as I slice this way and that - in order to maximise the surface area to be basted with garlicky, herby butter.
 
Double-Craggy Garlic Bread with Herbs, Lemon and Peppered Cream Cheese
The first time I tasted garlic bread was when I was six or seven, at a birthday party, and I have never forgotten that first heavenly bite. Our friends, the Spences, lived not far from our house, near Swartkop in Muldersdrift, some 30 km north of Johannesburg. Situated close to the famous Sterkfontein Caves and the Cradle of Humankind, Swartkop is a twin-peaked hill that was a distinctive feature in a landscape of rolling golden grassland, or veld. It probably has townhouse developments gnawing at its lower slopes nowadays - I haven't been there for years - but when I was a child, it was the closest thing to a mountain I'd ever seen. In our family, it was always called 'Bosom Mountain'.

Anyway, the Spences lived just under Bosom Mountain, in a big house thatched with shiny grass the colour of a lion's pelt. Malcolm Spence (who died this year, at 73) was an interesting and clever man who - according to his obituary - had the distinction of winning the 400m bronze medal at the 1960 Rome Olympics,  in what has been billed as 'one of the greatest sprint races of all time'. Malcolm apparently didn't like to talk about his triumph, but on this occasion I remember him showing all the kids a jumpy black-and-white movie of his famous sprint (projected onto a white bedsheet nailed to the wall, which was how we watched movies in those days). After that, we watched an old and terrifying film about a sabre-toothed tiger that lived in a cave. Petrified, I crawled under a blanket and stuck my thumb in my mouth, vowing never to go to a birthday party at the Spences again.

But all was made right when Naomi Spence called us to the table. She'd made three or four loaves of garlic bread, tightly wrapped in foil and packed with garlic, chopped fresh curly parsley and lashings of farm butter. There was a cake too, strewn with little silver balls, and iced Marie biscuits with hundreds-and-thousands, and orange-skin wedges filled with red jelly, but all these delights paled when I tasted the garlic bread. I ate a lot of it, and threw up on the back seat of the car on the way home. This may have been the bumpy farm road, but it was probably the butter.

I can't eat garlic bread without remembering that party, and here's my attempt to recreate a special food memory. I've used a flat-topped, poppyseeded potbrood here, but any big loaf of good, fine-textured white bread will do. Don't worry if stalagmites of bread fall off when you've cut it in a grid pattern: tie everything loosely together with a piece of string or raffia, and remove the string just before you serve the bread.

Double-Craggy Garlic Bread with Herbs, Lemon and Peppered Cream Cheese
A fabulous crowd-pleaser for a braai.

Double-Craggy Garlic Bread with Herbs, Lemon and Peppered Cream Cheese

a large, circular loaf of bread, a day or two old
1 cup (250 ml/250 g) salted butter
8 large cloves garlic, peeled and finely grated
the finely grated zest of a lemon
1 cup (250 ml) chopped fresh herbs (parsley, rosemary, oregano, rosemary, thyme, or whatever you have to hand)
freshly milled black pepper
125 g pepper-crusted cream cheese or goat's milk cheese

Heat the oven to 190 ºC. Place the loaf of bread on a board. Using a very sharp serrated knife, cut the bread, to within a centimetre of its base, into thick (2 cm) slices. Now turn the loaf the other way, and cut across the slices to form a grid. Take your time about this, and use quick, light, sawing motions, pressing the slices you've just cut firmly together.

Melt the butter in a pan set over a medium heat (or in your microwave oven) and stir in the garlic, lemon zest, fresh herbs and pepper.

Squeeze the base of the loaf gently to splay out the 'fingers' of bread and, using a pastry brush or a turkey baster, liberally coat each finger of bread with the flavoured butter.

Brush the top and sides of the bread with more melted butter. Tie a piece of string or a strand of raffia firmly around the loaf. Put the bread on a baking sheet and place in the oven. Cover lightly with a sheet of tin foil and bake for 10 minutes. Remove the foil and bake for a further 10 minutes, or until it's beginning to crisp and turn golden. Take the loaf out of the oven, and crumble the peppered cream cheese over and around the 'fingers' of bread. Bake for a further five  minutes, or until the cheese is hot and just beginning to bubble.

Serve immediately.

Serves 6-8 as a side dish.

Print Friendly and PDFPrint Friendly

Monday, 23 May 2011

Lemony Green Beans with Frizzled Prosciutto, Fried Breadcrumbs and Aïoli

A pile of squeaky green beans dressed with lemon, olive oil and garlic is my idea of heaven on a plate. In this recipe, I've added a luxurious touch to the beans by topping them off with crunchy fried prosciutto, breadcrumbs and a flurry of pungent, garlicky home-made aïoli.

Lemony Green Beans with Frizzled Prosciutto, Fried Breadcrumbs and Aïoli
Michael Le Grange's photograph of my Lemony Green Beans with Aïoli. In this version of the recipe, from my cookbook, I added toasted, flaked almonds. Image © Random House Struik 2012. Bowl by David Walters.
As I mentioned in my previous post (Dill Baby Potatoes with Smoked-Salmon Mayonnaise) I'm a great fan of dishes that take a small quantity of a luxurious ingredient and spread it between many portions, and this is such a dish. Top-quality Italian prosciutto is very expensive, but you need only six large slices (although of course you are free to add more, if you're throwing caution to the wind).

Here, I've used Richard Bosman's excellent locally cured prosciutto, which is available in selected delis and other outlets in Cape Town. I know it may seem like heresy to fry prosciutto, but it is so splendidly crisp and flavoursome prepared this way that every time I taste it I want to fall into a dead faint.

Lemony Green Beans with Frizzled Prosciutto, Fried Breadcrumbs and Aïoli
Although authentic aïoli calls for olive oil only, I use a mixture of good fruity olive oil and sunflower oil for a lighter mayonnaise. Feel free to add more garlic, if you want your mayo to deliver a good punch in the nose.

You can serve these beans piping hot or at room temperature. If you're not serving them hot, don't omit the step of plunging them into iced water to set the colour.


Lemony Green Beans with Frizzled Prosciutto, Fried Breadcrumbs & Aïoli

two packs of young green beans (enough for six)
4 Tbsp (60 ml) extra virgin olive oil
the juice of a lemon
salt and milled black pepper
six slices of prosciutto
two breadrolls
sunflower oil for frying

For the aïoli:
2 large egg yolks, at room temperature
a pinch of salt
1 tsp (5 ml) Dijon mustard
150 ml light vegetable oil (such as sunflower or canola oil, or any other flavourless oil)
170 ml good, fruity olive oil
the juice of a lemon
a large clove of fresh garlic, finely grated (or more, to taste)
freshly milled black pepper

First make the aïoli. Put the two egg yolks into a small bowl (a ceramic soup bowl is ideal) and add the salt and mustard. Mix the vegetable oil and olive oil in a small jug with a sharp pouring nozzle. Place a damp cloth underneath the soup bowl so that it doesn't skid around while you're making the mayo. Using a rotary beater (electic whisk) beat the egg yolks and salt for a minute. If you don't have such a gadget, use an ordinary wire whisk, and plenty of elbow power.

Now, as you whisk the egg yolks with one hand, pick up the jug of oil with the other, and dribble a little splash of oil onto the yolks. Keep whisking and dribbling, a little splash at a time, with great energy, and within a few minutes you will see the egg mixture begin to thicken rather dramatically. Keep adding the oil, a dribble at a time, until you have a thick yellow ointment. You may not need to add all the oil: stop adding oil once the mayonnaise has thickened to your liking. Stir in the lemon juice, garlic and pepper, and add more salt if necessary. Set aside.

Fill a bowl with cold water and add to it a handful of ice cubes. Top and tail the beans. Bring a pot of salted water to the boil and add the beans. Boil rapidly for 2-3 minutes, or until the beans are just tender. (How long you cook them will depend on the size and age of your beans.)

Drain the beans. If you're not serving this piping hot, immediately plunge them into the ice water. Leave in the water for three minutes, then drain and pat dry.

In the meantime, prepare the toppings.  Heat sunflower oil, to a depth of a millimetre, in a frying pan. When hot, but not smoking, add the prosciutto slices, a few at a time, and cook for a minute or so, or until frizzled and crisp. Drain on a piece of kitchen paper.  Now crumble the breadcrumbs into the hot oil and fry until crisp and golden (remember that they will carry on browning once you remove them from the heat, so don't let them get too dark). Drain on kitchen paper.

To serve, toss the beans in the olive oil and lemon juice and season with salt and pepper.  Pile onto a platter (or onto individual plates) and top with the prosciutto and breadcrumbs.  Serve with a large dollop of aïoli.

Serves 6.

Print Friendly and PDFPrint Friendly

Wednesday, 23 February 2011

Sheet Mozzarella Rolls with Sorrel, Lemon, Anchovies and Capers

In the post before this one, I wrote about the interesting sheets of mozzarella I bought from Puglia Cheese in Cape Town, and showed you some beetroot, rocket, lemon and marjoram rolls. Here's the second batch I made, which contain fresh sorrel leaves, lemon zest, white anchovies, capers, garlic and pepper.

Sheet Mozzarella Rolls with Sorrel, Anchovies and Capers


As you can see, these rolls don't have the nice circular shape the beetroot ones had. I was going for a pinwheel look, but I found it really difficult to achieve a nice, tight roll when the entire sheet was covered with leaves. (I covered only one edge of the sheet with leaves in the first batch I made; here's a picture). Still, they were delicious, and tasted even better the next day, when the flavours had had a chance to develop. You could blanch the leaves, I suppose, to make them more flat and pliable, but they would lose their fresh bite (and perhaps become slimy in the fridge).

I used red-vein sorrel leaves from my garden, which have a lovely sour bite, but you could use any similar fresh green leaf.

Sheet Mozzarella Rolls with Sorrel, Lemon, Anchovies and Capers

a sheet of fresh mozzarella
the finely grated zest of a lemon
2 large cloves of garlic, peeled
a pinch of flaky sea salt
3 T (45 ml) capers
6 white Italian anchovy fillets, or 4 of the brown, tinned kind
3 T (45 ml) olive oil
salt and freshly milled black pepper
fresh sorrel, beetroot or rocket leaves

To serve:
olive oil
extra capers
crusty bread

Place a sheet of clingfilm or baking paper on your kitchen counter and smear it with some olive oil. Sprinkle with a little salt and freshly milled black pepper. Pat the mozzarella sheet quite dry using kitchen paper, and place it on the clingfilm.

Put the lemon zest, garlic and salt in a mortar and pound to a coarse paste. Finely chop the capers and the anchovies and stir them into the paste, along with the olive oil.  Smear the mixture evenly all over the mozzarella sheet. Season generously with freshly milled black pepper, and a little more salt, if necessary. Arrange the sorrel leaves all over the top; don't worry if they overlap slightly. Now pick up the edge of the clingfilm and nudge the sheet into a roll, as you would do if you were making sushi. Roll, away from you, into a neat sausage. Wrap clingfilm round the roll and tightly twist the ends in opposite directions to make a tight 'salami'.

Place in the fridge to firm up for two hours (or longer). Now, using a very sharp knife, slice directly through the plastic to make discs. Place on a plate for half an hour to bring to room temperature. Just before serving,  drizzle with olive oil and scatter with extra capers and a few grinds of black pepper. Serve immediately with plenty of fresh crusty bread for mopping up the juices.

Makes about 15. Print Friendly and PDFPrint Friendly

Wednesday, 23 June 2010

Whole Chicken Legs with Parma Ham & Lemon Herb Butter, and Sauté Potatoes

A pungent butter containing garlic, herbs, lemon zest and anchovies gives these chicken pieces a lovely flavour, and keeps their flesh succulent as they cook. The Parma ham is there to help prevent the butter from flooding out, and to add a nice, crisp, salty finish.
Whole Chicken Legs with Parma Ham and Garlic Herb Butter, and Sauté Potatoes
Although they're a bit of a fiddle to prepare, these legs are easy to cook: they're browned for a few minutes in a hot pan, and then quickly finished off in the oven. This is a great lunch or dinner-party dish - double up the quantities as you please - because you can prepare the chicken and potatoes in advance and keep them in the fridge until half an hour or so before you serve them.

You can, at a pinch, use whole chicken breasts on the bone for this dish, but their anatomy is such that the butter tends to leak out. Whole chicken legs (or 'Marylands') are ideal because you can make a small opening under the skin and stuff the butter deep into and around the drumstick and thigh.  Also, dark meat is juicier and so much more flavourful than breast meat. Please see my Cook's Notes (below) for information about how to get your hands on whole chicken legs.

I don't think this dish needs a sauce, but if you are the saucy type, instructions for a simple (and sinfully rich) reduction of wine, stock and cream are at the very end of the recipe. (I'm feeling dead-guilty about this: when I made this dish to photograph, I also made a sauce, and slurped up all but a tablespoon.  That's why there's no sauce in the picture. Look, I was hungry.)

Whole Chicken Legs with Parma Ham & Lemon Herb Butter, and Sauté Potatoes
6 whole chicken legs
2 cloves fresh garlic, peeled
2 whole anchovy fillets, from a tin or bottle
1 T (15 ml) finely chopped rosemary needles
1 T (15 ml) fresh thyme leaves
2 T (30 ml) finely chopped fresh parsley
the finely grated zest of a lemon
5 T (75 ml) softened butter
milled black pepper
a pinch of flaky sea salt
6 slices of Parma ham
a little vegetable oil for frying

For the potatoes:
6 medium potatoes, peeled
3 T (45 ml) olive oil
2 T (30 ml) butter
salt and milled black pepper

Trim the chicken legs - especially the thigh sections - of any excess fat. Crush the garlic using a mortar and pestle (or chop very finely). Add the anchovies and pound to a paste. Now stir in the rosemary, thyme, parsley, lemon zest and butter. Season with a few grinds of black pepper, but don't add extra salt - the anchovies are salty enough. Push two fingers under the skin of each chicken portion, at the junction of the thigh and drumstick, and carefully loosen the flesh from the skin and its membrane, to make two pockets: one deep into the drumstick, and the other into the thigh. Divide the butter into six portions and spread it inside the pockets, smoothing the skin so that the butter is evenly distributed. Season the chicken pieces with a little salt and black pepper.
Whole Chicken Legs with Parma Ham and Garlic Herb Butter, and Sauté Potatoes
Place a piece of clingfilm on a chopping board and rub a light film of olive oil over its surface (this prevents the ham from sticking). Put a piece of Parma ham on the clingfilm. Place a chicken piece, skin-side down and crossways, on the ham, then lift both ends of the ham up and over the middle of leg, pressing it down to secure. Now pick up the clingfilm and wrap it tightly around the chicken. Repeat with the other five pieces. Place the chicken in the fridge for 20 minutes - or longer, if you're making this in advance - for the butter to firm up.

To prepare the potatoes: peel and cut into disks 7mm thick. Drop into a big pot of rapidly boiling salted water, cover, and cook for 4-6 minutes, or until you can poke the tip of a sharp knife through one of the slices, with the potato offering just a little resistance. Drain in a colander, spread the slices on a tray covered with kitchen paper and allow to dry out for 20 minutes, or longer if you're preparing this in advance.

Preheat the oven to 180ºC. Heat a little vegetable oil  in a large frying pan. Brown the chicken, in batches of two: When the oil is very hot, place the chicken, skin side down, in the pan. Cook for 2½-3½ minutes, or until the ham and skin are golden brown and crispy. Turn the chicken over and cook for another 2 minutes. Place skin-side up on a baking sheet while you brown the rest. (If you're making a sauce - see below - set the frying pan to one side.)

Bake at 180ºC for 16-20 minutes or until the chicken is cooked through (see Cook's Notes, below). While the chicken is baking, fry the potatoes: heat some of the olive oil, over a brisk flame, in a large frying pan. Season the slices with salt and pepper. Arrange the slices (you'll need to do this in three batches) in the frying pan, and sizzle for a few minutes, or until golden brown and beginning to crisp. Flip the slices over and fry the other sides. Add a nut of butter to the pan, and toss well to coat. Set aside and keep warm while you finish frying the the remaining potato slices.

Serve the chicken pieces and potato piping hot, with a leafy green salad (rocket, watercress and similar dark leaves are perfect) dressed with olive oil, lemon juice and salt.

Serves 6


To make a sauce: When you make the flavoured butter for the chicken, add an extra 2 T (30 ml) butter to the mixture.  Stir the mixture well, remove the two extra tablespoons, and place in the fridge, on a plate. Reheat the frying pan in which you fried the chicken pieces. When the fat begins to sizzle, pour in half a cup (125 ml) of white wine. Cook over a fierce heat for three minutes, stirring and scraping to dislodge any golden residue.  Add 3/4 cup (180 ml) good chicken stock. Allow to bubble briskly for ten minutes, or until the sauce has reduced by half. Stir in 3 T (45 ml) cream, and cook gently for another three minutes. Finally, stir in the cold butter, a few knobs at a time.  The sauce will thicken slightly. Season with a little black pepper and serve with the chicken.

Cook's notes:
  • You won't often see whole legs on a supermarket shelf, so order them  in advance from your butcher, or buy whole chickens and cut off the Marylands yourself.  (This is really, really easy to do, and whole chickens are so much cheaper than pieces. You can keep the breasts and wings for another dish, and make an excellent stock from the rest of the bones. Here are easy instructions for cutting up a chicken.)
  • How long your chicken legs will take to cook through will depend on their size, and the efficiency of your oven. After sixteen minutes, remove one of the legs from the oven and poke a sharp knife-tip into the deepest, underside part of the chicken thigh. If the juices run clear and the flesh next to the bone is very hot to the touch, the chicken is ready. If there is a trace of pinkness, and the flesh is merely warm, put the chicken legs back in the oven for another five to ten minutes. 
  • Please don't leave out the anchovies. Even if you loathe them, they're an essential savoury ingredient, and I promise that you won't taste a hint of fishiness in this dish.
Print Friendly and PDFPrint Friendly

Monday, 19 April 2010

Leaf-Wrapped Wine-Soused Camembert, over the coals

Soaked in wine overnight, then flavoured with herbs and garlic, these little cheeses are wrapped in green leaves, tied with string and grilled over hot coals until the cheese has liquefied. This is a great warm-up snack for a braai [barbeque]: put them on at the same time as the meat (they take only a few minutes to cook) and then pass them around with a pile of crisps or salty crackers while you finish cooking the steaks.
Leaf-Wrapped Wine-Soused Camembert, over the coals
You can flavour these cheeses with anything you like - I used thyme and garlic - and any large, fresh, flexible leaf will do as a wrapping: fig leaves, spinach leaves, banana leaves, beetroot greens, or even a robust lettuce leaf. (Here I used mustard greens, which grow like weeds in containers in my garden). Don't worry about the leaves catching fire: their moisture prevents them from charring too quickly.  By the time they've blackened at the edges, the cheese will have collapsed into a herby goo.

Leaf-Wrapped Wine-Soused Camembert, over the coals 
This, I might add, is the only dish that I've so far managed to cook successfully on my brand-new, super-duper, Taj Mahal of a braai-and-pizza oven.  I fired up the new braai on Sunday for the first time, partly because I'd laid my hands on a beautiful slab of fresh tuna, straight off a fishing boat, but also because I wanted to road-test my new grid. This grid, which I asked a local ironsmith to make, has a cunning feature: a third of the total space is covered by a removable double-decker section. This is designed, first, to keep food hot, and second to allow slow-cooking meat (such as chicken) to finish off at its own pace. The grid and its upper storey worked very well; the tuna steaks, on the other hand, were... um.... well,  they were deliciously, spankingly fresh, but they overcooked in a matter of minutes, welding themselves so resolutely to the new and shining grid that I started hunting for a crowbar.

Clearly, there is a long way to go before I get this outdoor cooking arena working perfectly.  (And the pizza oven?  Oh, please don't mention the bloody pizza oven.  I fired it up once, and the results were dismal.  The wood burned out too quickly, the oven didn't get hot enough, and the pizzas were floppy, stodgy and riddled with concrete dust. Certain members of my family were so disgusted with their 'pizzas' that they dumped them in the bin. Some gave scornful snorts at my bourgeois efforts to own a pizza oven. But that's another story.)

Thank goodness for the cheese.

Leaf-Wrapped Wine-Soused Camembert, Cooked over the Coals
4 small, just-ripe Camembert cheeses
250 ml (1 cup) white wine
2 T (30 ml) olive oil
2 cloves garlic, peeled and crushed
12 large, fresh green leaves (see notes above)
a few sprigs of fresh thyme, or herbs of your choice
salt and milled black pepper

The day before you want to braai the cheeses (or at least six hours in advance), use a sharp knife to slice off the top layer of rind, removing about 2mm.  Put the cheeses, and the sliced-off rinds, into a shallow dish. Prick holes, using a fork, all over the soft upper surfaces of the cheeses. Mix together the wine, olive oil and crushed garlic, and pour the mixture over the cheeses.  Cover with cling film and set aside in a cool place.  Turn the cheeses once or twice while they marinate.

Soak 1.5 metres of string in cold water ten minutes.  Remove any large, stiff stalks from the leaves.  Place two leaves, crosswise, on your counter top.  Place a wheel of cheese on top.  Drizzle some of the marinade over the cheese, top with a few sprigs of thyme, season with salt and pepper, and cover with the sliced-off 'lid' of rind.
Leaf-Wrapped Wine-Soused Camembert, over the coals 
Place another leaf on top. Cut off a 40-cm length of wet string and slide it under the bottom-most leaf.  Gather the edges of the leaves up into a parcel, pleating and tucking as you go, and secure it by knotting the string around it in six 'spokes'  (see picture, left.) Don't worry if the parcel is scruffy: as long as there are no gaping holes, your cheese is safe. Repeat the process with the remaining cheeses.

Place the parcels over hot coals, face down, for about three minutes, or until the top of the parcel is browned. Before the cheese melts completely, flip over the parcel, using a spatula, and allow the underside to cook for another three to five minutes  (depending on the heat of your coals). The very instant you see cheese seeping from the parcel, it's ready. Serve immediately.

Serves 8. http://whatsforsupper-juno.blogspot.com/2009/08/spring-salad-of-edamane-beans-fennel.html
Print Friendly and PDFPrint Friendly

Wednesday, 9 September 2009

Salad of Griddled Baby Butternut with Lemon, Garlic, Feta and Mint: plus a Cooksister!

Salad of Griddled Baby Butternut with Lemon,
 Garlic, Feta and Mint
There are two things I want to write about in this post: one is a delicious, garlicky, lemony dish of chargrilled baby-butternut-squash slices, and the other is Jeanne Horak, arguably the Net's best-known South African food blogger. I've been scratching my head for 20 minutes trying to find a way to knit these two topics into a coherent opening paragraph, and I think I have cracked it.

What do this vegetable and Jeanne have in common? Well, they're both young, fresh and unusual, they're both South African, each one has added a particular deliciousness to my day. Jeanne, I apologise for comparing you to a vegetable (a word that doesn't have good connotations when applied to a human), but I know you won't mind at all. In fact, I think, given your love of fine, snappingly fresh ingredients, you'd be quite pleased to be compared to an infant butternut in the prime of its youth.

Jeanne Horak, who lives in London, is a talented cook, food writer and photographer, not to mention a great champion of South African food bloggers. Her blog, Cooksister, has won many awards, and in February 2009 was listed in The Times, UK, as one of the Top Ten Food Blogs for the Home Cook. What's more, she's drawn up a comprehensive directory of South African food blogs.

We met last year, when Jeanne contacted me to say that she and her husband were nipping into South Africa for a few weeks, and it was jolly good to meet her, and the other Johannesburg food bloggers she'd lined up for a Sunday breakfast. Anyway, the reason I mention this is because Jeanne has generously featured my Scrumptious blog on her South African food bloggers' page - click here to read more about me and my food philosophy.

Now, the very tiny baby butternut squashes. I came across these perky little beauties, each the length of a middle finger, at my local veggie shop today, and was intrigued by their lovely pale-cream and green variegated skin. Thinking they'd probably taste similar to baby marrows (courgettes) or pattypan squashes, and would be perfect for a stir-fry, I bought them.

But, after slicing off a piece and tasting it, I was intrigued to note that the flesh was a little denser and sweeter than that of a baby marrow, with a nutty note, and not at all watery or spongy. So I decided to char-grill them and dress them, still warm, with olive oil, garlic, lemon juice, feta cheese, fresh mint and parsley. And, oh my goodness, they were faintingly good: cooked in a very hot ridged grill pan, they developed a slight sweetness at the edges, but were still tender-crisp and full of flavour. The dressing contains a lot of crushed fresh garlic, but it is strained before it's poured over the cooked butternut.

If you can't find these, you can use courgettes or pattypan squashes instead, although the final result will be somewhat more watery. This just won't work with mature, yellow-fleshed, hard-skinned butternuts.

Salad of Grilled Baby Butternut with Lemon, Feta and Mint

10 baby (really tiny) butternut squashes
some olive oil for rubbing
the juice of a lemon

For the dressing:
4 cloves fresh garlic, peeled
the juice of a large lemon (about 3 T; 45 ml)
130 ml fruity olive oil
a pinch of salt
freshly milled black pepper

To top:
3 Tbsp (45 ml) fresh, finely chopped mint
3 Tbsp (45 ml) fresh, finely chopped parsley
crumbled feta cheese

salt and freshly milled black pepper

Heat a ridged griddle pan on a hot plate for 7-10 minutes, or until very, very hot. Wipe each little butternut squash to remove any furry bits. Cut the squashes, lengthways (that is, from top to bottom, stalks and all), into four 'leaves'.

Using your fingers, rub each slice, top and bottom, with a little olive oil. Place the slices on the griddle, in batches, and cook until dark-gold lines appear on the underside, and the edges of each slice begin to darken. Add more olive oil, if necessary. Flip the slices over. When they are nicely striped on both sides, remove them from the pan and put aside on a plate.

When all the slices have been browned, pile them back into the griddle pan, turn the heat down to medium-low, wait for a few minutes for the pan to cool slightly, and squeeze over the juice of one lemon, plus a tablespoon of water. Cover the griddle pan with a circle of greaseproof paper, or a saucepan lid of the right size. Leave the slices to steam gently until they are just cooked: that is, tender-crisp, but not raw, and certainly not mushy.

In the meantime, make the dressing. Finely chop the garlic, or smash it to pieces with a mortar and pestle. Add the olive oil, salt, pepper and lemon juice, and whisk well to combine. Let the mixture sit and infuse for ten minutes while you finish cooking the butternut slices.

Lift the cooked baby butternut slices from the pan, arrange on a big platter and allow to cool for five minutes. Strain the garlicky dressing, through a metal sieve, over warm slices, pressing down on the garlic mush with the back of a spoon. Scatter the chopped mint and parsley over the dish, and toss gently to combine. Crumble the feta cheese over the salad, and set aside, at room temperature, for an hour or two so the flavours can mingle. You can make this up to 8 hours in advance, but don't put it in the fridge.

Serves 6-8, as a side salad. Print Friendly and PDFPrint Friendly

Tuesday, 25 August 2009

Leg of Lamb with Lemon, Garlic and Rosemary Stuffing

The idea for roasting lamb this way comes from a photograph I cut out from a foodie magazine. Foolishly, I didn't keep the recipe; nor did I make a note of which magazine I took it from, so I had to make up the ingredients for the stuffing using classic lamb flavourings: lemon, garlic, rosemary, oregano and anchovies. If this is your recipe, thank you very much: I love it.

I slashed the lamb crossways, instead of lengthways (as it was cut in the picture I had), thinking this would make carving a breeze, which it did. Next time I make this, though, I am going to make the slashes shallower, because I found that the stuffing that was resting close to the bone was rather mushy and sticky. Another mistake (and this is what comes from not having a recipe to hand): I undercooked the lamb, presuming it would need a shorter cooking time due to the slashes. I was wrong, so I had to put it, half-carved, back into the oven to finish roasting.

My suggestion: use a meat thermometer to test for doneness or, if you don't have one, turn the cooked lamb over, cut a deep slit into its underside, and peek inside to make sure that the meat close to the bone is not raw and bloody, but very hot to the touch and a pale rosy pink (or a brown, depending on how you like your lamb done).

This would be very nice with a deboned, butterflied leg of lamb, but you will need to reduce the cooking time accordingly: ask your butcher.

Finally, please don't be hesitant about adding the anchovies, even if you loathe them. You will not detect a single fishy whiff in the stuffing: instead, there will a deep savoury note that will make your visitors cry out: 'But, darling, what did you put in this delicious stuffing?'

Leg of Lamb with Lemon, Garlic and Rosemary Stuffing

1 large leg of lamb (2.5- 3 kg)
3 slices day-old bread
1 10-cm sprig fresh rosemary
1 10-cm sprig fresh oregano (or 30 ml dried)
grated zest of a lemon
3 T (45 ml) olive oil
2 anchovy fillets, mashed to a paste
3 cloves garlic, peeled and finely choppped
salt and milled black pepper
2 carrots, sliced
a whole onion, sliced, skin and all, into 1 cm slices
the juice of a large lemon
a glass of white wine

Preheat the oven to 200°C. Wipe the lamb with a clean, damp cloth and cut off any large chunks of fat. Using a very sharp knife, make a series of crossways slashes about 6-7 cm deep. Put the bread into the bowl of a food processor fitted with a metal blade and process to crumbs. Add 1 T (15 ml) fresh rosemary needles and the same amount of fresh oregano leaves and whizz until the herbs are finely chopped. Tip into a bowl and add the lemon zest, 1 T (15ml) olive oil, the mashed anchovies and the chopped garlic. Season with salt and pepper.

Using your fingers, mix the stuffing so that it just holds together (like the mixture you'd stuff a chicken with). If it seems too dry and crumbly, add a little more olive oil or some lemon juice. Press the mixture loosely into the slashes you made in the lamb, and then tie up the joint with individual lengths of string, as shown in the picture. Don't worry if a little crumbly stuffing pokes out: it will cook to a lovely golden crunch.

Sprinkle the remaining olive oil and the lemon juice over the joint and season with salt and pepper. Arrange a small bed of sliced carrots and onions in a roasting tray and top with the rosemary and oregano twigs. Place the lamb on top and pour the wine around the lamb. Roast at 200°C for 35-40 minutes (or until it is beginning to crisp and brown on top), then reduce to 180°C and roast for a further hour and a half, or longer (see my notes, above, about doneness). Top up with a little white wine and/or lemon juice every now and then, so that there is always a little liquid in the pan. Remove from the oven. Place the joint in a ceramic dish, cover loosely with tin foil and allow to rest for 10 minutes.

Heat a platter in the still-warm oven. Snip off the strings. Carve the roast: first, holding your knife blade parallel to the leg bone and starting at the thick end of the leg, make a long sideways cut to separate the entire top section from the bone. Now make vertical cuts to separate the slices. Do the same on either side of the bone (a little reckless hacking may be called for here). Arrange the lamb on a platter and pour the pan juices over. Or use the pan juices to make a gravy (instructions below)

Lovely with a plain green salad and crispy roast potatoes.

Serves 6

To make a gravy:

Put the roasting pan, vegetables and all, on the hob and turn the heat onto high. Sprinkle 4 t (20 ml) flour into the pan and stir well, scraping to dislodge any golden residue. Cook for two or so minutes, or until the mixture is golden brown. Now pour in a cup of stock or stock/wine combination, and, using a whisk, stir vigorously until the sauce thickens and bubbles alarmingly. Thin the gravy with more stock, water or wine to the desired consistency (I know it's old-fashioned, but I like a thickish gravy), whisking hard. Turn down the heat to very low and and allow to bubble gently for five minutes. Season with salt and pepper and strain into a gravy boat, pressing down on the roasted vegetables with the back of a soup ladle. If the gravy seems a bit pale add a dash of soy sauce or liquid gravy browning. Print Friendly and PDFPrint Friendly

Saturday, 15 November 2008

Low-Carb Oven-Roasted Ratatouille

My Oven-Roasted Ratatouille 
Ratatouille (or Rat-a-Toolie, as my sister calls it) has fallen out of favour a little since its heydey in the Eighties, which is a pity, because this traditional Provençal dish of stewed vegetables is arguably the best combination of non-meaty ingredients ever invented.

The troublesome word, in my opinion, is 'stewed'. I just don't much like stewed veggies, any way you slice them.

A ratatoolie made by sautéeing the ingredients in olive oil and then chucking them into a baking dish - in layers or mixed up, depending on whose gospel you are following - for a long stewing in the oven will taste okay, but doesn't do justice, in my opinion, to the key ingredients of this dish, namely tomatoes, aubergine, courgettes, red peppers, garlic, onions and herbs. I'm all for the mingling of flavours, but I don't want them to mingle to the extent that all you can taste is, well, ratatouille, with a lightly mushy texture, and a top note of seeped veggie water.

Try this method of oven-roasting the ingredients, in batches, before you combine them with a purée of tomatoes. The roasting intensifies the flavour of each vegetable, and prevents a watery result.

This recipe takes little effort, but a lot of time. It also contains quite a lot of olive oil, but it's very low in carbohydrates, making it a brilliant choice of veggie accompaniment for a low-carb diet.


Oven-Roasted Ratatouille

First stage:
  • three large onions, peeled and quartered
  • two large, shining brinjals [eggplants], cut into cubes
  • three red peppers [capsicums], sliced
  • ½ cup (125 ml) olive oil
  • salt and freshly milled pepper
  • a few sprigs of thyme
  • a few needles of fresh or dried rosemary

Set the oven temperature to its highest setting (mine goes up to 260 °C). Arrange the vegetables in three separate stripes [see left] in a deep metal roasting dish. Trickle the olive oil over the vegetables, rubbing with your fingers to ensure that every piece is glossed with oil, and season well with salt and pepper. Top with a few sprigs of thyme and the rosemary needles. Put the dish into the blazing hot oven and roast for 15 to 20 minutes, or until they are just beginning to blacken on the edges. Now turn the oven down to 180 °C and bake the vegetables for another 15 minutes, or until they are soft.

Second stage:
  • three cups (750 ml) plump, ripe cherry tomatoes, halved
  • 12 courgettes, thickly sliced
  • 6 cloves fresh garlic, peeled and thinly sliced
  • a handful of fresh basil leaves, torn into small pieces
  • 2 Tbsp (30 ml) olive oil


Put all the ingredients into a bowl and toss well to combine. Remove the roasted vegetables from the oven, and tip in the new raw ingredients. Stir well to combine. 


Put the dish back in the oven and baked for about 25 minutes, or until the cherry tomatoes have just started to collapse and the courgettes are tender. In the meantime, make the tomato sauce.

Third stage:


  • 2 Tbsp (30 ml)
  • 2 fat cloves fresh garlic, peeled and crushed
  • two tins canned Italian tomatoes, and their juice, roughly chopped
  • 4 big, ripe tomatoes, cut into small chunks
  • 1 tsp (5 ml) white sugar
  • 1 bay leaf
  • a sprig of thyme
  • salt and freshly milled black pepper
Heat the olive oil in a saucepan and add the garlic. Fry gently, but don't allow the garlic to brown. Now tip in all the remaining ingredients. Simmer over a very low heat for about 30 minutes. If the sauce seems lumpy, give it a light blitz with a stick blender (but remember to remove the bay leaf and thyme sprig)

Fourth stage:


  • A handful of fresh basil, torn
Remove the vegetables from the oven. Tip the hot tomato sauce over the veggies, add the torn basil leaves, and toss to combine. Adjust seasoning, adding more salt and pepper if necessary, and return to the oven for ten minutes.


Serve hot or, even better, just warm.

Excellent with a crumble of feta cheese, over a tangle of pasta, or warm on bruschetta. Or on its own, with a few rocket leaves.


Serves 4 as main dish, 6-8 as a snack on bruschetta.


Print Friendly and PDFPrint Friendly

Tuesday, 4 November 2008

Garlicky Lamb Kebabs with Fennel Seeds, on Rosemary Skewers

Do you ever stare glumly into the freezer, wondering what gnarled old thing you can defrost for supper for a grumpy and hungry family? I did the frantic freezer hunt yesterday, and for the first fifteen minutes of ploughing through fields of snow and chipping away glaciers turned up nothing but a few fossilised fishfingers, a powdery packet of celery soup and a puppy who went missing in 2005. And then - aha! - right at the back in the permafrost, a big box of cubed Karoo lamb, cut from the leg. It looked okay after defrosting, and after two hours in a simple marinade, and a quick grilling on my gas braai [barbeque], tasted sensational. Even though it had been frozen for - at a guess - four or five months, the lamb was still juicy, flavoursome and meltingly tender, so there's a smart smack in the broeks for kitchen purists who denounce freezing. If you don't have a rosemary bush in the garden, use ordinary kebab sticks and add fresh or dried rosemary needles to the marinade.

Image above by botanical artist Louise M Smith. See more of her work at Greenstems.com

Garlicky Lamb Kebabs with Fennel Seeds, on Rosemary Skewers

For the marinade:

1 T [10 ml] fennel seeds
1 T [10 ml] coriander seeds
3 cloves fresh garlic, crushed or finely chopped
juice of two fat lemons [save the squeezed-out lemon halves]
1/2 cup [125 ml] olive oil
salt and freshly milled black pepper

For the kebabs:

2 kg lamb, from the leg or shoulder, cut into 2cm x 2cm cubes
6-8 fresh woody rosemary stalks, about 30 cm long

To make the marinade: first dry-roast the seeds. Put the fennel and coriander seeds into a hot, dry frying pan and toss for 30 to 60 seconds, or until they are just beginning to toast and release their scent. Now, using a mortar and pestle [or a flat, heavy knife blade against a chopping board] lightly crush and bash to produce a slightly coarse grind. Put the seeds into a flat shallow dish and add all the remaining marinade ingredients. If you're not using fresh rosemary skewers [see above] , add a tablespoon of fresh or dried rosemary needles. Now tip in the lamb cubes and the squeezed-out lemon halves, toss well to coat, cover with cling film and set aside in a cool place to marinate for two hours, or overnight.

To make the kebabs: strip the leaves off three-quarters of each rosemary stalk, leaving a tuft of leaves at one end. With a good knife, or penknife, strip off the bark of the bare end of each stalk, and sharpen it to a point. Thread the lamb chunks onto the stalks, taking care not to pack them too tightly. Braai, barbecue or grill over a good heat, turning frequently and basting occasionally with the remaining marinade, for about 2o-30 minutes, or until the lamb is browned and sizzling on the outside but ever so faintly pink on the inside. You might be forced to pull off a piece of lamb and taste for yourself.

Excellent with lemon wedges and tzatziki.

Serves 8. Print Friendly and PDFPrint Friendly

Saturday, 25 October 2008

Umami Tomato Soup: passion in a bowl

The deepest, cleanest fix I can get is from a bowl of hot tomato soup. Look, everyone has a crazy food-monkey, and my particular monkey has a wild craving for tomato soup. It started year or so ago, when I developed an insatiable taste for hot, spicy soup.

For a while, this instant curried soup, made in jiffy, with canned chickpeas, tomatoes, coconut milk, and so on, satisfied me. Then, when the tomato bug hit hard, I experimented with various tomato soups, including my grandmother's famous tomato soup, which was very good, but not quite intense enough. Several soups later, I came up with Roast Red Pepper and Tomato Soup, which seemed to hit the spot for a few months.

But, the nature of an addiction is that it is insatiable, and I needed a more intense taste, so I experimented once again, and came up with this soup, which has a deep, lip-smacking, cheek-slapping flavour.

I was inspired to hotfoot it into the kitchen for soup experimentation after I watched an episode of Heston Blumenthal's cookery programme In Search of Perfection. Blumenthal, a culinary genius and ground-breaker in the field of taste and flavour, recently discovered - and scientifically proved - that the pulp and seeds of tomatoes are a rich source of the elusive umami flavour, also known as the 'fifth flavour'. More about umami here.

So that's why I've called this soup Umami Soup. This is quite a rough, textured soup: if you are looking for posh haute soup, you will need to peel the tomatoes before you add them to the pot, and sieve the soup after liquidising it. I can't be bothered and, besides, I like tomato skin. This soup feeds eight to ten, but is easily halved.

Umami Tomato Soup

4 T [60 ml] olive oil
2 large, ripe red peppers [bell peppers or capsicums], seeded and roughly chopped
2 kg very ripe, sweet red tomatoes, roughly chopped, skins, pips and all
2 tins canned Italian tomatoes
2 T [30 ml] concentrated tomato paste
4 fat cloves of fresh garlic, skinned and chopped
1 tsp bicarbonate of soda*
a pinch of good-quality mixed dried herbs [for example, Herbs de Provence. Don't use fresh herbs, which will distract from the tomato taste]
1 t [5 ml] Tabasco sauce
1 t [5 ml] sugar
enough fresh chicken or vegetable stock to cover the tomatoes [if you don't have stock, use a good stock cube]
salt and freshly ground black pepper
300 ml thin cream

Turn your hot plate or gas ring on to its hottest setting and place a large, deep soup pot over the heat. When the pan is very hot, add the olive oil, wait for a minute until it is spitting, and then throw in the chopped red pepper. Toss the chunks in the hot oil until they just begin to blacken in spots. Now turn down the heat to medium and tip in all the chopped tomatoes, the tinned tomatoes, the tomato paste, half the garlic and the bicarbonate of soda. Cook for 30 minutes over a medium heat, stirring occasionally, and breaking up any tomato chunks with the back of a spoon. Add the herbs, the Tabasco sauce, the sugar and the remaining garlic. Pour over just enough stock or water to cover the tomatoes. Allow to bubble fairly briskly for another ten to fifteen minutes. Season with salt and pepper.

Tip the mixture into a liquidizer or or food processor fitted with a sharp blade, and whizz until smooth. [You can also use a stick blender]. If want a perfectly silken soup, sieve the mixture into a deep bowl by pressing it through a sieve or strainer with the back of a soup ladle. Return the soup to the pot. Gently reheat the soup, and gradually dribble in the cream. Don't be tempted to add the cream in a gush, as it may curdle, and don't allow the soup to boil. Check the seasoning - this soup needs lots salt - and serve hot, with a swirl of olive oil and perhaps a dot or two of Tabasco sauce.

Serves eight to ten.

* Don't ask me why this recipe needs bicarb, but it does, and this was an important component of my Granny's tomato soup. Oh duh, I get it: the bicarb reduces the tomatoes' acidity. Print Friendly and PDFPrint Friendly

Sunday, 19 October 2008

Luscious confit of baby tomatoes, basil and garlic

I know confit is a poncy, cheffy word to use for this wonderful dish of baby tomatoes, basil and garlic gently stewed in lashings of olive oil and butter, but I can't think of a better one: it's not really sauce, and it's not a preserve.

The shops here in South Africa are filled with luscious baby tomatoes, the most delicious and tasty of which are tiny red jewels the size and shape of calamata olives. The label calls them 'Spanish Sante' tomatoes and I've also seen them labelled 'Santine'. If you can't find them, use Rosa baby tomatoes.

The secret to a deep basil taste is to allow the tomatoes to steep for a while after the initial cooking. Excellent on bruschetta, over pasta, or with bacon and eggs. Not for dieters.

Luscious confit of baby tomatoes, basil and garlic

1/2 cup [125 ml] olive oil
2 fat cloves fresh garlic, finely chopped
2 punnets [about three cups] tiny ripe cherry tomatoes, halved if they are bigger than grapes
4 T [60 ml] butter
a large handful of fresh basil, shredded
salt and freshly milled black pepper
a pinch of dried red chilli flakes [optional]

Heat the olive oil in a saucepan or frying pan and add half the garlic. Cook for a minute or two over a gentle heat, but do not allow the garlic to brown. Now add the tomatoes and stew gently for about eight minutes, or until the tomatoes begin to soften and split. Gently crush any unbroken tomatoes with the back of a spoon. Add the butter and half the fresh basil and stir until the butter has just melted. Season with salt and pepper. Turn off the heat and allow the mixture to infuse for half an hour. Now stir in the remaining garlic, and gently reheat the mixture for two or three minutes. When a rich, buttery sauce coats the half-solid tomatoes, add the remaining fresh basil, and the chili flakes, if you're using them. Stir well. If the mixture seems too dry, add a little water [or more butter, if you're throwing caution to the winds].

Serve hot or just warm. Print Friendly and PDFPrint Friendly

Tuesday, 1 July 2008

Woolies frozen ginger - now there's a good idea

Woolworths have recently launched a lekker new product: a pack containing little frozen cubes of puréed fresh ginger, each one a little smaller than a dice (and I mean the sort of dice you play games with). When you're making a stir-fry or curry, you just pop out a few cubes, leave them to defrost (or chuck them in the microwave) and Bob's your uncle.

Purists may scoff at this (but, then again, purists scoff at everything, don't they? And, besides, most purists are restaurant reviewers who have no children to feed, and all day to stooge around the shops) but I love the convenience of not having to lacerate my knuckles trying to grate the wizened-and-sprouting piece of fresh ginger in the vegetable rack, and then plucking the hairy bits from my teeth.

It's strange how freezing things has gone out of fashion. In the early heydeys of the freezer, home cooks were encouraged to freeze everything bar the cat. In fact, the adjective 'frozen' is almost a dirty word when applied to food nowadays.

Look, I am the first to agree that most things lose a bit of flavour and texture when frozen, but - provided that you don't leave them in the freezer for too long - it's really only a little loss, and it's cancelled out by the convenience factor. (Take peas, for example. A pea frozen in its pinnacle of sweetness is so superior to a podded pea that's been sitting and getting starchy under a film of clingwrap).

Here are some things that I've found freeze extremely well (wrapped tightly in plastic)

freshly grated or puréed ginger
whole, peeled garlic cloves (but they must be very young and snappy when you freeze them)
pomegranate seeds
curry leaves, lime leaves and bay leaves
fresh lemon juice (freeze it, in ice-cube trays, within fifteen minutes of squeezing it)
home-made pesto
berries (except for strawberries)
lemon grass
blanched chopped spinach
meringues
butter
herb and/or garlic butter
garlic bread
bacon bits
pork sausages
fresh vanilla beans

Here are a few things, that, in my experience, don't freeze well:

home-made chicken stock (it just never tastes the same as fresh stock)
soups (ditto)
chicken breasts
fish
bananas
fresh parsley, basil and coriander
fresh green chillies
yoghurt
cream
coffee beans
spices (except whole nutmeg) Print Friendly and PDFPrint Friendly