Sunday, 19 September 2010

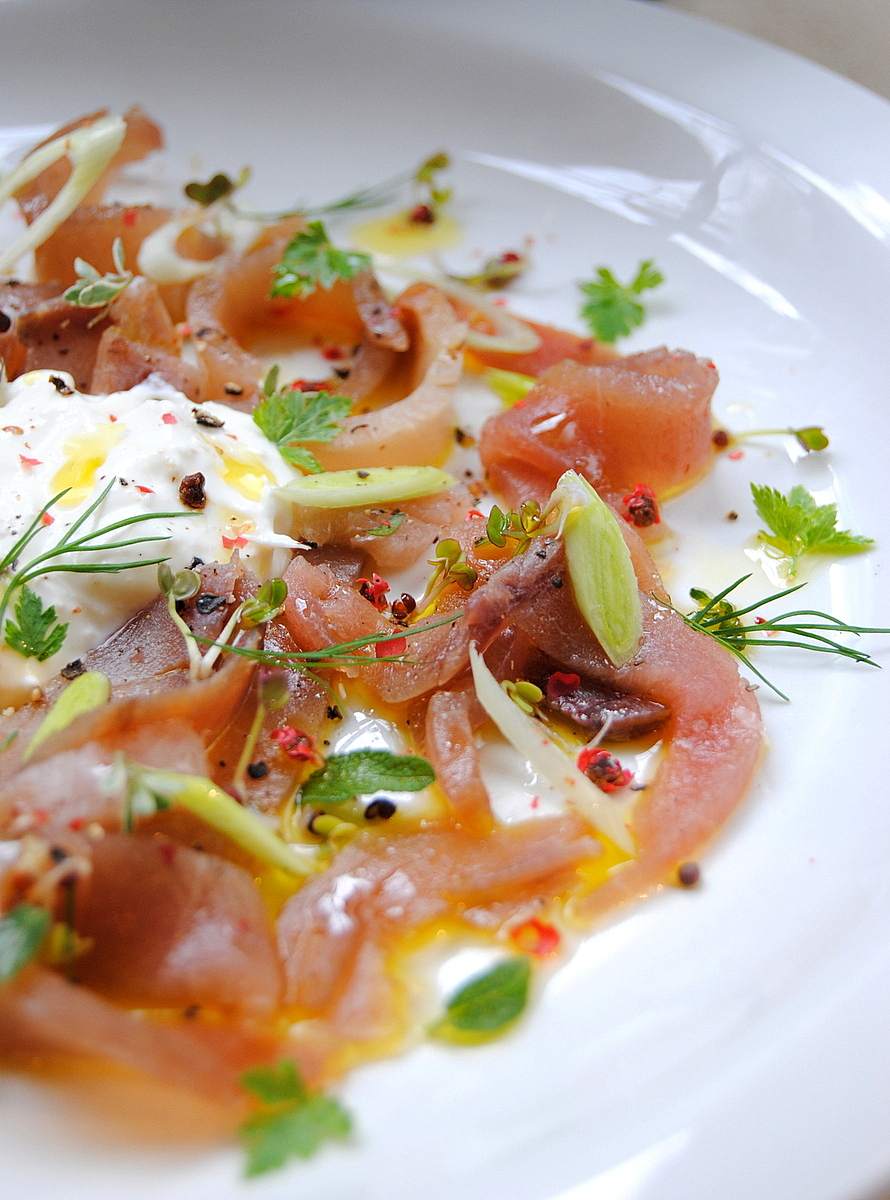
Smoked Tuna with Fresh-Horseradish Cream, Pink Pepper and Herbs

A tingling punch in the nose is what fresh horseradish delivers, which makes it the perfect accompaniment to smoked, oily fish.  My horseradish plant didn't survive the trip from Johannesburg to Cape Town, so I was overjoyed to see fresh roots (which look like spindly parsnips) in my local supermarket.  Quite fortuitously, I managed to get my hands on some lovely local cold-smoked tuna, which is produced by my fellow food blogger Sam Linsell of Drizzle and Dip. Sam's a partner in The Smoking Shed, an artisan-producer of a variety of cold-smoked foods and spices.


Smoked Tuna with Fresh-Horseradish Cream, Pink Pepper and Herbs.
If you're on a low-carb diet, leave out the caster sugar. 

With a buttery texture and a robust smokiness, this ingredient can stand up well to other strong flavours. I've used finely sliced baby leeks here, but you can use shaved red onion or snipped chives for that essential oniony note. For a final zip, I've added sprouted mustard seeds, which are crunchy to the bite. (You can't buy these, but they are easy to make in a sprouting jar, using fresh mustard seeds from your local spice shop.)

This recipe is suitable for anyone on a low-carb, #LCHF or diabetic diet, but please leave out the caster sugar.

If you've bought a whole horseradish, you'll need only a little of it for this dish. It's worth grating the whole root, however, and putting it in a jar with olive oil and salt (here are my instructions for preserving horseradish). Or you can wrap what's left over and put it in the freezer: it keeps remarkably well, and can be grated over food straight from the freezer.  If you can't find fresh horseradish, use a little of the creamed variety.

Scatter the tuna with tiny baby herb leaves and sprouts. 


Smoked Tuna with Fresh-Horseradish Cream, Pepper and Herbs

one fresh horseradish root
200 ml thick sour cream
½ tsp (2.5 ml) caster sugar
2 tsp (10 ml) lemon juice
salt
250 g cold-smoked tuna, or similar smoked fish
one baby leek, very finely sliced on the diagonal
a handful of baby herb leaves: thyme, sage, dill and parsley
2 Tbsp (30 ml) mustard sprouts
2 tsp (10 ml) pink peppercorns, lightly crushed
6 T (90 ml) fruity olive oil
milled black pepper
lemon wedges, for serving

Peel the horseradish root with a potato peeler (if it's a young root, no need to peel). Grate it finely, using a microplane or fine side of a cheesegrater. (Do this under an open window: there are strong fumes.)

Put the sour cream and caster sugar in a small bowl and stir in two teaspoons (or more, if you'd like it stronger) of grated horseradish. Season with salt and set aside for fifteen minutes. Stir well.

Slice the tuna into ribbons and arrange on a platter, or on individual plates.

Scatter the leeks, herbs, sprouts and pink peppercorns over the fish.  Drizzle over the olive oil and dust with black pepper.  Serve immediately, with the horseradish cream and some lemon wedges.

Serves 4 as a starter. 


Print Friendly and PDFPrint Friendly

Thursday, 9 September 2010

Egg and Fennel Salad with Nasturtium-Leaf Mayonnaise

This delicious salad of boiled eggs and shaved fennel, dressed with a caper & anchovy vinaigrette and a nasturtium-leaf mayonnaise, is surprisingly light and delicate, considering how much oil and egg it contains.

Bowl by David Walters
Egg salads aren't very popular these days, no doubt because of the bad rap eggs have received in the past two cholesterol- and fat-conscious decades.

Whether the cholesterol in eggs is damaging to your health is still a matter of heated debate, and frankly I couldn't give a flying feather.

Boiled eggs are very dear to my heart because they evoke many comforting memories of childhood meals: softly cooked to golden runniness, and served with crispy toast soldiers, or hard-boiled, halved and stuffed, Fifties-style, with mashed yolk, butter, mayo and cayenne pepper.

But what about the nasturtiums, I hear you cry.  I came up with the idea for this recipe when I noticed, while pootling around Hout Bay this week, that the sidewalks are brimming with nasturtiums: green banks of tender little leaves, dotted here and there with brilliant orange and yellow flowers.  These are all garden escapees (nasturtiums are indigenous to central and South America) and although they have no business rioting all over the Cape Peninsula's sensitive floral region, I couldn't help screeching to a halt and picking several big bunches. (This, in the high-falutin' world of foodie correctness, is known as 'foraging').

I love nasturtium leaves because, like eggs, they remind me of my childhood. As a kid, I picked them, ate them, grew them from seed and - most important of all - spent happy hours marvelling at how water, when splashed on a leaf, formed a perfect silver sphere and skipped around like a bead of liquid mercury.  Apparently, nasturtium leaves repel water because they are covered with tiny nano-crystal bundles, with each bundle being about a thousand times smaller than the width of a human hair.

Tiny these bundles may be, but they're not nano enough for my tender tastebuds. Nasturtium leaves may have a lovely fresh, peppery taste, but they feel unpleasantly hairy on the adult tongue. This I learned when I made the first version of this salad, which combined small whole nasturtium leaves with wedges of hard-boiled egg. So I abandoned the idea of using the whole leaves, and instead chopped them finely into a thick mayonnaise. To add crunch to the salad, I added fine shavings of fresh fennel bulbs, and a scattering of spring onions.

Some important points about this salad.  The dressing and the mayonnaise must be made at least an hour in advance, to allow the flavours to infuse.  Boil the eggs 20 to 30 minutes before you serve the salad, so that they are still tender and retain a trace of warmth. Add the spring onions (or chives) at the very last minute, or their pungency will overwhelm the other flavours.  Use eggs that are 3-4 days old, or they will not peel well.

I strained the dressing over the salad to prevent bits of anchovy and caper from flecking the eggs, but you can use it unstrained if you like. Last, this salad doesn't keep: after two or three hours in the fridge, it tastes of nothing but onion.

If you can't find nasturtium leaves, use finely chopped rocket.

Egg and Fennel Salad with Nasturtium-Leaf Mayonnaise
12 eggs
3 small bulbs of fresh fennel
2 spring onions, very finely chopped, or a handful of snipped chives
a few sprigs from the top of the fennel
a few fresh nasturtium leaves and flowers, to garnish

For the dressing:
1 very small clove of garlic (or a third of a big clove)
2 small anchovy fillets, from a tin or bottle
2 tsp (10 ml) capers
a pinch of Hot English Mustard Powder
a pinch of white sugar
freshly milled pepper
3 T (45 ml) freshly squeezed lemon juice
5 T (60 ml) extra virgin olive oil, or a mixture of olive oil and light vegetable oil

For the nasturtium mayonnaise:
2 large egg yolks, at room temperature
1 tsp t (5 ml) flaky sea salt
200 ml light vegetable oil (such as sunflower or canola oil, or any other flavourless oil)
100 ml good olive oil
1 cup (250 ml, loosely packed) fresh nasturtium leaves
the juice of a large lemon (about 2 T/30 ml)
freshly milled black pepper

First make the dressing. Put the garlic, anchovies, capers, mustard powder and sugar into a mortar and grind to a rough paste. Stir in the lemon juice, and then whisk in the oils.  Season with pepper (but no salt, as the anchovy fillets are salty enough). Set aside and allow to stand for an hour.  

Now make the mayonnaise. Put the two egg yolks into a small bowl and add the salt. Mix the vegetable oil and olive oil in a small jug, or put them in a plastic squeezy bottle with a nozzle. Using a rotary beater or whisk, beat the egg yolks and salt for a minute.  Now, as you whisk the egg yolks with one hand, dribble a little splash of oil onto the yolks with the other hand.  Keep whisking and dribbling, a few drops at a time, until the mixture begins to thicken rather dramatically. Now add the rest of the oil in a steady stream, beating all the time until the mayonnaise is thick and creamy. (Detailed instructions here).  

Finely chop the nasturtium leaves and stir them into the mayonnaise along with the lemon juice. Season with pepper and more salt, if necessary.  Cover, set aside and allow to stand for an hour. 

Half an hour before serving the salad, hard-boil the eggs. It doesn't matter how you do this (every cook has their own theory about how to make and peel a perfect hard-boiled egg; if you don't, please refer to Delia Smith's careful instructions).  What does matter is that the white is firm, and that the yolks are just cooked through, with not a sign of glassiness.  Drain off the boiling water and run cold tap water over the eggs until they are just warm to the touch.  Set them aside for ten minutes.

In the meantime, prepare the fennel. Trim the stalks and leaves off the bulbs, and cut each one into quarters. Chip out the hard pulpy core at the centre of each quarter.  Using a mandolin or a very sharp knife, cut each quarter vertically into fine slices. 

Peel the eggs and cut them length-ways  into quarters or eighths. Arrange the egg quarters and fennel slices on a flat salad platter.  Strain the dressing through a sieve or tea-strainer into a bowl, pressing down well with the back of a spoon to extract all the anchovy and caper flavours.  Drizzle just enough of the dressing over the salad to lightly coat the eggs and fennel.  Scatter with the spring onions or chives. Finely chop a few of the fine, feathery fennel tops and sprinkle them over the salad.  Decorate the platter with fresh nasturtium leaves and flowers. Serve immediately, with the nasturtium mayonnaise on the side. 

Serves 6
Print Friendly and PDFPrint Friendly

Monday, 6 September 2010

Magic Marbled Microwave 'Meringues'

I'm not a maker of cupcakes or sweet fancies, but this recipe intrigued me, because it's quite unlike anything I've seen before. How can a stiff paste of unbeaten egg white and three cups of icing sugar make anything meringue-like? I had my doubts, but was interested enough to hotfoot it to the supermarket to buy several bottles of eye-poppingly bright food colouring.

Magic Marbled Microwave 'Meringues'
The recipe, which appeared in a local newspaper under the byline of Angela Day (a pseudonym used by the writers of a food feature that is run every week in newspapers of the Independent Group, and which first started in The Star in 1964), was accompanied by a photograph of some dainty, rather flattened pale-pink meringues sandwiched with whipped cream.

My enthusiasm turned to frustration within minutes. There wasn't enough egg white to bind the specified amount of icing sugar into a pliable paste. The marble-sized balls of meringue puffed up dramatically, and then flattened out to burnt-sugar discs.  Some of them caught fire. Others unfurled and then exploded. I tried shortening the cooking time, but the 'meringues' turned into sticky globs. Those bits that did escape incineration tasted like over-sugared air.

But, by gad, I was not going to be defeated. Three batches later, after much experimentation and swearing,  I'd used almost a kilogram of icing sugar, covered the kitchen in a sticky layer of goo, and stained my fingers in all the colours of the rainbow. But I had what looked, and almost tasted like, a meringue. The flattening problem was fixed by using paper cups (instead of placing blobs on a piece of baking paper); the explosion issue was resolved by cooking at least six meringues at a time.

Six important points about this recipe.

First, the drawbacks:

- These are not true meringues: their texture is too dusty, they are overly sweet, and they have none of the delicate, billowing loveliness of a proper oven-dried meringue.

- You will need to experiment with the cooking times. Every microwave oven is different, and it may take a few tries before you figure out the optimum number of seconds - and yes, seconds count here - it takes to cook the meringues to a perfect crispness.  For this reason, I recommend that you make a double batch of the paste (cover whatever you're not using with clingfilm) to allow for mistakes.

Second , the reasons I like this recipe:

- These are a perfect, last-minute sweetie-treat for birthday parties and cake sales. They are quick to make, and look very pretty, especially when sprinkled, just before cooking, with edible cake glitter.

- This is a wonderful recipe to make with kids: there is something magical about the way the meringues puff up, quadrupling in size, as they cook.

- These are a great standbye if you're making Eton Mess, or any recipe that calls for crumbled meringues (but do omit the food colouring).

- They remain super-crispy for at least 12 hours, and get crisper the longer they stand.

Magic Marbled Microwave Meringues

3 cups (750 ml) icing sugar
2 egg whites
1 tsp (5ml) vanilla extract or essence
food colouring
edible cake glitter (optional)

Sift the icing sugar into a large bowl.  Put the egg whites and vanilla into a separate, small bowl, and whisk very lightly for 30 seconds, or until the mixture is lightly frothed and smooth, with no gloopy bits.

Make a well in the centre of the icing sugar, and add a tablespoon of the egg white/vanilla mix. Using a spoon, or your fingers, mix well, adding a little more egg white as you go - less than a teaspoon at a time - so that you end up with a rather stiff, but pliable, paste. If you add too much egg white, and the mixture seems too runny, sift some more icing sugar into the bowl.

Magic Marbled Microwave Meringues
Add a few drops of food colouring to each hole.
Tip the paste onto a board covered with a sheet of baking paper and knead lightly with your fingertips for a minute.

Poke two holes, using a fingertip, into the paste. Add a few drops of different food colouring to each hole.

Lightly knead the paste again, twisting and turning as you go, to achieve a marbled effect. If you don't want to stain your fingers, wrap the paste in a big piece of clingfilm or put it in a polythene bag.

Make the meringues six at a time. Pinch off  pieces of the paste (the size of a large marble) and place each one in a paper case.

Sprinkle with a little edible cake glitter, if you have it.

Cover the remaining paste to prevent if from drying out. Arrange the six paper cases in a circle on the turntable of your microwave oven.

Magic Marbled Microwave Meringues
Set the time for two minutes, on high, and press the start button.  Watch the meringues closely as they cook: after 45 seconds or so, depending on the power of your microwave, they will billow upwards with great flamboyance.

Once they've stopped billowing, cook them for another 30-40 seconds (again, you will need to experiment here).   Remove from the oven and set aside to cool.

Makes about 40 'meringues'


Print Friendly and PDFPrint Friendly

Friday, 3 September 2010

Scrumptious wins a place in the Foodista Best of Blogs Cookbook


I'm happy to announce that my recipe for Prickly Pear Granita has won a place in the Foodista Best of Food Blogs Cookbook. This is the first of my recipes (and food photographs) to be published in a book. If my back weren't so creaky, I'd be doing delighted cartwheels across my kitchen counter. Mine was the only African blog to be featured in this cookbook.

I submitted three recipes to the competition, but did so without much enthusiasm: there are many hundreds of exceptional food blogs out there, and I didn't think I stood  a chance.  Fifteen hundred recipes were entered, and members of the Foodista community were asked to vote on them. To my surprise, this particular recipe soon became one of the eight top-rated entries, so I felt a little prickle of hope. Later, when the book's editor Sheri Wetherell contacted me to ask for a hi-res photograph of myself, I began to hold both thumbs.

The final 100 recipes were chosen by an editorial team, taking the voting results into consideration. Born out of the “Blog to Book” panel at the first International Food Blogger Conference (IFBC) in 2009, the cookbook celebrates the best food bloggers worldwide. It has been published by Andrews McMeel Publishing, and will be released late in October 2010.


Here is the online version of the post and recipe, at the Foodista site, and here is the original post. Print Friendly and PDFPrint Friendly