Showing posts with label #banting. Show all posts

Tuesday, 25 November 2014

Low-Carb Silken Chicken-Liver Pâté with Green Peppercorns

If you're looking for a brilliant snack to serve friends and family over the festive season, try this velvety chicken liver pâté with green peppercorns.  My formula is the culmination of many years of making retro party pâtés, and I hope this easy, inexpensive dish will knock the socks off your guests. (Scroll to the end of this page for links to more of my potted pleasures).

My Low-Carb, Silken Chicken Liver Pâté with Green Peppercorns. 


Wine recommendation from Michael Olivier: He says: "Leopard's Leap Culinaria Muscat de Frontignan Collection 2013, made from Muscat de Frontignan grapes from Robertson. A sweet wine goes very well with paté."

It looks like: Elegant packaging. The wine is pale salmon in colour. 

It smells like: Rose petals and Turkish Delight.

 It tastes like: Rich and sweet grapiness. Though not cloying in its sweetness. Percent balance of beautiful aromas, luscious sappy fruits, good counterbalancing acidity and a long gently waning aftertaste with an undertow of rose geranium.


I can't bear gritty, greyish chicken-liver pâtés: for me even to consider eating liver (shudder), the mixture must be very smooth and fine, with a complex flavour, a boozy undertone and a slight rosy blush on the inside. I've added Madagascan green peppercorns to this recipe because I love the way the way their peppery pop surprises your tongue and adds lovely contrast to the richness of the livers.

There are two important watchpoints here: Don't overcook the livers - a gentle pinkness as you cut into the pâté is essential - and do strain the mixture through a fine sieve to remove any gristle and ensure a silken result. The clarified butter topping isn't essential to seal the top of the pâté, but it looks so pretty, with its scattering of both crunchy pink peppercorns and brined green ones.

This recipe is low in carbohydrates and suitable for diabetics. If you're on a #LCHF regime, I suggest you serve it with slim discs of cucumber or crisp celery sticks, or caperberries, as shown in the picture above. If you're not banting, serve this with slices of fresh baguette or Melba toast.

Low-Carb Silken Chicken-Liver Pâté with Green Peppercorns 

500 g chicken livers, thawed
150 g (150 ml) salted butter
a small onion or two shallots, peeled and very finely chopped
1 large sprig fresh thyme
1 clove garlic, peeled and finely chopped
2 Tbsp (30 ml) brandy, plus an extra teaspoon
2 Tbsp (30 ml) cream
4 tsp (20 ml) brined green peppercorns
a grating of whole nutmeg
salt and milled black pepper, to taste

To top:

50 g (50 ml) salted butter
a few green peppercorns
a few red peppercorns
a sprig of thyme

Trim any gristle or unpleasant-looking bits off the chicken livers, rinse under cold water and drain for 10 minutes in a colander.  Pat them dry on kitchen paper. If they are of unequal size, cut the biggest ones in half.

Melt 100 g of the butter in a large frying pan, over a medium heat, and add the onion and thyme sprig. Cook gently for 4-5 minutes, until the onion bits are soft. Don't allow the onions to brown  - they must seethe happily in their bath of golden butter, without catching. When the butter begins to turn a rich golden-brown at the edges of the pan, add the garlic and cook for a further minute.

Now turn the heat right up and tip in all the chicken livers. Cook for about 3-4 minutes, turning them over now and then. The butter should bubble enthusiastically, and the livers must must take on a little colour, while remaining pink in the middles. To check, cut the biggest piece in half - it should be rosy, but not raw, on the inside.  Remove the livers with a slotted spoon and put them in a blender.

Add the brandy to the pan - stand back, in case it ignites - and bubble furiously for a minute or two, or until the alcohol has burned off and the liquid has reduced by about half. Remove the thyme sprig and pour the hot pan juices into the liquidizer.

Put the cream, the remaining 50 g butter and 1 tsp brandy (to taste; you might want to add a little more) into the goblet, and blitz to a smooth pureé.

Put a fine sieve over a bowl and tip the warm mixture into it.  Strain it through the sieve by pressing down on the mixture with the back of a large spoon.

Stir in the green peppercorns and a little freshly grated nutmeg, to taste.  Season with salt and black pepper. Let the mixture cool to for a 5-10 minutes (this is to prevent the peppercorns sinking to the bottom), stir well, then pour into a clean pâté dish. Smooth the top to as level as you can get it.

Scatter over a few more green peppercorns, and some pink peppercorns if you fancy those, and lightly press a sprig of thyme to the centre. Cover with clingfilm and refrigerate for 2 hours.

To prepare the clarified butter, melt 50 g butter in a pan or your microwave.  Place a new or laundered cloth (a dishcloth like this is perfect) in a sieve, and pour the butter through the sieve over the pâté, to form an even layer.

Cover and refrigerate until ready to eat.

Serve with crackers and pickles.

Serves 6 as a snack or starter.

Like this recipe? Try some of my other potted pleasures:

Potted Pork Shoulder with Green Peppercorns

Easy Duck Rillettes

Potted Pork Belly with Mace & Pepper

Old-Fashioned Potted Salmon or Trout


Print Friendly and PDFPrint Friendly

Wednesday, 5 November 2014

Low-Carb Wine-Braised Leeks with Cream, Thyme & Parmesan

A dish of silken baby leeks cloaked in a wickedly creamy Parmesan sauce. The leeks take about half an hour to braise in their bath of wine, garlic and thyme, but once they're tender, the sauce takes just a few minutes of brisk bubbling to reduce and thicken. This dish is low in carbohydrates, and suitable for diabetics and anyone on a low-carb #LCHF regime.

Low-Carb Wine-Braised Leeks with Cream, Thyme & Parmesan.
This beautiful plate by my uncle David Walters, Master Potter of Franschhoek.

Wine recommendation by Michael Olivier.  He says: "Boland Cellar Granny Smith Nouvelle 2014. Nouvelle is a grape developed by Chris Orffer at the University of Stellenbosch by crossing Semillon and Ugni Blanc. First planted on the Geldenhuys family farm Klipvlei near Perdeberg, Nouvelle is grown in the Swartland, and it's a belter. 

 It looks like: Lime-green tinge of youth. Packed in a green-tinged bottle, with Granny Smith dancing on the label. 

 It smells like: Well - Granny Smith apples and fynbos herbs scrunched in your hand. 

 It taste like: Yes, you guessed, Granny Smiths again - and vibrantly so. A real thirst quencher: zesty, crisp and dry. A nice counterfoil to the leeks and cream.


I'm mad about baby leeks, and feature them often on this blog (recipe links below).  One watchpoint: even the slimmest leeks can be stringy, so be sure to keep them bubbling in the wine until they're as tender as a kiss.

If you don't cook with wine, you can use a cup of chicken stock in its place.

Here are more of my baby leek recipes. The first one is low in carbs, and the second and third are too, provided you omit the breadcrumbs and croutons.

Low-Carb Wine-Braised Baby Leeks in Prosciutto

Braised Baby Leeks with Halloumi 'Popcorn' and Frizzled Prosciutto

Salad of Warm Baby Leeks with Blue Cheese and Chilli Croutons


Low-Carb Wine-Braised Leeks with Cream, Thyme & Parmesan

750 g baby leeks
3 Tbsp (45 ml) olive oil
2 large cloves of garlic, peeled and cut in half lengthways
1 cup (250 ml) dry white wine
a few sprigs of fresh thyme
1 cup (250 ml) cream
½ cup (125 ml) finely grated Parmesan, plus a little extra for topping
a squeeze of fresh lemon juice
salt and pepper, to taste

Fry the leeks in the oil until they take on a little
colour here and there. 
Trim the bases of the leeks and cut off the upper dark-green parts (freeze these for using in your next chicken stock).

Heat the olive oil in a large shallow pan and fry the leeks over a medium-high heat for 4-5 minutes, or until they take on a little colour here and there (see picture, left).

Add the garlic and fry for another minute, without letting it brown.

Pour in the wine - it will bubble furiously -  and add the thyme sprigs.

Now turn the heat right down, cover with a tilted lid and simmer for 25-35 minutes, or until the leeks are very - and I mean very - tender.

When almost all the liquid has evaporated, add
the cream.
Take off the lid. The liquid in the pan should have reduced to just a few tablespoons. If it has not, continue cooking the leeks, uncovered, until there are just a few tablespoons of liquid left in the pan.

Turn up the heat again, pour in the cream, and bubble briskly for a few minutes, or until the cream has reduced and thickened to the consistency of thin custard.

Stir in the Parmesan, turn the heat right down, and simmer, stirring occasionally, for a further minute, or until the cheese has melted.

Season to taste with salt and pepper. Go easy on the salt - the Parmesan is salty enough in its own right.

Remove the pan from the heat. Now add a spritz of lemon juice - just enough to give the sauce a little acidic lift.

Remove the garlic pieces and the thyme sprigs.

Serve hot, with an extra grating of Parmesan.

Serves 4 as a side dish. 


Print Friendly and PDFPrint Friendly

Friday, 31 October 2014

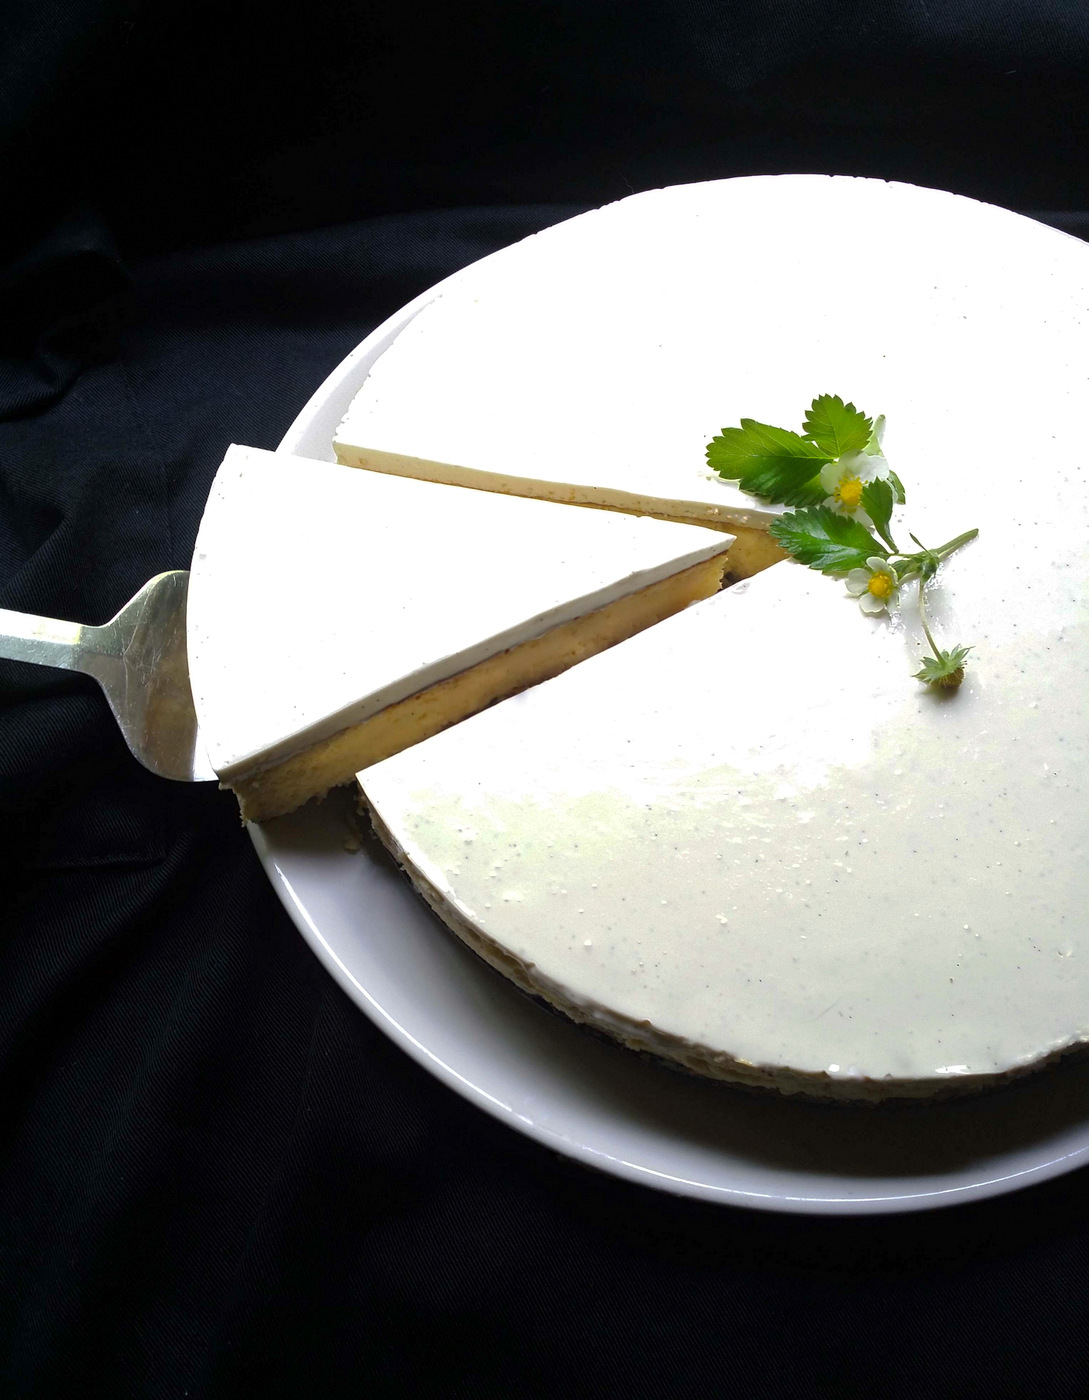
Luscious Low-Carb, Sugar-Free Vanilla Cheesecake with a Nut Crust

I have made many cheesecakes in my life and this one is, I think, the very best. The baked part is luscious, dense and creamy, with an almond-flavoured nut crust, while a top layer of barely jellied vanilla-scented sour cream adds a delicious final flourish. You won't believe, when you taste this, that it contains not a speck of sugar.

Luscious Low-Carb, Sugar-Free Vanilla Cheesecake with a Nut Crust. In this version I used
crème fraîche for the topping, which creates lovely swirls. 

Wine recommendation from Michael Olivier:  He says: "KWV Classic Collection Red Muscadel. We have the most underrated and under-priced sweet fortified wines in South Africa. This is pure Red Muscadel juice fortified with grape spirit and matured in large French oak barrels for a year. The most perfect wine for a rich and creamy cheesecake. You want something to cut through the cream and to make a statement. A wine that’s packed with flavour, and yet is not all about sweetness. The acidity offers contrast and the alcohol a little oomph. Do serve it chilled and in a wine glass, not a mean little liqueur glass. And pour it over ice if it takes your fancy."

It looks like: Gem bright like a ruby tinged amber. Pretty ‘cathedral windows’ appear on the side of the glass when you swirl the wine. 

It smells like: Berries and raisins and a whisper of oak. Begs you to go in and taste it. 

It tastes like: Phwoar! Big waves of fabulous fruit, raisins, red and black berries, a wash of the alcohol and oak, a little acid twist and an aftertaste that slowly rides off into the sunset.


For sweetening, this cheesecake relies on a little Xylitol, plus Canderel sweetener in powder form, which I find the least offensive of sugar substitutes. (I tried, while testing this recipe, using powdered stevia, but I found its bitterness impossible to disguise). The choice of sweetener is yours; please see my Cook's Notes at the end of this page. This recipe is ideal for anyone on a low-carb #LCHF regime, and suitable for diabetics.

Because this is an expensive cake, containing four tubs of cream cheese, I've provided detailed instructions so it turns out perfectly for you every time.

The most important thing is to use top-quality vanilla for the filling, and excellent almond extract for the nut base. I use this lovely vanilla paste from Yuppiechef, but if you can't find it, you can use good vanilla extract, plus the scraped-out seeds of a vanilla pod.

Also: don't over-cook the cheesecake, which will result in a somewhat dry and crumbly result. Baking the cheesecake nestled in crumpled foil, in a bain-marie, is crucial, as is judging when to take it out of the oven. Follow my instructions in the recipe closely, and you cannot go wrong.

I use low-fat Lancewood Cream Cheese for my cheesecakes, but you can choose any similar product.

In this version I used sour cream, which creates a perfectly smooth topping.


Luscious Low-Carb, Sugar-Free Vanilla Cheesecake with a Nut Crust

For the crust: 

¾ cup (180 ml) whole nuts of your choice - I use a mixture of almonds, walnuts, pecans and hazelnuts
1 cup (250 ml) almond flour
3 Tbsp (45 ml) melted butter
2 Tbsp (30 ml) Xylitol, or more, to taste
a few drops of good-quality almond extract

For the filling:

4 x 250 g tubs cream cheese, at room temperature (see Cook's Notes at the end)
1/3 cup (80 ml) Xylitol
2 tsp (10 ml) vanilla extract, or 1 Tbsp (15 ml) vanilla paste
1 Tbsp (15 ml) cornflour or flour
4 extra-large free-range eggs
3-5 paper 'sticks' Canderel sweetener, or a sweetener of your choice (see recipe)

For the topping:

1 Tbsp (15 ml) water
1 tsp (5 ml) gelatine
1 cup (250 ml) sour cream or crème fraîche
1 tsp (5 ml) vanilla extract, or 2 tsp (10 ml) vanilla paste
1 'stick' Canderel powder, or a sweetener of your choice (see recipe)

First prepare your tin. Generously butter the sides and bottom of a non-stick 24-cm springform cake tin, or similar. Cut a long strip of baking paper to roughly the same width as the height of the tin, and use it to line the sides of the tin.  Now butter the baking paper, or varnish it well with cooking spray.

Heat the oven to 180 ºC.

Put the nuts into a dry frying pan and toast them gently over a medium-low heat for a few minutes, tossing frequently and watching them closely. Chop into small bits, tip into a mixing bowl and add the almond flour, melted butter, Xylitol and almond extract.

Stir well, then press evenly onto the base of the tin.  My top tip for an even crust is to put a small drinking glass (such as a shot glass) on its side, rim pointing towards the edges of the tin, and roll it around in a circular fashion.
Press the crust into a springform pan lined with baking paper.
Bake the crust at 180 ºC for about 10 minutes, or until it's just beginning to turn golden at the edges. Watch it like a hawk, as it burns in an instant. Take the tin out of the oven and set aside to cool. Turn down the oven to 170 ºC.

In the meantime, make the filling. Put the softened cream cheese - see Cook's Notes, below - in a large mixing bowl. (I make this in a jiffy using my faithful Kenwood mixer, but if you don't have a similar gadget you will need to whisk this by hand, or use a rotary beater).

Add the Xylitol, vanilla and cornflour, and whisk till smooth and combined. Now add the eggs, one at a time, beating hard.  The mixture might take a while to come together, but if you work patiently, it will soon form a beautiful smooth cream. Now sweeten the mixture to taste, with a sweetener of your choice.  I find that four sticks of Canderel are enough.

Pour the cheesecake mixture over the crust, aiming at the centre so it spreads evenly to the edges.

Make a foil 'nest' for your cheesecake. This image
comes from my recipe for Cinnamon-Stencilled
Cheesecake
, where I did  not line the tin with
baking paper. 
Place the tin on two large squares of tin foil, then bring up & crumple the foil to create a 'nest' that will keep the water from seeping into the base.

Fill a large roasting pan to about the half-way mark with hot water, and place in the oven.  Slide your foil-wrapped baking tin into the water bath, and bake at 170 ºC for about an hour, or until the cheesecake is lightly freckled with brown, set at the edges, and has the slightest wobble in the middle.

Turn off the heat, open the oven door a crack and leave the cake to cool completely in the oven.

Refrigerate, in its tin, for 4 hours (or overnight), until very cold.

To make the topping, put the water in a teacup or similar small bowl and sprinkle the gelatine over it. Set aside for a minute or two to sponge.

Place the cup in a pot of simmering water (the water should come half-way up the sides) and stir occasionally as the gelatine melts. When the liquid is clear, set the cup aside to cool slightly.

Whisk the sour cream or crème fraîche in a bowl to loosen it, then whisk in the gelatine, vanilla paste (or extract) and sweetener. Pour the mixture over the top of the chilled cheesecake and smooth the top (see Cook's Notes if your cheesecake has shrunk away from the sides of the pan).  Cover and refrigerate for at least 4 hours.

Release the cheesecake from the tin by briefly pressing a hot cloth against the outside rim  (I do this by wetting a dishcloth, and microwaving it until very hot.)

To serve, cut into thin slices using a big knife dipped for 45 seconds in a jug of boiling water.

Makes 1 cheesecake; serves 8-10. 

Cook's Notes
  • It really doesn't matter which non-nutritive sweetener you use in any of the three layers of this cheesecake, because the sweetener will not affect their textures.  
  • The cream cheese should be soft, or you will find it difficult to beat to a smooth mixture. Leave the tubs on your counter for at least 6 hours, so they can come up to room temperature. If you're in a hurry, take the lids and foils off the tubs, arrange them in a circle on your microwave's turntable, and blast on high for 45 seconds at a time, until the cheese has softened.
  • If you find your cheesecake has shrunk away from the edges of the pan, leaving a gap into which the topping will run, here is what to do:  ease the cake out of its ring. Wrap a long strip of acetate (available from stationers) around the cake to form a close-fitting collar, and secure with sticky tape. Pour over the topping and refrigerate. The acetate will peel away easily once the topping has set. 

MORE OF MY CHEESECAKES:

Cinnamon-Stencilled Cheesecake

Hazelnut and Chocolate Cheesecake

Buttermilk Cheesecake with a Strawberry Topping


Print Friendly and PDFPrint Friendly

Saturday, 11 October 2014

Seared Beef or Venison ‘Carpaccio’ with a Thai-Style Dressing

Carpaccio is a brilliant choice of starter or snack if you're on a low-carb or diabetic regime. I'm always astonished when people tell me they don't fancy carpaccio, because to my mind the combination of rosy leaves of beef fillet, sharp salty Parmesan shavings, fruity olive oil and a spritz of lemon juice is the food of the gods. It may seem like heresy to tinker with this formula by using a zippy Asian dressing, but the result is sensational. Follow my measurements to the letter, though, because the punchy ingredients will overpower the delicate meat if they're not used with restraint.

Seared Gemsbok 'Carpaccio' with a Thai-Style Dressing.
Plate by David Walters, Master Potter of Franschhoek


Wine recommendation from Michael Oliver. He says: "Du Toitskloof Tunnel White."
 Go to the end of this page for more detail about this wine pairing.

It’s impossible to produce paper-thin slices of carpaccio at home unless you have an industrial slicing machine, or you freeze the fillet first. I don’t have the former and won’t ruin the texture of the meat by doing the latter, so my solution is to flatten the leaves of fillet with a rolling pin.

I usually make this with beef, but it's also excellent with good-quality venison fillets. In this picture, I used gemsbok from the Gardens Continental Butchery in Kloof Street, which was as tender as a baby's cheek.

Strew the top of the dish with any tiny leaves or micro-herbs you can find - I used the tiniest flat-leaf parsley leaves, from the heart of a plant that cheekily seeded itself in a crack between two paving stones in my garden.

The recipe contains a very small amount of sugar (essential to create the perfect hot-sour-sweet-salty balance that characterises Thai food) but if you're on a punishing no-carb regime, you can leave this out. Or add a whisper of your favourite sugar substitute.

This recipe - which serves 6-8 as a starter - comes from my book Scrumptious: Food for Family and Friends, and is reproduced here courtesy of Random House Struik.

If you like this recipe, try my low-carb Halloumi and Beef Carpaccio Salad with Crisp-Fried Capers, and Low-Carb Seared Tuna with a Burnt Tomato & Caper Dressing


Seared Beef or Venison ‘Carpaccio’ with  a Thai-Style Dressing

750 g fillet steak, or the equivalent weight of venison fillet
a little olive oil, for rubbing
4 tsp (20 ml) oil, for frying
small herb leaves, for garnish
white and black sesame seeds, for garnish

For the dressing:

2 limes (see Cook's Notes, below)
1 tsp (5 ml) white sugar
3-cm piece of lemon grass, bruised, peeled and finely sliced
1 Tbsp (15 ml) finely grated fresh ginger
1 clove garlic, peeled and finely chopped
1 small green chilli, deseeded and finely sliced
2 Tbsp (30 ml) sunflower oil
1 tsp (5 ml) finely grated palm sugar (or ordinary sugar)
1 tsp (5 ml) soy sauce
1 tsp (5 ml) fish sauce
2 drops sesame oil

Rub a little olive oil all over the fillet. Wrap the meat lengthways in a large sheet of clingfilm and twist the ends in opposite directions to create a tight Christmas-cracker shape. Tuck the ends underneath and chill for at least 2 hours, or until needed.

Heat the oil in a large pan and, when it is blazing hot (but not yet smoking), quickly brown the meat on all sides. This should take no more than 2-3 minutes - less, if you have a slim venison fillet - and the meat should remain quite raw inside. Place in the fridge to cool for 15 minutes.

Cut the fillet into slices 3-4 mm thick. Place the slices between two sheets of clingfilm and use a rolling pin to thin and gently stretch the meat to the desired thickness. Alternatively, you can use the back of the blade of a heavy knife to stretch and flatten the slices.

To make the dressing, cut the limes in half and dip the cut end in the white sugar. Place them, sugar-side down, in a hot non-stick frying pan. Cook until the cut surface is nicely browned and caramelised. (If you're on a sugar-free regime, leave out this step and squeeze the lime juice directly into the dressing.)

Cool the limes for a few minutes, then squeeze the warm juice into the jug attachment of a stick blender. Add all the remaining dressing ingredients and whizz at high speed until well combined. The dressing should be slightly coarse, with tiny 'bits'.  If you don't have a blender, very finely slice the ingredients and pound everything together with a mortar and pestle before whisking in the liquid dressing ingredients.

Spread a little dressing on the base of a platter or several smaller plates. Arrange the meat slices on top and drizzle with the remaining dressing. Strew over the herb leaves, sprinkle with sesame seeds and serve immediately.

Serves 8 as a starter.

Cook’s Notes

The fillet can be seared, sliced and refrigerated, and the dressing made, up to 3 hours in advance, but put them together just before you serve the dish or the dressing will ‘cook’ the fillet. If you can’t find fresh limes, use lemons instead.

Wine pairing by Michael Olivier

It looks like: Very refreshing in a dew dropped bottle. Pale golden straw in colour with some lime green flashes around the rim of the glass.
It smells like: Grapey, fresh, yellow apples and a lime squirt.
It tastes like: Crisp off-dry fruity.

This is a non-vintage wine.

Print Friendly and PDFPrint Friendly

Sunday, 31 August 2014

Low-Carb Mediterranean 'Pasta' Salad, but with Calamari

A bright mixture of tender calamari rings, olives, tomatoes, capers, feta, baby marrows and frizzled chorizo bits, in a punchy garlic & lemon dressing. I've invented this recipe to quell my longings for my favourite pasta salad, because after almost a year on a punishing low-carb regime, I still find myself battling cravings for carbohydrates.

Low-Carb Mediterranean 'Pasta' Salad, but with calamari
Wine recommendation from Michael Oliver. He says: "Môreson Mercator Premium Chardonnay 2014"
Go to the end of the page for more detail about this wine pairing.

I dream about buttery mashed potatoes, and would love to plunge my face into a bowl of fresh pasta ribbons cloaked in a creamy sauce. But, as a diabetic, I can't eat any of these things without my blood sugar having hysterics, so I've had to find smart ways of going without them.

Calamari, if it's of great quality, and cooked in a flash (see my recipe below), has a mouth-feel not unlike that of al dente pasta. I admit this is an expensive salad, because it's not worth making unless you can lay your hands on beautifully tender calamari tubes.

An easy, nourishing salad, but frying the calamari to tender
perfection takes care and attention. 
Please don't use calamari 'steaks' or strips, which are either unpleasantly spongy or toughen to leather in the pan, even if they've been 'tenderised' (that is, pierced multiple times by being rolled through, I imagine, some fearsome machine with many sharp blades).

The best little calamari tubes and tentacles come from Patagonia, and you can buy these frozen (and occasionally fresh) from good fishmongers and supermarkets.  If you can't find them, ask your fishmonger to order them for you - it really is well worth the wait.

This marinated salad improves upon standing, and keeps well in the fridge for up to 24 hours. However, please add the crisp chorizo bits to the salad just before you serve it.

Serve on a bed of crisp lettuce leaves or - if you're not on a low-carb regime - with plenty of crusty bread to soak up the juices.


If your calamari tubes are small and delicate, there's no need to slice them into rings. You can fry them whole, but please do so for 30-45 seconds longer than I've recommended below. I always laboriously slice them, though, because I like the pasta-like look of rings. The choice is yours.

Low-Carb Mediterranean Calamari Salad 

1 kg small, tender Patagonian calamari tubes and tentacles, thawed overnight in the fridge if you've bought them frozen
3 Tbsp (30 ml) olive oil, for frying
1 x 200 g chorizo sausage, cut into a fine dice
2 cloves garlic, peeled and finely grated or crushed
5 Tbsp (75 ml) dry white wine
10 baby marrows, very finely sliced
1 punnet  (about 350 g) ripe cherry tomatoes
4 Tbsp (60 ml) baby capers
16 black olives
16 green pimento-stuffed olives
a small bunch of chives, finely sliced
a small bunch of parsley, finely chopped
2 x feta cheese 'wheels' (about 140 g), crumbled
1 Tbsp (15 ml) dried chilli flakes
milled black pepper, to taste

For the dressing: 

1 fat clove garlic, peeled (or more, to taste)
a pinch of salt
finely grated zest of 1 small lemon
¼ cup (60 ml) fresh lemon juice
½ cup (125 ml) olive oil
2 tsp (10 ml) Kikkoman soy sauce
2 tsp (10 ml) Dijon mustard

First make the dressing. Using a mortar and pestle, pound together the garlic clove, salt and lemon zest to make a paste. Stir in the lemon juice and, when the salt has dissolved, whisk in the remaining dressing ingredients to form a smooth emulsion.  (Or, if you have a jug attachment for your stick blender, whizz everything together.)  Set aside.

Trim the tubes and cut them into rings, or leave them
whole if they are tiny.
Rinse the thawed calamari under a cold running tap for 1 minute, tip into a colander, shake well and drain for 5 minutes. Separate the tentacles from the tubes, and place on two different plates.

Prepare the calamari tubes as follows:  using a sharp knife, cut away about 2 mm of the ragged opening at the thicker end of each tube, at the same time dragging the knife blade to one side to pull out any membrane.  Trim away the pointy end of each tube. Now neatly slice the tubes into 5-mm rings, and set aside.

Dry the tentacles and rings by dabbing them firmly with plenty of kitchen paper.

Heat 1 Tbsp (15 ml) of the olive oil over a high heat in a large shallow pan, until the oil is shimmering. Fry the tentacles first, in three batches, for about 90 seconds each, or until they are slightly stiffened and golden, but still tender. Remove from the pan and set aside in a large mixing bowl.

Add the diced chorizo to the pan, and fry over a high heat until the pieces are toasty and just crisp. Don't overcook them!  Remove from the pan, drain on a sheet of kitchen paper and set aside.

Fry the calamari rings (or tubes; please see my note above) in three or four batches for 45-90 seconds, stirring often. It's crucial not to overcook the rings!  If the pan seems a little dry, add more olive oil. Remove the rings from the pan and set aside in the same bowl as the tentacles.

Turn down the heat a little. To the frying pan, add the garlic and fry gently for about 45 seconds, just to take the sting off, and without allowing the garlic to brown.  Turn up the heat again and deglaze the pan with the white wine, stirring and scraping to dislodge any golden brown sticky bits.   Bubble briskly for 1 minute, or until the liquid in the pan has reduced by half.

Remove the pan from the heat and let it cool for two minutes. Now whisk in all the dressing ingredients, tilting the pan to one side if necessary.   Pour this mixture over over the calamari rings and tentacles.

Add all the remaining salad ingredients and toss so everything is well coated.

Tip the salad onto a platter and top with the crisped chorizo.

Serves 6 as a main course (alongside a big bowl of green salad), and 8 as a starter. 


Wine pairing by Michael Olivier: 

Môreson Mercator Premium Chardonnay 2014


It looks like: Pale gold straw in the bottle.  In the glass there are some lime green flashes around the edges.

It smells like: Soft dried apricots, crème brulée, hazelnuts and vanilla

It tastes like: Rich windfall citrus, lime squirt acidity.  Undertow of oak and vanilla.  Full broad palate and long aftertaste.

Print Friendly and PDFPrint Friendly

Thursday, 3 July 2014

Low-Carb Chicken Breasts in a Butter, Basil & Tomato Cream Sauce

This delicate dish, with its tiny sequins of butter, is quick to make, but it does involve some faffery in the tomato-peeling department. It's worth the effort, though - the dabs of fresh tomato and basil shreds add freshness to the sauce, which is scandalously creamy and buttery, containing as it does those two luscious ingredients so allowed on a low-carb #LCHF or #Banting diet.  This is a dish of utmost simplicity, and I hope you enjoy it.

Low-Carb Chicken Breasts in a Butter, Basil & Tomato Cream Sauce

Wine recommendation from Michael Oliver: Môreson Dr Reason Why Unwooded
Chardonnay 2013 - Franschhoek. Go to the end of the page for more detail about this pairing.

The first time I made this, I found the sauce lacked depth, as is the case with any dish made in a hurry. The next time I tried it, I added a little concentrated chicken stock, which made all the difference.  It's frowned upon in foodster circles to use shop stock, but I have no patience with this attitude.  I don't have time, when I'm making my family's evening meal, to fiddle around making stock, or thawing and reducing the many tubs of home-made stock ossifying in my freezer.  Two important points: one, use a good quality concentrated stock; two, these can be quite salty, so don't season the sauce until you've tasted it.

Please follow my instructions to the letter in this recipe so your chicken breasts are beautifully tender, without a hint of rubberiness.

As this sauce is subtle, I suggest you serve it with meek-tasting veggies, such as courgettes or baby green beans.  Don't pair it with the ubiquitous caulirice or cauliflower mash, which will overpower the understated tomato and basil flavours. If you're not on a low-carb regime, I'd recommend serving this with creamy mashed potatoes.

If you'd like to add a little smokiness to this dish, crisp up some finely chopped bacon in a hot pan before you fry the chicken breasts.  Set aside, then stir the bits in when you add the cream.

The pulp and seeds of tomato are packed with umami, so don't throw these away when you prepare the tomatoes - again, see my instructions below.

This sauce contains no starchy agents, relying for thickening on fast reduction.  So it's suitable for diabetics, low-carbers and everyone else reducing carbohydrates in their diets.


Low-Carb Chicken Breasts in a Butter, Basil & Tomato Cream Sauce

8 free-range, deboned, skinless chicken breasts
salt and milled black pepper
5 large red juicy tomatoes
boiling water, for skinning the tomatoes
3 Tbsp (45 ml) salted butter
2 Tbsp (30 ml) olive oil
1 small clove garlic, peeled and finely crushed or grated
1½ tsp (7.5 ml) good quality concentrated chicken stock, such as a Nomu Fond or Knorr Chicken Stock Pot
1 cup (250 ml) cream
10 big fresh basil leaves
a squeeze of fresh lemon juice

Trim any globules of fat from the chicken breasts, place on a board and season lightly with salt and pepper.

Put the tomatoes into a big bowl and cover them with boiling water. Set aside for 3-4 minutes, or until you see their skins begin to wrinkle and split.

Very gently cook the chicken breasts on one side only in their buttery
 bath. I have turned over two breasts in this picture to show you how
 they should look when they're ready to be taken out of the pan.
In the meantime, heat the butter and olive oil over a high heat in a large shallow pan big enough to fit all the chicken breasts in a single layer.

When the butter stops foaming, add the breasts, smooth side down, turn down the heat to medium-low and gently fry them in their buttery bath for 3-4 minutes, or until their undersides are a light golden colour, but the breasts are still completely raw on top.  Don't allow them to brown or burn - if the butter is anywhere near darkening, turn the heat right down.  When they look as if they've cooked halfway through, remove from the pan and pile them onto a plate. Set aside.

Pull the wrinkly skin off the tomatoes and discard. Carve out the dots on the stalk ends and slice each one in half.  Place a bowl on your countertop and, holding each tomato half above the bowl, remove the seeds and pulp, letting these drop into the bowl. It's easiest to do this with your fingers.

Slice the outer parts of the tomatoes into a fine dice, and place these little pieces in a sieve set over the bowl containing the tomato pulp. Drain for a few minutes, then set aside in a bowl (you'll add these bits to the sauce at the end).

Gently reheat the oil/butter mixture in the pan and add the crushed garlic. Cook over a low heat for 30-60 seconds, without letting the garlic brown.  Now hold your sieve over the pot, and into it tip the contents of the bowl containing the tomato pulp and juices.  Press down hard with the back of a soup ladle - or your fist - to extract every bit of juice.  Discard the remaining pulp.

Add the concentrated chicken stock and bring the butter/tomato juice mixture to a brisk simmer. Cook for 2 minutes, then remove the pan from the heat and let it cool for a minute.  Now stir in the cream, a splash at a time.  It's important to do this slowly - and off the heat - to prevent your sauce from curdling.

Simmer the browned chicken breasts in the creamy
sauce very gently, until just cooked through.
Return the pan to the heat and bubble over a medium heat for 3-4 minutes, stirring often. The sauce will soon thicken slightly, with the bubbles in the centre getting bigger and lazier. Return the chicken pieces to the pan, uncooked side down, along with the golden juices that have collected beneath them.

Simmer, uncovered, for about 4 minutes, or until the chicken pieces are just cooked through, but still very tender and succulent.

While the chicken is cooking, cut the basil leaves into fine shreds.  It's easiest to do this by stacking four or five leaves together, rolling them up into a tight 'cigar', then slicing them very finely crossways.

When the chicken is done, stir in the reserved diced tomato flesh and the shredded basil.

Add a spritz of lemon juice - just enough to give the sauce a slight pleasant acidity - and stir. Serve immediately with steamed veggies.

Serves 8, as a main course along with vegetables. 

Wine pairing by Michael Olivier: 

Môreson Dr Reason Why Unwooded Chardonnay 2013 - Franschhoek

It looks like: Beautiful gem-like citrine in colour in the glass.

It smells like: Tropical fruit, windfall citrus.

It tastes like: Crisp and fresh like a Granny Smith Apple.  Creamy desiccated pineapple, fresh sliced pear and the texture of ripe winter melon.  A wash of lime on the long aftertaste.


Print Friendly and PDFPrint Friendly

Sunday, 15 June 2014

Low-Carb Double Cauliflower Cheese

I love cheesy cauliflower cloaked in bubbling white sauce, but not a morsel has passed my lips since I started my low-carb regime last year. Then it occurred to me  - why not make a 'white sauce' from puréed cauliflower? I did, and that's why I've called this new recipe Double Cauliflower Cheese.  It's also doubly cheesy, with a topping of both Cheddar and Parmesan.  I've added some sympathetic flavours - mustard, lemon, nutmeg and white pepper - to the sauce to tone down the caulifloweriness, and I'm pleased with the result. This is gluten-free, diabetic-friendly, and well suited to anyone on a Low-Carb High Fat (#LCHF) regime.

Low-Carb Double-Cauliflower Cheese.

Wine recommendation from Michael Oliver: Boland Cellar Five Climates
Chenin Blanc 2014. Go to the end of the page for more detail about this pairing.

This isn't difficult to make, but to achieve a silken purée you will need a fairly powerful food processor fitted with a metal blade. If you don't have one, you can use a liquidiser or stick blender and a lot of patience. Don't add the cream to the sauce too early if you're going to be whizzing it for a long time, as it may thicken or even turn to buttery granules. If you find your sauce is a little grainy despite your patient blitzing, push it through a sieve before you pour it over the cauliflower florets.

This is good with a squirt of tomato sauce, my family reckons, but I like it flecked with Tabasco. If you want to add real luxury to the dish, throw in some crisped bacon bits when you assemble the dish, or use cubed, fried gammon, as I've done in this recipe: Luxurious Broccoli 'n Cheese with Gammon, and a Parmesan Crust.

And if you're not on a low-carb regime, try my Luxurious Cauliflower Cheese with Bacon and Leeks, which has an indulgent topping of buttered breadcrumbs.

This recipe will make slightly more sauce than you need, but you can cover the remainder and save it for dolloping over steamed veggies later in the week.  For extra flavour, and if you have time, infuse the hot milk ahead of time with a bay leaf, a slice of onion and a clove.

Low-Carb Double-Cauliflower Cheese

2 large heads cauliflower, or 4 small ones
5 Tbsp (75 ml) water
salt
½ cup (125 ml) hot milk, plus extra for thinning
4 Tbsp (60 ml) cream
2 Tbsp (30 ml) butter
2½ cups (about 150 g) grated Cheddar
2 tsp (10 ml) Dijon mustard
a pinch or more of freshly grated nutmeg, to taste
a pinch of white pepper, to taste
a squeeze of lemon juice

For the topping: 
1 cup (250 ml, fairly loosely packed) grated Cheddar
5 Tbsp (75 ml) grated Parmesan or Grana Padano
sweet paprika or cayenne pepper, for dusting

Heat the oven to 180 ºC, fan on.

First make the sauce. Remove the green leaves from one of the cauliflowers (or two, if you're using small caulis).  Trim off the stalk and cut the cauliflower lengthways into quarters. Now use a sharp knife to cut away the core, and break up the florets.

Heat a large pot over a medium-high flame, add the water, the cauli florets and a pinch of salt. Cover and let them  steam for about 15 minutes, or until the stalks are very tender.  Check the pan now and again, adding more water if the pan starts to dry out.  If you'd like a nutty taste, let the water dry up so the florets take on a little golden colour, but watch them carefully so they don't scorch.

Whizz the cauliflower with the butter, cream
and milk to a fine purée. 
Drain the cauliflower in a colander for 2 minutes then tip it, piping hot, into a food processor (or return it to the pan if you're using a stick blender).  Add the milk, cream and butter and whizz to a fine, soft purée.

Now, while the mixture is still hot, add the grated Cheddar and process until the cheese has melted into the sauce.

Add the mustard, nutmeg and white pepper and mix well. Now thin the sauce with more hot milk so it's about the consistency of a thickish white sauce.

Season to taste with salt. Add a spritz or two of lemon juice - just enough to give the sauce a little sparkle.  Set aside.

Cut up and steam the remaining cauliflower, as described above, but cook it until it is just tender when pierced with the tip of a sharp knife. (I do this in the microwave, in a big bowl tightly covered with clingfilm - it takes about 7 minutes, on high.)  Drain well in a colander for three minutes, then tip the florets into a large buttered oven-proof dish.

Top the cauliflower cheese with grated Cheddar, Parmesan
and a dusting of sweet paprika or cayenne pepper.
Pour over the reserved sauce - just enough generously to coat the florets - and sprinkle with the Cheddar, Parmesan and a dusting of sweet paprika (or cayenne pepper if you fancy that).

Bake in a hot oven for 20-25 minutes, until the cheese is bubbling and golden.  Serve immediately with a crisp green salad.

Serves 4 hungry people, or 6 as a side dish.


Wine pairing by Michael Olivier: 

It looks like: Pale gold straw in the glass. Gem bright.

It smells like: Classic Chenin. Tropical fruits like guava. Honey. White flowers.

It tastes like: Excellent mouthful of wine with great breadth and depth of flavour. The guava is in full presence, as are slice ripe pear and red apple. While dry, there is a whisper of honey. Long aftertaste, clean, crisp and fresh.


Print Friendly and PDFPrint Friendly

Saturday, 14 June 2014

Low-Carb Beef Shin, Tomato & Olive Stew with a Naartjie Gremolata

It's the gremolata that makes this stew special: a heavenly scent of citrus, parsley and garlic billows up as your face meets the plate. The starring ingredient here is freshly zested naartjie [clementine] peel - a glorious South African flavour that brings such warmth and colour to winter kitchens.

Beef Shin, Tomato & Olive Stew with Naartjie, Lemon, Garlic & Parsley Gremolata.
 Bowl by my uncle David Walters, Master Potter of Franschhoek.

Wine recommendation from Michael Oliver: Simonsig Pinotage 2012.  Go to the
end of the  page for more detail about this pairing.

I'm besotted with naartjies and use them with abandon in many dishes, even more so now that I've discovered that they have no impact on my blood sugar. They're one of the only fruits I, as a diabetic, can eat with no fear.  At the end of this post, you'll find links to some of my favourite naartjie recipes.

This nourishing beef & olive stew is easy to make. 

This heartwarming, deep-flavoured stew is easy to make, but it involves several steps, and takes time, as all good stews do.  It will take you about 45 minutes to get the stew on the go - so put on some music and relax into the cooking! After that you can leave the pot on the stove over a very low heat and forget about it for two or three hours.

Please use well-trimmed, dark-red beef shin in this recipe, preferably with the bone in.  Shin is much leaner than other similar stewing cuts, and it dissolves beautifully into melt-in-the-mouth pieces.  You can use boneless shin if you don't fancy finding those fat ivory bangles in your stew, but the bone marrow does add lovely unctuousness to this dish, and the leftovers make good treats for jealous dogs.

A tip: avoid sliced shin that looks as if it has bone dust sprinkled over the meat.  If your butcher can't slice up a shin without splintering the bone, his saw isn't sharp enough, and you must find a better supplier.  The shins I used here come from Woolies - they're on special now.

If anyone in your family doesn't like olives, set aside a portion before you add the olives.

This recipe contains four tablespoons of flour, so it isn't perfect if you're on a punishing low-carb diet. However, this is a piffling amount of carbohydrates split between six to eight people, so I think I can confidently recommend this for anyone on a low-carb or diabetic regime.

Some of the ingredients for this dish: carrots, leeks, beef shin, bacon, garlic,
red wine, chopped tinned tomatoes, olives and naartjie peel. 

Here's an Instagram quick video of my making this dish: http://instagram.com/p/pONolmw4xc/


Beef Shin, Tomato & Olive Stew with Naartjie Gremolata

8 (2 kg) bone-in beef shin slices
4 Tbps (60 ml) white flour
salt and milled black pepper
4 rashers streaky bacon, chopped
3 Tbps (45 ml) olive oil, for frying
2 large onions
500 g medium carrots
500 g small leeks
2 bay leaves
a large sprig of fresh thyme
4 cloves garlic, peeled
5 Tbsp (75 ml) tomato paste
1 cup (250 ml) dry red wine
2 x 410 g tins tomato-and-onion mix, or chopped tomatoes
1 thumb-sized strip naartjie [clementine] or orange peel
24 Calamata olives, pitted

For the gremolata:
the finely zested rind of 2 small naartjies
the finely zested rind of a lemon or lime
5 Tbsp (75  ml) finely chopped fresh curly parsley
2 small cloves garlic, peeled and finely grated

Trim any small pads of fat off the shin slices. Snip the membrane surrounding the slices here and there so the meat can collapse easily in the pan.  Put the flour on a plate, season generously with salt and pepper and mix well.

Heat a large heavy-based lidded pot over a high flame and fry the bacon bits dry until golden and just crisp. Remove with a slotted spoon and set aside.

Press the shin slices - three at a time - into the seasoned flour, and shake to remove the excess. Add the olive oil to the pan and when it is very hot and shimmering - but not yet smoking - add the first three shin slices. Fry for 3 minutes, until nicely golden and caramelised, then turn them over to brown the undersides.  Don't allow the pan to get too fiercely hot, or your stew will have black spots.  Remove the slices from the pan and set aside on a plate. Repeat with the remaining slices.

In the meantime, get the vegetables ready.  Peel the onions and cut them into thick slices, crossways. Do the same with the carrots, cutting them into 2-cm thick slices. Trim the bases of the leeks, remove the green upper parts and slice the white and pale green sections crossways into 4-cm lengths.

When you've finished browning the shin, add the onions, carrots, leeks, bay leaves and thyme sprig to the pan, turn down the heat and sauté for 4-5 minutes, or until the onions are beginning to turn golden.

Gently sauté the veggies in the bacon fat & olive oil.
Finely grate or chop the garlic, and add it into the vegetables along with the tomato paste.  Cook, stirring often, for a minute, without allowing the garlic to burn. Pour in the red wine and deglaze the pan, stirring and scraping to dislodge any golden stickiness.

Turn up the heat and add the tinned tomatoes and the reserved bacon and beef shin. Press the shin pieces deep into the liquid and bring to a fast boil. Season to taste with salt and black pepper.

Now turn down the heat to its lowest setting. Cover and bubble very gently for 2½ to 3 hours, or until the meat is so soft you can pull it apart with a fork.  Thirty minutes before the end of the cooking time, add the olives.

Check the stew now and then to make sure it isn't sticking on the bottom.  You shouldn't need to add extra liquid, but if the sauce seems too thick, thin it down with a little water.

Just before you serve the stew,  mix together, in a small bowl, the grated naartjie and lemon zest, the chopped parsley and the freshly grated garlic.  Turn off the heat under the stew, and sprinkle with the gremolata.  Alternatively, you can pass the gremolata around the table and let your guests help themselves. [Postscript 15 June 2014: My daughter says not to put too much gremolata on each portion as it can overpower the taste of the stew.]

Serve with hunks of warm crusty bread, or rice, or boiled baby potatoes, or - best of all - creamy mash.

Serves 8 as a main course. 

Wine pairing by Michael Olivier: 

It looks like: ‘Deep Persian carpet red’, say the estate notes. At the edge of the glass the wine shows ruby purple, an indication of its youth.

It smells like: Sweet red berries and cinnamon spice.

It tastes like: Again the red berries. Soft tannins. Sappy with fruit cake spices on the long aftertaste.

More naartjie recipes: 

Slow-Cooked Moroccan-Spiced Beef and Apricot Stew with Naartjie Couscous

Dried Naartjie Peel, and a South African Milk Tart to go under it

Naartjie Mousse in Dark-Chocolate Cups, with Rosemary Flowers

Caramel-Dipped Naartjies on Kebab Sticks

Couscous, Feta & Pea Salad with a Naartjie Dressing


Print Friendly and PDFPrint Friendly

Sunday, 8 June 2014

Low-Carb Griddled Baby Butternut with Chorizo, Feta & a Lemon Dressing

This beautiful black plate is the work of my uncle, master potter
David Walters of Franschhoek. The shiny black slick of glaze
 across the plate is designed to stop your fork from grating.
I seldom see these beautiful baby vegetables in the shops, and when I do spy them, I grab a few punnets and race home to cook them. They're similar to courgettes [zucchini] but have a nuttier, sweeter flavour, a denser texture and a beautiful pale-orange colour.

In this easy tapas-style dish, I've griddled them until just tender, and combined them with fried chorizo, crumbled feta and a garlicky lemon vinaigrette, with toasted pumpkin seeds for crunch.  If you can't find baby butternuts, use courgettes, sliced into thick leaves.

I haven't been able to figure out the carbohydrate content of these veggies, but I had a great big bowl of them for lunch, and they didn't cause any spike in my blood sugar, so I can assume their carbohydrate content and glycaemic load is negligible.  This recipe is suitable for anyone on a low-carb, #LCHF or diabetic regime.

The chorizo sausage I used in for this dish wasn't the best in its class, but was all that was available at my local supermarket. The gorgeous smoky note it adds to this dish makes all the difference, and I'm looking forward to trying this with an excellent Italian cured sausage, or with crisp-fried bacon bits.

Wine recommendation from Michael Oliver: La Bri Merlot 2012. 

Low-Carb Griddled Baby Butternut with Chorizo, Feta and a Lemon Dressing

600 g baby butternut (or courgettes, if you can't find mini butternuts)
2 Tbsp (30 ml) olive oil, for frying
1 spicy chorizo sausage, sliced
a squeeze of fresh lemon juice
1 'wheel' (about 70 g) feta cheese
1/3 cup (80 ml) pumpkin seeds [optional]
salt and milled black pepper to taste
baby salad leaves, to serve

For the dressing:
1 clove garlic, peeled (or more, to taste)
a pinch of flaky sea salt
½ tsp (2.5 ml) prepared Dijon mustard, or a big pinch of Hot English Dry Mustard powder
the juice of a small lemon
4 Tbsp (60 ml) extra-virgin olive oil

Rinse the baby butternuts (or courgettes) under cold running water to remove any grit.  Cut lengthways into slices about 7 mm thick.

Add the chorizo slices towards the
end of the cooking time so their smoky
flavour permeates the veggies. 
Heat a griddle pan, or a large flat pan, over a very high heat. Add the olive oil and - when it is shimmering -  arrange the baby butternut slices in a single layer on the pan.  Cook over a medium-high heat for about 5 minutes on each side (three if you're using courgettes) or until toasty and golden on the outside, and just tender on the inside.  Watch them closely, adjusting the heat if necessary because they scorch quickly.

Two minutes before the veggies are ready, add the sliced chorizo, and fry until hot and crisp. Now add a generous spritz of lemon juice. As soon as the juice has evaporated, remove the pan from the heat, set aside and keep warm. Season to taste with salt and milled black pepper.

While the butternut slices are cooking, make the dressing. Put the garlic and salt into a mortar and pound to a paste.  Add the mustard and lemon juice and stir until the salt has dissolved.

Now whisk in the olive oil to form a smooth emulsion.  If the dressing seems a bit sharp, add a pinch of white sugar. Set aside.

Place the pumpkin seeds in a dry frying pan and toast over a medium heat for 1-2 minutes, or until they are hot and crunchy.

To serve, lightly blot the baby-butternut and chorizo slices with kitchen paper to remove any grease.  Arrange them on a platter, sprinkle over the dressing - just enough to coat the slices -  and scatter with the toasted pumpkin seeds, baby salad leaves and crumbled feta.

Serve hot or warm.

Serves 4 as a starter. 


Print Friendly and PDFPrint Friendly

Thursday, 5 June 2014

Spicy Low-Carb Roast Chicken Soup

Although the picture below shows a few dabs of fresh red chilli, this is delicately spiced and mild enough to offer to kids. I've used restraint because I don't want the spices to overpower the deep delicious chickeny flavours of this soup. The chilli is there to give the soup a finishing kick, but entirely optional.  I often use ready-roasted rotisseried chickens in soups these days because their flesh and skin have a gorgeous melting texture and a salty succulence that's difficult to reproduce in a domestic oven, and they're a world apart from the insipid flesh you'll pull off a chicken that's been simmered in a home-made stock.

Spicy Low-Carb Roast Chicken Soup

It may seem a hassle to make stock using the bones and skin of your supermarket chicken, but this process takes just 30 minutes, and adds glorious depth of flavour. The veggies are seethed at the same time, in a separate pot; after that you'll need just 10 minutes to put the soup together. And dinner's on the table!

If you don't have all the ingredients for the stock, throw in what you do have in your fridge - half an onion, a stick of celery, and so on.

I've used vegetables to thicken this soup (leeks, cauliflower plus a few carrots for colour) and it contains not a grain of starch, making it suitable for anyone on a low-carb or diabetic regime.

I bought the chicken for this soup from Checkers - hot out of a huge industrial rotisserie - and it was plump, juicy and packed with flavour.  My favourite rotisseried chickens, however, come from Woolies.

Spicy Low-Carb Roast Chicken Soup

1 ready-roasted/rotisseried chicken (it helps if it's still warm, as this makes it easier to strip away the flesh)
6 medium leeks (500 g, after trimming)
4 large carrots, peeled
2½ litres boiling water
2 cloves
2 bay leaves
a few parsley stalks
freshly milled black pepper
2 Tbsp (30 ml) olive oil or butter
3 cloves garlic, peeled and crushed
1 small head of cauliflower (500 g), trimmed and broken into florets
4 Tbsp (60 ml) cream
½ tsp (2.5 ml) turmeric
½ tsp (2.5 ml) cumin
½ tsp (2.5 ml) mild curry powder
½ tsp (2.5 ml) chilli powder
a pinch of freshly grated nutmeg
salt

To garnish:
finely chopped or sliced fresh red chillies [optional]
fresh parsley or coriander

Pull the rotisseried chicken into big flakes, leaving
some golden skin behind if you fancy it.
Tear all the flesh away from the chicken, pull it into large shreds, place in a bowl and cover.  (If you like chicken skin, cut away the breasts whole and slice diagonally into strips so each piece has a covering of golden skin). Put all the skin and bones into a large pot. Scrape out any golden-brown jelly or juices that have collected in the chicken's packet and add to the pot.  Turn on the heat and gently fry the bones and skin for a minute or two.

Prepare the leeks by trimming off the dark-green upper parts and making a long horizontal slit three-quarters of the way through their lengths.  Fan out the ‘pages’ of the leeks under a cold running tap and rinse away any grit hiding in the outer leaves. Set aside.

Add one leek and one carrot, each cut into thirds, to the pot, and pour in 2½ litres boiling water.  Now add the cloves, bay leaves and parsley stalks and season generously with milled black pepper.

Bring the stock to a fast boil, skimming off any foam as it rises, cover with a tilted lid and cook over a medium heat for 30 minutes, or until the carrot pieces are very soft.  Turn off the heat and let it sit for five minutes.  Using a large spoon, lift away and discard any fat.

While your stock is boiling, gentle sauté the leeks and carrots
in a separate pan.
While the stock is boiling, slice the remaining leeks and carrots.  Heat the oil or butter in a separate large pot (I use my wok) and gently sauté the veggies for about 4 minutes, or until the leeks are just beginning to soften. Add the garlic and cook for another minute. Now place the cauliflower florets on top of the leeks and carrots, and add 4 ladles of boiling stock from the other pot.  (It's okay if the cauliflower is poking up above the water line - the steam inside the pot will cook it.)  Cover with a lid and simmer at a brisk bubble for 15 minutes, or until the carrots are very soft.

Remove the lid from the pot containing the veggies and place a colander on top.  Pour the hot stock through the colander and press down on the bones with the back of a spoon.  Retrieve the carrot and leek pieces from the colander and add them to the soup.

If your second pot isn't very big, you can pour everything back into the rinsed-out pot in which you made the stock.

Blitz to a fine purée using a stick blender or liquidiser.  If the soup is too thick, thin it to the desired consistency with hot water.  Season to taste with salt and pepper.

Stir in the cream, turmeric, cumin, curry powder, chilli powder and nutmeg,  and simmer for 5 minutes. Now add the chicken strips - reserving some for the garnish - and cook over a gentle heat for another few minutes, or until the chicken has heated through.

Serve with finely chopped red chilli, plenty of milled black pepper and a scattering of parsley or coriander.

Serves 6. 


Print Friendly and PDFPrint Friendly