Friday 31 October 2014

Luscious Low-Carb, Sugar-Free Vanilla Cheesecake with a Nut Crust

I have made many cheesecakes in my life and this one is, I think, the very best. The baked part is luscious, dense and creamy, with an almond-flavoured nut crust, while a top layer of barely jellied vanilla-scented sour cream adds a delicious final flourish. You won't believe, when you taste this, that it contains not a speck of sugar.

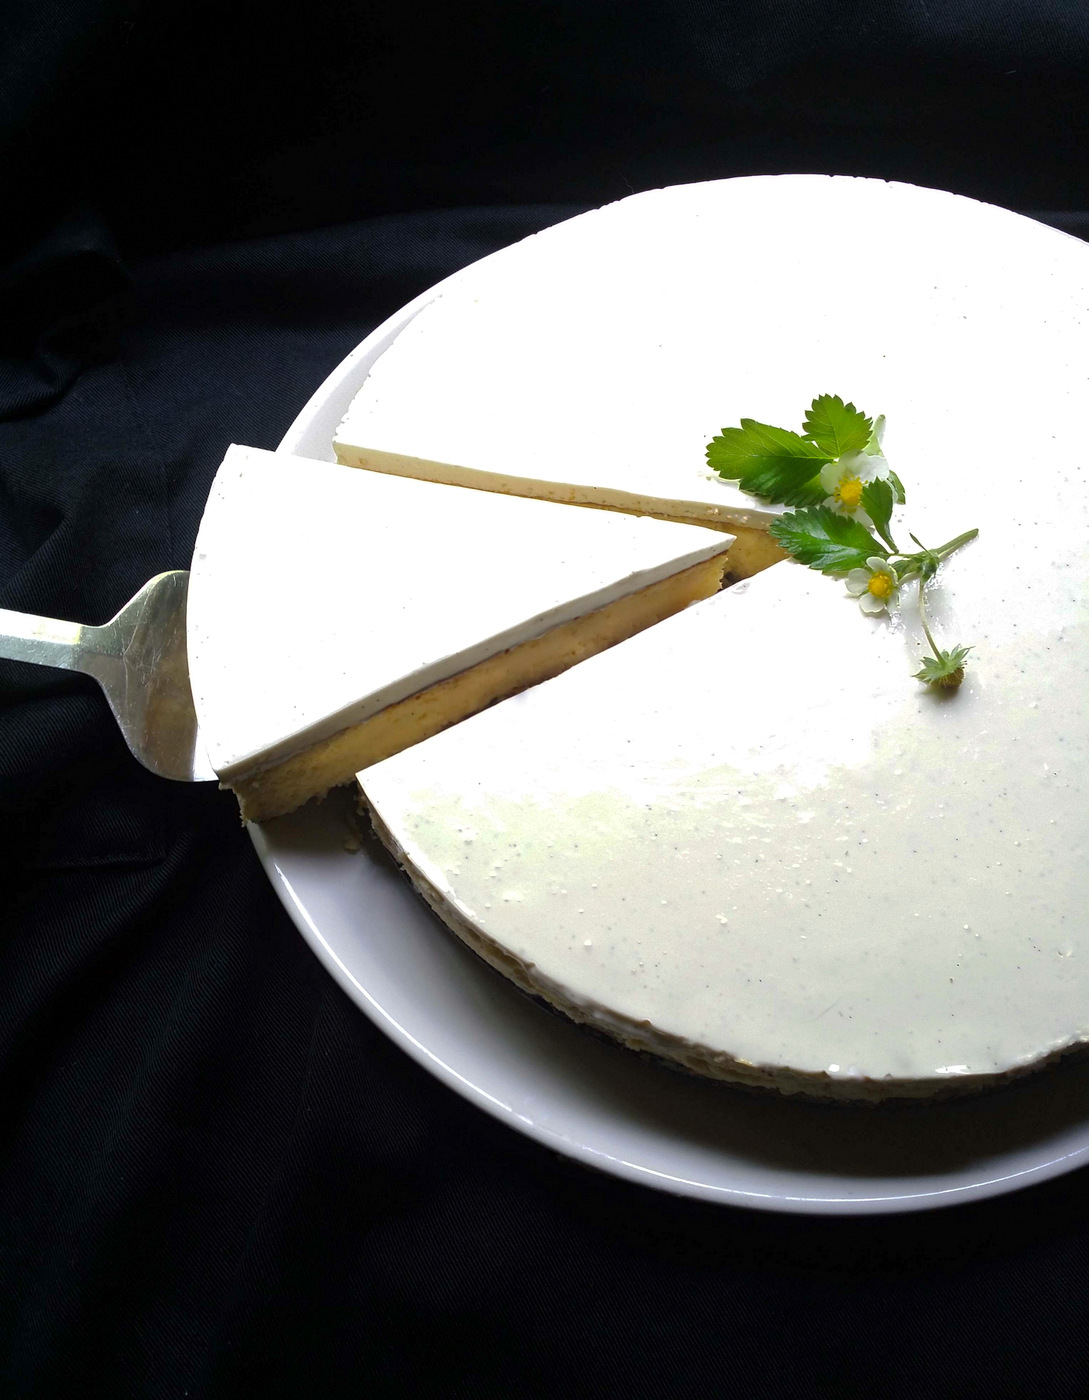
Luscious Low-Carb, Sugar-Free Vanilla Cheesecake with a Nut Crust. In this version I used
crème fraîche for the topping, which creates lovely swirls. 

Wine recommendation from Michael Olivier:  He says: "KWV Classic Collection Red Muscadel. We have the most underrated and under-priced sweet fortified wines in South Africa. This is pure Red Muscadel juice fortified with grape spirit and matured in large French oak barrels for a year. The most perfect wine for a rich and creamy cheesecake. You want something to cut through the cream and to make a statement. A wine that’s packed with flavour, and yet is not all about sweetness. The acidity offers contrast and the alcohol a little oomph. Do serve it chilled and in a wine glass, not a mean little liqueur glass. And pour it over ice if it takes your fancy."

It looks like: Gem bright like a ruby tinged amber. Pretty ‘cathedral windows’ appear on the side of the glass when you swirl the wine. 

It smells like: Berries and raisins and a whisper of oak. Begs you to go in and taste it. 

It tastes like: Phwoar! Big waves of fabulous fruit, raisins, red and black berries, a wash of the alcohol and oak, a little acid twist and an aftertaste that slowly rides off into the sunset.


For sweetening, this cheesecake relies on a little Xylitol, plus Canderel sweetener in powder form, which I find the least offensive of sugar substitutes. (I tried, while testing this recipe, using powdered stevia, but I found its bitterness impossible to disguise). The choice of sweetener is yours; please see my Cook's Notes at the end of this page. This recipe is ideal for anyone on a low-carb #LCHF regime, and suitable for diabetics.

Because this is an expensive cake, containing four tubs of cream cheese, I've provided detailed instructions so it turns out perfectly for you every time.

The most important thing is to use top-quality vanilla for the filling, and excellent almond extract for the nut base. I use this lovely vanilla paste from Yuppiechef, but if you can't find it, you can use good vanilla extract, plus the scraped-out seeds of a vanilla pod.

Also: don't over-cook the cheesecake, which will result in a somewhat dry and crumbly result. Baking the cheesecake nestled in crumpled foil, in a bain-marie, is crucial, as is judging when to take it out of the oven. Follow my instructions in the recipe closely, and you cannot go wrong.

I use low-fat Lancewood Cream Cheese for my cheesecakes, but you can choose any similar product.

In this version I used sour cream, which creates a perfectly smooth topping.


Luscious Low-Carb, Sugar-Free Vanilla Cheesecake with a Nut Crust

For the crust: 

¾ cup (180 ml) whole nuts of your choice - I use a mixture of almonds, walnuts, pecans and hazelnuts
1 cup (250 ml) almond flour
3 Tbsp (45 ml) melted butter
2 Tbsp (30 ml) Xylitol, or more, to taste
a few drops of good-quality almond extract

For the filling:

4 x 250 g tubs cream cheese, at room temperature (see Cook's Notes at the end)
1/3 cup (80 ml) Xylitol
2 tsp (10 ml) vanilla extract, or 1 Tbsp (15 ml) vanilla paste
1 Tbsp (15 ml) cornflour or flour
4 extra-large free-range eggs
3-5 paper 'sticks' Canderel sweetener, or a sweetener of your choice (see recipe)

For the topping:

1 Tbsp (15 ml) water
1 tsp (5 ml) gelatine
1 cup (250 ml) sour cream or crème fraîche
1 tsp (5 ml) vanilla extract, or 2 tsp (10 ml) vanilla paste
1 'stick' Canderel powder, or a sweetener of your choice (see recipe)

First prepare your tin. Generously butter the sides and bottom of a non-stick 24-cm springform cake tin, or similar. Cut a long strip of baking paper to roughly the same width as the height of the tin, and use it to line the sides of the tin.  Now butter the baking paper, or varnish it well with cooking spray.

Heat the oven to 180 ºC.

Put the nuts into a dry frying pan and toast them gently over a medium-low heat for a few minutes, tossing frequently and watching them closely. Chop into small bits, tip into a mixing bowl and add the almond flour, melted butter, Xylitol and almond extract.

Stir well, then press evenly onto the base of the tin.  My top tip for an even crust is to put a small drinking glass (such as a shot glass) on its side, rim pointing towards the edges of the tin, and roll it around in a circular fashion.
Press the crust into a springform pan lined with baking paper.
Bake the crust at 180 ºC for about 10 minutes, or until it's just beginning to turn golden at the edges. Watch it like a hawk, as it burns in an instant. Take the tin out of the oven and set aside to cool. Turn down the oven to 170 ºC.

In the meantime, make the filling. Put the softened cream cheese - see Cook's Notes, below - in a large mixing bowl. (I make this in a jiffy using my faithful Kenwood mixer, but if you don't have a similar gadget you will need to whisk this by hand, or use a rotary beater).

Add the Xylitol, vanilla and cornflour, and whisk till smooth and combined. Now add the eggs, one at a time, beating hard.  The mixture might take a while to come together, but if you work patiently, it will soon form a beautiful smooth cream. Now sweeten the mixture to taste, with a sweetener of your choice.  I find that four sticks of Canderel are enough.

Pour the cheesecake mixture over the crust, aiming at the centre so it spreads evenly to the edges.

Make a foil 'nest' for your cheesecake. This image
comes from my recipe for Cinnamon-Stencilled
Cheesecake
, where I did  not line the tin with
baking paper. 
Place the tin on two large squares of tin foil, then bring up & crumple the foil to create a 'nest' that will keep the water from seeping into the base.

Fill a large roasting pan to about the half-way mark with hot water, and place in the oven.  Slide your foil-wrapped baking tin into the water bath, and bake at 170 ºC for about an hour, or until the cheesecake is lightly freckled with brown, set at the edges, and has the slightest wobble in the middle.

Turn off the heat, open the oven door a crack and leave the cake to cool completely in the oven.

Refrigerate, in its tin, for 4 hours (or overnight), until very cold.

To make the topping, put the water in a teacup or similar small bowl and sprinkle the gelatine over it. Set aside for a minute or two to sponge.

Place the cup in a pot of simmering water (the water should come half-way up the sides) and stir occasionally as the gelatine melts. When the liquid is clear, set the cup aside to cool slightly.

Whisk the sour cream or crème fraîche in a bowl to loosen it, then whisk in the gelatine, vanilla paste (or extract) and sweetener. Pour the mixture over the top of the chilled cheesecake and smooth the top (see Cook's Notes if your cheesecake has shrunk away from the sides of the pan).  Cover and refrigerate for at least 4 hours.

Release the cheesecake from the tin by briefly pressing a hot cloth against the outside rim  (I do this by wetting a dishcloth, and microwaving it until very hot.)

To serve, cut into thin slices using a big knife dipped for 45 seconds in a jug of boiling water.

Makes 1 cheesecake; serves 8-10. 

Cook's Notes
  • It really doesn't matter which non-nutritive sweetener you use in any of the three layers of this cheesecake, because the sweetener will not affect their textures.  
  • The cream cheese should be soft, or you will find it difficult to beat to a smooth mixture. Leave the tubs on your counter for at least 6 hours, so they can come up to room temperature. If you're in a hurry, take the lids and foils off the tubs, arrange them in a circle on your microwave's turntable, and blast on high for 45 seconds at a time, until the cheese has softened.
  • If you find your cheesecake has shrunk away from the edges of the pan, leaving a gap into which the topping will run, here is what to do:  ease the cake out of its ring. Wrap a long strip of acetate (available from stationers) around the cake to form a close-fitting collar, and secure with sticky tape. Pour over the topping and refrigerate. The acetate will peel away easily once the topping has set. 

MORE OF MY CHEESECAKES:

Cinnamon-Stencilled Cheesecake

Hazelnut and Chocolate Cheesecake

Buttermilk Cheesecake with a Strawberry Topping


Print Friendly and PDFPrint Friendly

Saturday 11 October 2014

Seared Beef or Venison ‘Carpaccio’ with a Thai-Style Dressing

Carpaccio is a brilliant choice of starter or snack if you're on a low-carb or diabetic regime. I'm always astonished when people tell me they don't fancy carpaccio, because to my mind the combination of rosy leaves of beef fillet, sharp salty Parmesan shavings, fruity olive oil and a spritz of lemon juice is the food of the gods. It may seem like heresy to tinker with this formula by using a zippy Asian dressing, but the result is sensational. Follow my measurements to the letter, though, because the punchy ingredients will overpower the delicate meat if they're not used with restraint.

Seared Gemsbok 'Carpaccio' with a Thai-Style Dressing.
Plate by David Walters, Master Potter of Franschhoek


Wine recommendation from Michael Oliver. He says: "Du Toitskloof Tunnel White."
 Go to the end of this page for more detail about this wine pairing.

It’s impossible to produce paper-thin slices of carpaccio at home unless you have an industrial slicing machine, or you freeze the fillet first. I don’t have the former and won’t ruin the texture of the meat by doing the latter, so my solution is to flatten the leaves of fillet with a rolling pin.

I usually make this with beef, but it's also excellent with good-quality venison fillets. In this picture, I used gemsbok from the Gardens Continental Butchery in Kloof Street, which was as tender as a baby's cheek.

Strew the top of the dish with any tiny leaves or micro-herbs you can find - I used the tiniest flat-leaf parsley leaves, from the heart of a plant that cheekily seeded itself in a crack between two paving stones in my garden.

The recipe contains a very small amount of sugar (essential to create the perfect hot-sour-sweet-salty balance that characterises Thai food) but if you're on a punishing no-carb regime, you can leave this out. Or add a whisper of your favourite sugar substitute.

This recipe - which serves 6-8 as a starter - comes from my book Scrumptious: Food for Family and Friends, and is reproduced here courtesy of Random House Struik.

If you like this recipe, try my low-carb Halloumi and Beef Carpaccio Salad with Crisp-Fried Capers, and Low-Carb Seared Tuna with a Burnt Tomato & Caper Dressing


Seared Beef or Venison ‘Carpaccio’ with  a Thai-Style Dressing

750 g fillet steak, or the equivalent weight of venison fillet
a little olive oil, for rubbing
4 tsp (20 ml) oil, for frying
small herb leaves, for garnish
white and black sesame seeds, for garnish

For the dressing:

2 limes (see Cook's Notes, below)
1 tsp (5 ml) white sugar
3-cm piece of lemon grass, bruised, peeled and finely sliced
1 Tbsp (15 ml) finely grated fresh ginger
1 clove garlic, peeled and finely chopped
1 small green chilli, deseeded and finely sliced
2 Tbsp (30 ml) sunflower oil
1 tsp (5 ml) finely grated palm sugar (or ordinary sugar)
1 tsp (5 ml) soy sauce
1 tsp (5 ml) fish sauce
2 drops sesame oil

Rub a little olive oil all over the fillet. Wrap the meat lengthways in a large sheet of clingfilm and twist the ends in opposite directions to create a tight Christmas-cracker shape. Tuck the ends underneath and chill for at least 2 hours, or until needed.

Heat the oil in a large pan and, when it is blazing hot (but not yet smoking), quickly brown the meat on all sides. This should take no more than 2-3 minutes - less, if you have a slim venison fillet - and the meat should remain quite raw inside. Place in the fridge to cool for 15 minutes.

Cut the fillet into slices 3-4 mm thick. Place the slices between two sheets of clingfilm and use a rolling pin to thin and gently stretch the meat to the desired thickness. Alternatively, you can use the back of the blade of a heavy knife to stretch and flatten the slices.

To make the dressing, cut the limes in half and dip the cut end in the white sugar. Place them, sugar-side down, in a hot non-stick frying pan. Cook until the cut surface is nicely browned and caramelised. (If you're on a sugar-free regime, leave out this step and squeeze the lime juice directly into the dressing.)

Cool the limes for a few minutes, then squeeze the warm juice into the jug attachment of a stick blender. Add all the remaining dressing ingredients and whizz at high speed until well combined. The dressing should be slightly coarse, with tiny 'bits'.  If you don't have a blender, very finely slice the ingredients and pound everything together with a mortar and pestle before whisking in the liquid dressing ingredients.

Spread a little dressing on the base of a platter or several smaller plates. Arrange the meat slices on top and drizzle with the remaining dressing. Strew over the herb leaves, sprinkle with sesame seeds and serve immediately.

Serves 8 as a starter.

Cook’s Notes

The fillet can be seared, sliced and refrigerated, and the dressing made, up to 3 hours in advance, but put them together just before you serve the dish or the dressing will ‘cook’ the fillet. If you can’t find fresh limes, use lemons instead.

Wine pairing by Michael Olivier

It looks like: Very refreshing in a dew dropped bottle. Pale golden straw in colour with some lime green flashes around the rim of the glass.
It smells like: Grapey, fresh, yellow apples and a lime squirt.
It tastes like: Crisp off-dry fruity.

This is a non-vintage wine.

Print Friendly and PDFPrint Friendly

Thursday 2 October 2014

Deep-Dish Quiche with Blistered Tomatoes, Peas, Ham, Basil & Mozzarella

I made this quiche to use up a left-over ball of shortcrust pastry and a cup of peas. Every Sunday morning, I clear out my fridge and its veggie drawer, which always resembles a compost heap, no matter how hard I try to keep it organised.  (Try my recipe for Quick Nourishing Green Soup, which is a smart way of using up leaves and herbs that have wilted in the cold but are still perfectly good for eating.)

Deep-Dish Quiche with Blistered Tomatoes, Peas, Ham, Basil & Mozzarella

Wine recommendation from Michael Oliver. He says: "Haute Cabriere Unwooded Pinot Noir 2014".
Go to the end of this page for more detail about this wine pairing.

You can add anything you like to this quiche - how about some crisped bacon bits, pitted black olives, feta cubes or left-over shredded roast chicken?

If you don't have a deep quiche pan, you can make it in a bigger shallow one, but please reduce the baking time by about 10 minutes.

A quiche like this takes some time to make and bake, but I love the slow Sunday ritual of sloping into the kitchen in my pyjamas to make pastry and chop ingredients, while listening to rousing classical music. And then, of course, triumphantly presenting the puffed-up quiche to sleepy-heads who wake up late and hungry.

I have given you quite detailed instructions, below, about how to make a rich, blind-baked quiche pastry. Here are my top tips for making pastry.


Deep-Dish Quiche with Blistered Tomatoes, Peas, Basil & Mozzarella

For the pastry: 
250 g cake flour
150 g cold butter, cut into small cubes
a pinch of salt
about 90 ml ice-cold water (see recipe, below)

For the filling: 
1 punnet (250 g) ripe cherry tomatoes
1 Tbsp (15 ml) olive oil
8 large free-range eggs
¾ cup (180 ml) cream
salt and pepper, to taste
1 cup (250 ml) cooked peas
150 g mozzarella, grated
5 thin slices ham, fat trimmed, chopped [optional]
4 Tbsp (60 ml) finely chopped chives
10 big basil leaves, torn into little pieces
100 g Parmesan, finely grated

To serve:
fresh pea shoots or baby rocket leaves

Heat the oven to 190 °C.

First make the pastry. Put the flour, butter and salt in a bowl, and lightly rub together with your fingertips until the mixture resembles breadcrumbs. Add the cold water, bit by bit, until the pastry holds together. Knead lightly with your fingertips and press into a ball. (You can do this quickly in a food processor fitted with a metal blade: use the pulse button to process the flour and butter to crumbs, then add the cold water in small splashes, through the tube of the jug, until the pastry just comes together and forms a ball. Don't over-process the dough).

Flatten the pastry ball into a rough disc, wrap in clingfilm and put it in the fridge to rest for 15-20 minutes.

While the pastry is resting, prepare the filling. Cut the cherry tomatoes in half. Heat the olive oil in a frying pan over a fierce heat.  When the oil is shimmering, add the tomatoes.  Cook for 2-3 minutes, tossing frequently, until the tomatoes are blackened and blistered in places, but still fairly raw on their insides.  Set aside on a plate.

Now get ready to roll out your pastry. Sprinkle a little water on a marble slab, or your counter-top or a large wooden board. Press a long piece of clingfilm to this wettened surface and place the pastry disc on top. Cover with another length of clingfilm. Roll out the pastry to a rough circle about 22 cm in diameter and around 2 mm thick. (Roll the pin away from you, but give the pastry/clingfilm 'sandwich' a quarter turn every two rolls). Lightly grease a deep 18-cm-diameter quiche dish. I use a fluted metal pan with a loose bottom, but a ceramic or glass flan dish will do.

Peel off the top layer of clingfilm. Now flip the pastry over and drape it over the quiche dish, without removing the upper layer of clingfilm. Gently ease the pastry into the dish, getting well into the corners, and letting its edges drape over the rim. When the pastry is sitting comfortably in the dish, run a rolling pin firmly over the rim to remove any overhang.  Peel off the top layer of clingfilm.

Prick the base of the pastry all over with a fork, and lightly press down on it a circle of baking paper or tin foil cut to about the same size.  Fill the paper with 2-3 cups of rice or dried beans, and bake blind at 190 °C for 10 minutes, or until the outer rim feels somewhat dry when you tap it with a finger.

Carefully remove the paper with the rice or beans and return the case to the oven. Turn the heat down to 180 °C and bake for a further 10-15 minutes, or until the base of the pastry is a light golden colour and feels dry to the touch.

Meanwhile, put the eggs and cream in a bowl and whisk by hand for 2 minutes, or until well combined and slightly frothy. Season to taste with salt and pepper and set aside.

Pour the slightly frothy egg/cream mixture into the quiche dish. 
Remove the pastry case from the oven and sprinkle over the peas, mozzarella, ham, chives and basil.  Drain the blistered tomatoes in a sieve, discarding the juice, and arrange them on top.

Pour the whisked egg/cream mixture into the pastry case, and top with grated Parmesan.

Bake the quiche at 180 °C for about 30 minutes, or until puffed and golden, and ever so slightly wobbly in the middle.  If you're using a deep quiche dish, this can take up to 40 minutes.  And if the rim of the pastry darkens beyond golden-brown, cover it with strips of tin foil.

Remove the quiche from the oven and let it stand for 10 minutes.  Serve warm, topped with pea shoots or rocket.


Makes 1 x 18 cm quiche; serves 6, with a salad. 


Wine pairing by Michael Olivier

Haute Cabriere Unwooded Pinot Noir 2014

It looks like: A garnet, a bright gem that you can see through.

It smells like: Elegant red berries, pomegranate and cranberry.

It tastes like: Sumptuous berries and cherries with a gentle undertow of mushrooms crushed underfoot on the forest floor.


Print Friendly and PDFPrint Friendly