Showing posts with label #LCHF #lowcarb #diabetic-friendly. Show all posts

Wednesday, 14 October 2015

Cold Cucumber, Herb & Yoghurt Soup with Verjuice Granita

I hope you'll enjoy this cold yoghurty cucumber soup, topped with feathery flakes of frozen Verjuice. With its lovely contrast of herbal creaminess and sweet, crunchy acidity, this is a splendid starter for a blazing day. There are deep, clean, singing flavours here that make you want to drink it in buckets, as if it is exactly what your body craves.  This low-carb recipe is suitable for diabetics.

Cold Cucumber, Herb & Yoghurt Soup with Verjuice Granita 


Wine recommendation by Michael Olivier.  He says: "Klein Constantia Metis Sauvignon Blanc 2014." 

 It looks like: Packed in the bottle embossed with the Constantia logo, the fusion of philosophies is reflected in the flower on the label that is a hybrid of the South African Protea and French Iris. In the glass a pale gold with green amber flashes. 

 It smells like: Pure classical good Sauvignon aromas. White fleshed peaches and nectarines. Grapefruit oil. 

 It taste like: Rich, vibrant palate. Generous fruit, blackcurrant leaves, almost savoury. Minerals present in the exciting lime squirt in the long aftertaste. This is a laster if well stored could go up to 8 years after vintage.


I've had fun this month developing a series of new recipes using Verjuice, and this is the first of nine. Are you familiar with Verjuice?  It's a delicate, slightly tart, somewhat sweet, unfermented juice made from unripe grapes, popular as an acidulating agent in Roman times and the Middle Ages.

In recent times, this ingredient's been revived by Maggie Beer, one of Australia's best-loved cooks, food writers and restaurateurs. My aunt, the brilliant Gilly Walters of Wedgewood Nougat fame, introduced me to this ingredient some years ago, and I always have a bottle of it in my kitchen. What I love about Verjuice is that it doesn't have any of the throat-raspiness of vinegar - it's a gentle ingredient that sings sweetly in the background.

Over the next few weeks I'll be sharing some of my new Verjuice recipes with you, and I hope they encourage you to experiment with this intriguing ingredient over the festive season (you'll find it at Woolies).

When I first wrote this recipe down, I recommended serving it immediately, but I found that its flavour developed and mellowed over the next day, so feel free to make it up to 24 hours in advance (but keep it in the fridge, tightly covered, in a non-metallic bowl).

Make sure the serving bowls are very well chilled, or make pretty ice bowls in which to serve this beautiful starter.

Cold Cucumber, Herb & Yoghurt Soup with Verjuice Granita 

For the granita:

½ cup (125 ml) Verjuice

For the soup:

2 chilled English cucumbers (about 700 g)
2 Tbsp (30 ml) Verjuice
1 cup (250 ml) Greek yoghurt
1 small clove garlic, peeled and finely chopped
1/3 cup (80 ml) chopped curly parsley
1/3 cup (80 ml) chopped chives
3 Tbsp (45 ml) chopped dill
1 tsp (5 ml) Tabasco sauce
3 Tbsp (45 ml) cream
salt & milled black pepper

First make the granita.  Pour the Verjuice into a small metal pan and freeze for 45-90 minutes, or until just frozen - the time it takes will depend on how efficient your freezer is.  Use a fork to scratch and scrape at the surface to create light, feathery crystals. Return the dish to the freezer.

Lightly peel the cucumbers, leaving a little green skin here and there. Roughly chop and place in a food processor with all the remaining ingredients, except the cream and seasoning.  Whizz until very smooth. Now stir in the cream and season to taste with salt and plenty of black pepper.

Serve immediately in chilled bowls, topping each serving with a heaped spoonful of Verjuice granita, plus a scattering of chives or dill fronds.

Serves 4.  

(Note/Disclaimer:  I was paid a professional fee to develop these recipes and supply photographs, but this fee did not include featuring them on my blog and elsewhere. This I do because I'm pleased with these dishes and want to share them with you.)


Print Friendly and PDFPrint Friendly

Saturday, 15 August 2015

#RealFood For Kids: Low-Carb 'Grannies in Blankets'

This is a new twist on a beloved South African dish: Ouma Onder Die Komberse. Big, juicy meatballs are flavoured with nutmeg, onion and lemon zest, wrapped in soft cabbage ‘blankets’, then baked in a creamy lemon sauce.

The paragraph above comes directly from just-published Real Food: Healthy, Happy Children, by Kath Megaw (Quivertree, 2015), and I'm honoured to have been asked to contribute some of my low-carb recipes to the book.

South African paediatric dietician Kath Megaw is a leading fundi on low-carb and ketogenic diets for children. "Wait!" I hear you cry. "Low carb for kids?" Yes, that's right, but I can assure you that this is not some faddish, irresponsible book leaping onto the banting bandwagon. It's a painstakingly researched, well-informed, sensible guide that advocates a return to real, 'living' food using the wholesome unprocessed ingredients so familiar to our grandparents.

If you're looking to banish sugar, stodge and boxed foods from your family's diet, you've found the only guide you'll ever need, whether you're pregnant, or feeding a baby, or a coping with teens who have hollow legs. If you still need convincing, click here to listen to a podcast of Kath talking about her book, and here to read more about her low-carb philosophy.  

When I first picked up my copy of this hefty 300-page book at last week's launch, I was astonished at how much detailed information is packed between the pages. It's bursting with tips, tricks and accurate nutritional info, with lovely photographs and illustrations adding whimsy along the way. Journalist and cookery writer Daisy Jones, who wrote the text, has a chatty yet precise style, and she's brilliantly conveyed Kath's 20 years of clinical experience in this field.

What's pleased me so much about contributing to this project  is seeing my name on the same line as Phillippa Cheifitz's.  Phillippa, who wrote many of the gorgeous recipes in the book, is one of the grande dames of South African cookery writing, and I have greatly admired her since I cooked my way through her inspiring Cosmopolitan Cookbook in my twenties.

I hauled my tattered, cake-spattered copy of that book to the launch, and my day was complete when Phillippa graciously signed it for me, 29 years after I bought it.

I'm so looking forward to trying the recipes on my own family - specially the mouth-watering treats from the party food section.  (My beloveds feel so deprived of puds these days.)

Nutty Exploding Apples with Vanilla Custard: another of my recipes
from  Real Food: Healthy, Happy Children

Now to the recipe. I've used a Swedish-style creamy sauce to cloak these cabbage-wrapped meatballs, but you could also bake them in a fresh tomato sauce.  Meatballs tend to be a little dense when they don't contain breadcrumbs, but I've found that a big dollop of natural Greek yoghurt helps to tenderise them. This #LCHF recipe is suitable for diabetics.

Low-Carb 'Grannies in Blankets' 

12 outer leaves from a cabbage (or baby savoy leaves)
2 lemons
salt and milled pepper, to taste
1 large onion, peeled
900g beef mince
1 extra-large free-range egg, lightly beaten
2 cloves garlic, peeled and finely grated
3 tbsp thick Greek yoghurt
1½ tsp nutmeg
1 tbsp olive oil
2 tbsp white wine vinegar
1 cup cream
4 tbsp finely chopped parsley
butter, for greasing

1. Preheat the oven to 170°C (fan off).
2. Trim away the thick lower ‘ribs’ of the cabbage leaves. Bring a large saucepan of water to a
rolling boil, then add a wedge of lemon and a pinch of salt. Plunge the leaves into the water,
partially cover with a lid and blanch for 7 to 9 minutes, or until the leaves are wilted.
3. Drain (reserving the poaching water), then run the leaves under cold water for 3 minutes and
set aside to drain further.
4. Grate the onion on the fine tooth of a grater to create a soft, juicy pulp. Tip this into a large
mixing bowl and add the mince, egg, garlic, yoghurt, nutmeg and the zest of 1 lemon, plus
seasoning. Combine the mixture well using your hands., then roll the mince into 12 balls, each
about the size of a golf ball.
5. Heat a little olive oil in a non-stick frying pan and brown the meatballs on all sides, in batches,
over a medium-high heat – this should only take a few minutes per side as they should be nicely
caramelised, but still raw on the inside. Set the meatballs aside on a plate.
6. Turn up the heat and add the vinegar, plus half a cup of the cabbage poaching liquid. Let this
mixture bubble vigorously for 3 to 5 minutes, or until it has reduced by half.
7. Remove the pan from the heat, wait a minute, then stir in the cream. Return the pan to a
medium heat and let the sauce bubble for 1 minute, stirring now and then, until it has slightly
thickened. Now stir in the juice of half a lemon and the parsley and set aside.
8. Pat the cabbage leaves very dry on kitchen paper. Tuck a leaf around each meatball and arrange
in a buttered baking dish. Pour the sauce around and over the cabbage parcels and cover the dish
loosely with tin foil. Bake for 20 to 25 minutes, or until the ‘grannies’ are cooked right through.


Serves 4-6 Per serving: energy: 514 kcal protein: 33g fat: 39g carbs: 7g ratio: 1.0 :1

Recipe courtesy of Quivertree Publications

More of my meatball recipes:

Print Friendly and PDFPrint Friendly

Wednesday, 5 November 2014

Low-Carb Wine-Braised Leeks with Cream, Thyme & Parmesan

A dish of silken baby leeks cloaked in a wickedly creamy Parmesan sauce. The leeks take about half an hour to braise in their bath of wine, garlic and thyme, but once they're tender, the sauce takes just a few minutes of brisk bubbling to reduce and thicken. This dish is low in carbohydrates, and suitable for diabetics and anyone on a low-carb #LCHF regime.

Low-Carb Wine-Braised Leeks with Cream, Thyme & Parmesan.
This beautiful plate by my uncle David Walters, Master Potter of Franschhoek.

Wine recommendation by Michael Olivier.  He says: "Boland Cellar Granny Smith Nouvelle 2014. Nouvelle is a grape developed by Chris Orffer at the University of Stellenbosch by crossing Semillon and Ugni Blanc. First planted on the Geldenhuys family farm Klipvlei near Perdeberg, Nouvelle is grown in the Swartland, and it's a belter. 

 It looks like: Lime-green tinge of youth. Packed in a green-tinged bottle, with Granny Smith dancing on the label. 

 It smells like: Well - Granny Smith apples and fynbos herbs scrunched in your hand. 

 It taste like: Yes, you guessed, Granny Smiths again - and vibrantly so. A real thirst quencher: zesty, crisp and dry. A nice counterfoil to the leeks and cream.


I'm mad about baby leeks, and feature them often on this blog (recipe links below).  One watchpoint: even the slimmest leeks can be stringy, so be sure to keep them bubbling in the wine until they're as tender as a kiss.

If you don't cook with wine, you can use a cup of chicken stock in its place.

Here are more of my baby leek recipes. The first one is low in carbs, and the second and third are too, provided you omit the breadcrumbs and croutons.

Low-Carb Wine-Braised Baby Leeks in Prosciutto

Braised Baby Leeks with Halloumi 'Popcorn' and Frizzled Prosciutto

Salad of Warm Baby Leeks with Blue Cheese and Chilli Croutons


Low-Carb Wine-Braised Leeks with Cream, Thyme & Parmesan

750 g baby leeks
3 Tbsp (45 ml) olive oil
2 large cloves of garlic, peeled and cut in half lengthways
1 cup (250 ml) dry white wine
a few sprigs of fresh thyme
1 cup (250 ml) cream
½ cup (125 ml) finely grated Parmesan, plus a little extra for topping
a squeeze of fresh lemon juice
salt and pepper, to taste

Fry the leeks in the oil until they take on a little
colour here and there. 
Trim the bases of the leeks and cut off the upper dark-green parts (freeze these for using in your next chicken stock).

Heat the olive oil in a large shallow pan and fry the leeks over a medium-high heat for 4-5 minutes, or until they take on a little colour here and there (see picture, left).

Add the garlic and fry for another minute, without letting it brown.

Pour in the wine - it will bubble furiously -  and add the thyme sprigs.

Now turn the heat right down, cover with a tilted lid and simmer for 25-35 minutes, or until the leeks are very - and I mean very - tender.

When almost all the liquid has evaporated, add
the cream.
Take off the lid. The liquid in the pan should have reduced to just a few tablespoons. If it has not, continue cooking the leeks, uncovered, until there are just a few tablespoons of liquid left in the pan.

Turn up the heat again, pour in the cream, and bubble briskly for a few minutes, or until the cream has reduced and thickened to the consistency of thin custard.

Stir in the Parmesan, turn the heat right down, and simmer, stirring occasionally, for a further minute, or until the cheese has melted.

Season to taste with salt and pepper. Go easy on the salt - the Parmesan is salty enough in its own right.

Remove the pan from the heat. Now add a spritz of lemon juice - just enough to give the sauce a little acidic lift.

Remove the garlic pieces and the thyme sprigs.

Serve hot, with an extra grating of Parmesan.

Serves 4 as a side dish. 


Print Friendly and PDFPrint Friendly

Friday, 31 October 2014

Luscious Low-Carb, Sugar-Free Vanilla Cheesecake with a Nut Crust

I have made many cheesecakes in my life and this one is, I think, the very best. The baked part is luscious, dense and creamy, with an almond-flavoured nut crust, while a top layer of barely jellied vanilla-scented sour cream adds a delicious final flourish. You won't believe, when you taste this, that it contains not a speck of sugar.

Luscious Low-Carb, Sugar-Free Vanilla Cheesecake with a Nut Crust. In this version I used
crème fraîche for the topping, which creates lovely swirls. 

Wine recommendation from Michael Olivier:  He says: "KWV Classic Collection Red Muscadel. We have the most underrated and under-priced sweet fortified wines in South Africa. This is pure Red Muscadel juice fortified with grape spirit and matured in large French oak barrels for a year. The most perfect wine for a rich and creamy cheesecake. You want something to cut through the cream and to make a statement. A wine that’s packed with flavour, and yet is not all about sweetness. The acidity offers contrast and the alcohol a little oomph. Do serve it chilled and in a wine glass, not a mean little liqueur glass. And pour it over ice if it takes your fancy."

It looks like: Gem bright like a ruby tinged amber. Pretty ‘cathedral windows’ appear on the side of the glass when you swirl the wine. 

It smells like: Berries and raisins and a whisper of oak. Begs you to go in and taste it. 

It tastes like: Phwoar! Big waves of fabulous fruit, raisins, red and black berries, a wash of the alcohol and oak, a little acid twist and an aftertaste that slowly rides off into the sunset.


For sweetening, this cheesecake relies on a little Xylitol, plus Canderel sweetener in powder form, which I find the least offensive of sugar substitutes. (I tried, while testing this recipe, using powdered stevia, but I found its bitterness impossible to disguise). The choice of sweetener is yours; please see my Cook's Notes at the end of this page. This recipe is ideal for anyone on a low-carb #LCHF regime, and suitable for diabetics.

Because this is an expensive cake, containing four tubs of cream cheese, I've provided detailed instructions so it turns out perfectly for you every time.

The most important thing is to use top-quality vanilla for the filling, and excellent almond extract for the nut base. I use this lovely vanilla paste from Yuppiechef, but if you can't find it, you can use good vanilla extract, plus the scraped-out seeds of a vanilla pod.

Also: don't over-cook the cheesecake, which will result in a somewhat dry and crumbly result. Baking the cheesecake nestled in crumpled foil, in a bain-marie, is crucial, as is judging when to take it out of the oven. Follow my instructions in the recipe closely, and you cannot go wrong.

I use low-fat Lancewood Cream Cheese for my cheesecakes, but you can choose any similar product.
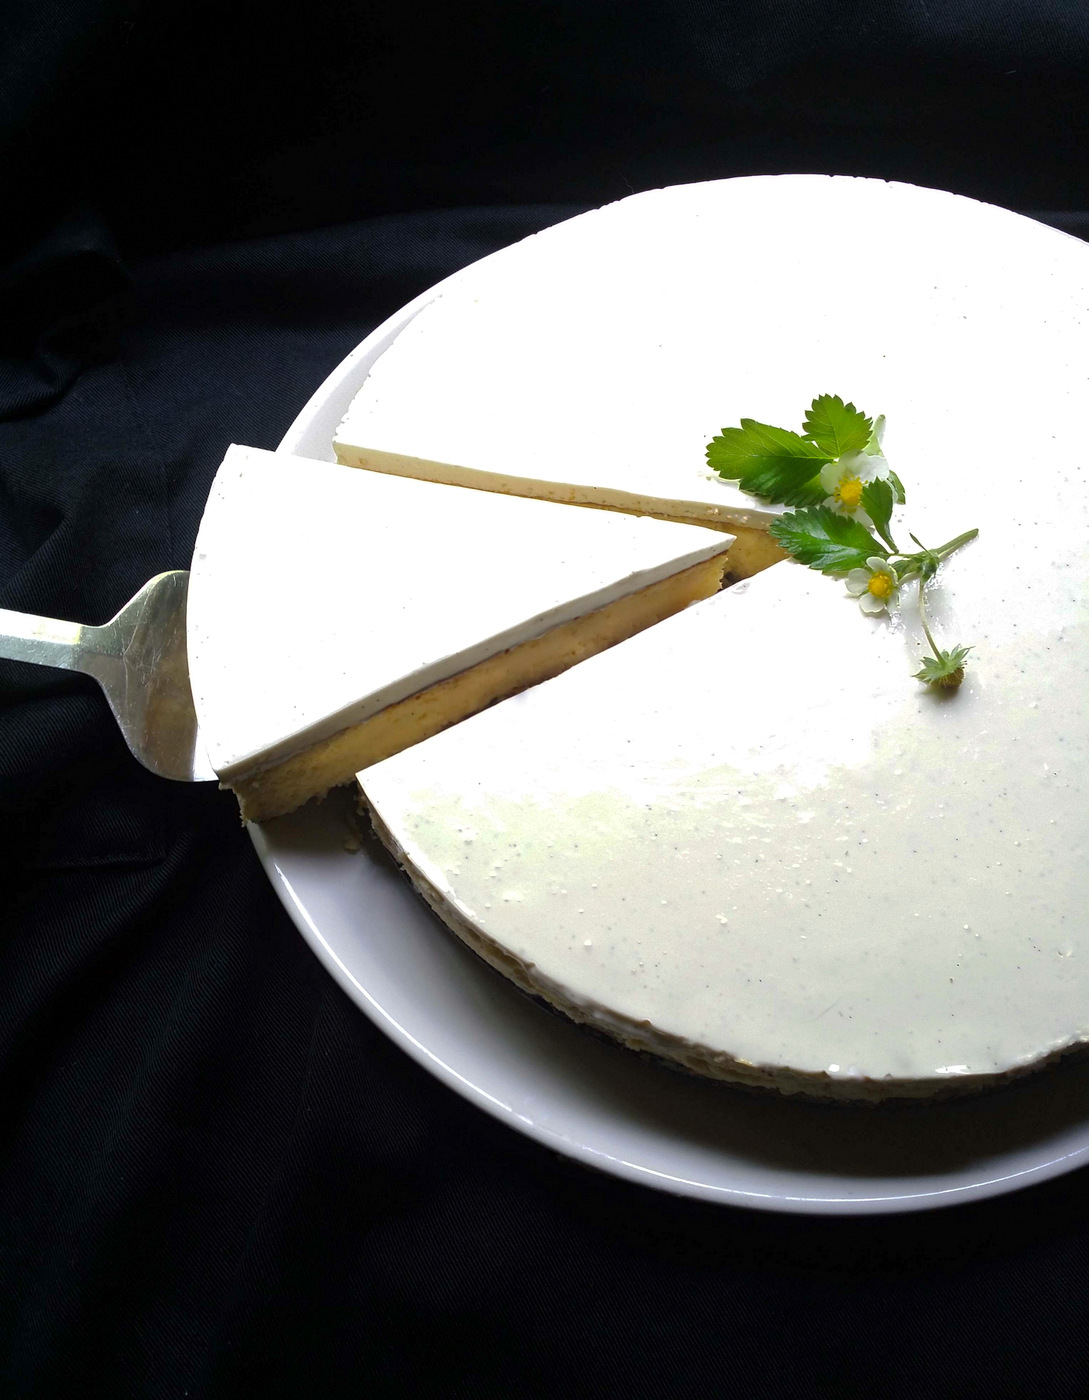
In this version I used sour cream, which creates a perfectly smooth topping.


Luscious Low-Carb, Sugar-Free Vanilla Cheesecake with a Nut Crust

For the crust: 

¾ cup (180 ml) whole nuts of your choice - I use a mixture of almonds, walnuts, pecans and hazelnuts
1 cup (250 ml) almond flour
3 Tbsp (45 ml) melted butter
2 Tbsp (30 ml) Xylitol, or more, to taste
a few drops of good-quality almond extract

For the filling:

4 x 250 g tubs cream cheese, at room temperature (see Cook's Notes at the end)
1/3 cup (80 ml) Xylitol
2 tsp (10 ml) vanilla extract, or 1 Tbsp (15 ml) vanilla paste
1 Tbsp (15 ml) cornflour or flour
4 extra-large free-range eggs
3-5 paper 'sticks' Canderel sweetener, or a sweetener of your choice (see recipe)

For the topping:

1 Tbsp (15 ml) water
1 tsp (5 ml) gelatine
1 cup (250 ml) sour cream or crème fraîche
1 tsp (5 ml) vanilla extract, or 2 tsp (10 ml) vanilla paste
1 'stick' Canderel powder, or a sweetener of your choice (see recipe)

First prepare your tin. Generously butter the sides and bottom of a non-stick 24-cm springform cake tin, or similar. Cut a long strip of baking paper to roughly the same width as the height of the tin, and use it to line the sides of the tin.  Now butter the baking paper, or varnish it well with cooking spray.

Heat the oven to 180 ºC.

Put the nuts into a dry frying pan and toast them gently over a medium-low heat for a few minutes, tossing frequently and watching them closely. Chop into small bits, tip into a mixing bowl and add the almond flour, melted butter, Xylitol and almond extract.

Stir well, then press evenly onto the base of the tin.  My top tip for an even crust is to put a small drinking glass (such as a shot glass) on its side, rim pointing towards the edges of the tin, and roll it around in a circular fashion.
Press the crust into a springform pan lined with baking paper.
Bake the crust at 180 ºC for about 10 minutes, or until it's just beginning to turn golden at the edges. Watch it like a hawk, as it burns in an instant. Take the tin out of the oven and set aside to cool. Turn down the oven to 170 ºC.

In the meantime, make the filling. Put the softened cream cheese - see Cook's Notes, below - in a large mixing bowl. (I make this in a jiffy using my faithful Kenwood mixer, but if you don't have a similar gadget you will need to whisk this by hand, or use a rotary beater).

Add the Xylitol, vanilla and cornflour, and whisk till smooth and combined. Now add the eggs, one at a time, beating hard.  The mixture might take a while to come together, but if you work patiently, it will soon form a beautiful smooth cream. Now sweeten the mixture to taste, with a sweetener of your choice.  I find that four sticks of Canderel are enough.

Pour the cheesecake mixture over the crust, aiming at the centre so it spreads evenly to the edges.

Make a foil 'nest' for your cheesecake. This image
comes from my recipe for Cinnamon-Stencilled
Cheesecake
, where I did  not line the tin with
baking paper. 
Place the tin on two large squares of tin foil, then bring up & crumple the foil to create a 'nest' that will keep the water from seeping into the base.

Fill a large roasting pan to about the half-way mark with hot water, and place in the oven.  Slide your foil-wrapped baking tin into the water bath, and bake at 170 ºC for about an hour, or until the cheesecake is lightly freckled with brown, set at the edges, and has the slightest wobble in the middle.

Turn off the heat, open the oven door a crack and leave the cake to cool completely in the oven.

Refrigerate, in its tin, for 4 hours (or overnight), until very cold.

To make the topping, put the water in a teacup or similar small bowl and sprinkle the gelatine over it. Set aside for a minute or two to sponge.

Place the cup in a pot of simmering water (the water should come half-way up the sides) and stir occasionally as the gelatine melts. When the liquid is clear, set the cup aside to cool slightly.

Whisk the sour cream or crème fraîche in a bowl to loosen it, then whisk in the gelatine, vanilla paste (or extract) and sweetener. Pour the mixture over the top of the chilled cheesecake and smooth the top (see Cook's Notes if your cheesecake has shrunk away from the sides of the pan).  Cover and refrigerate for at least 4 hours.

Release the cheesecake from the tin by briefly pressing a hot cloth against the outside rim  (I do this by wetting a dishcloth, and microwaving it until very hot.)

To serve, cut into thin slices using a big knife dipped for 45 seconds in a jug of boiling water.

Makes 1 cheesecake; serves 8-10. 

Cook's Notes
  • It really doesn't matter which non-nutritive sweetener you use in any of the three layers of this cheesecake, because the sweetener will not affect their textures.  
  • The cream cheese should be soft, or you will find it difficult to beat to a smooth mixture. Leave the tubs on your counter for at least 6 hours, so they can come up to room temperature. If you're in a hurry, take the lids and foils off the tubs, arrange them in a circle on your microwave's turntable, and blast on high for 45 seconds at a time, until the cheese has softened.
  • If you find your cheesecake has shrunk away from the edges of the pan, leaving a gap into which the topping will run, here is what to do:  ease the cake out of its ring. Wrap a long strip of acetate (available from stationers) around the cake to form a close-fitting collar, and secure with sticky tape. Pour over the topping and refrigerate. The acetate will peel away easily once the topping has set. 

MORE OF MY CHEESECAKES:

Cinnamon-Stencilled Cheesecake

Hazelnut and Chocolate Cheesecake

Buttermilk Cheesecake with a Strawberry Topping


Print Friendly and PDFPrint Friendly