Showing posts with label Scrumptious blog. Show all posts

Sunday, 14 December 2014

Nougat and Ice Cream Cake with Hot Raspberry Sauce

Here is a lovely family recipe that takes all the hassle out of preparing a hot-weather festive dessert. You can make this easy ice cream cake a day or two - or four! - in advance, and I promise your friends and relatives will love it.

Nougat and Ice Cream Cake with Hot Raspberry Sauce. Photograph by
Michael Le Grange, courtesy Random House Struik 

This recipe first appeared in my 2012 cookbook, and it was inspired by my aunt Gilly Walters, the wizardess who started Wedgewood Nougat in her home kitchen many years ago.  

Gilly is hands-down the best home cook I've ever met. Her exquisite food has inspired and delighted me for over 45 years, ever since I sat down at her table as a child, and scoffed myself sick on her feather-light scones.

These days, Wedgewood is a thriving enterprise exporting its nougat and heavenly Angel's Biscuits all over the world.  These are still made by hand in a hi-tech factory in the Natal Midlands, and the business - a model of social responsibility - is managed by my three cousins, brothers Jon, Steve and Paul Walters.

Cook's Notes:

  • Please choose a proper dairy ice cream for this cake, not the frozen ‘desserts’ that pass for vanilla ice cream. 
  • After you've taken it out of the freezer, let the cake stand at room temperature for 5–10 minutes, or until just soft enough to slice with a knife you've dipped in very hot water. 
  • How much lemon juice and icing sugar you add to the raspberry sauce will depend on how tart or sweet they are to begin with; adjust as necessary.
  • If you're making the ice cream cake a few days ahead, wrap it tightly in clingfilm so it doesn't pick up any whiff of freezer. 
  • As I mentioned in the original intro to the recipe (see below) you can add other goodies of your choice to the mixture.  I can recommend finely chopped dark chocolate, and a few drops of good almond extract


Nougat and Ice Cream Cake with Hot Raspberry Sauce

'My aunt Gilly Walters, a superlative cook and the inventive brain behind one of South Africa’s best-loved nougats, showed me this method of adding whipped cream and chopped frozen nougat to good shop-bought vanilla ice cream. What I love about ice-cream cakes like this is that they look spectacular and are so versatile: you can add anything that takes your fancy to the mix – chopped dark chocolate, nuts, liqueur, and so on.'

For the biscuit crust:

1 x 200 g packet shortbread biscuits
6 Tbsp (90 ml/90 g) very soft butter

For the filling and sauce:

2 litres full-cream vanilla ice cream
1 x 110 g bar nutty nougat, frozen solid
10 Romany Creams, or similar chocolate biscuit
1 cup (250 ml, or 1 x 250 ml tub) fresh cream
3 cups (750 ml) frozen raspberries
about 3 Tbsp (45 ml) icing sugar (see my Cook's Notes above)
a little lemon juice

Take the ice cream out of the freezer and let it soften slightly.

In the meantime,  make the crust. Whizz the shortbread biscuits to a fairly fine crumb in a food processor. Place in a bowl, add the soft butter and stir well to combine. Wet the base of a non-stick 24-cm springform cake pan and cover with clingfilm. Tuck the edges of the plastic under the base, pulling it quite tight as you fasten it in the ring. Press the biscuit mixture evenly onto the lined base and refrigerate it while you making the filling.

Using a heavy knife, chop the frozen nougat bar into pea-size pieces and cut the chocolate biscuits into big chunks.

Whip the cream to a soft peak in a large bowl and, working quickly so the mixture doesn’t melt, fold in the slightly softened ice cream, nougat, biscuits and half the frozen raspberries.

Tip the mixture over the crumb crust and, using a spatula, swirl the top into generous waves and ripples. Cover and freeze.

Put the remaining raspberries, the icing sugar and a squeeze of lemon juice (see my notes above) in a small pan, bring to a gentle simmer and cook for 2–3 minutes, stirring occasionally. Using a stick blender or food processor, whizz to a purée.

Strain the sauce if you’d like it fine, or leave it slightly rough. Set aside to reheat later.

Loosen the edges of the ice cream cake by briefly pressing a hot kitchen cloth against the sides.

Slip a spatula or palette knife between the crumb base and the clingfilm and loosen it by using gentle levering movements, turning the pan as you go. Slide the cake onto a plate or cake stand, leaving the base and clingfilm behind.

Cut the cake into slices using a knife dipped in boiling water. Reheat the raspberry sauce and serve separately, in a pretty jug.  Or you can leave the cake whole, and pour the hot sauce all over the top, as shown in the picture above.

Makes 1 x 24 cm 'cake'; serves 8-10.

Print Friendly and PDFPrint Friendly

Friday, 31 October 2014

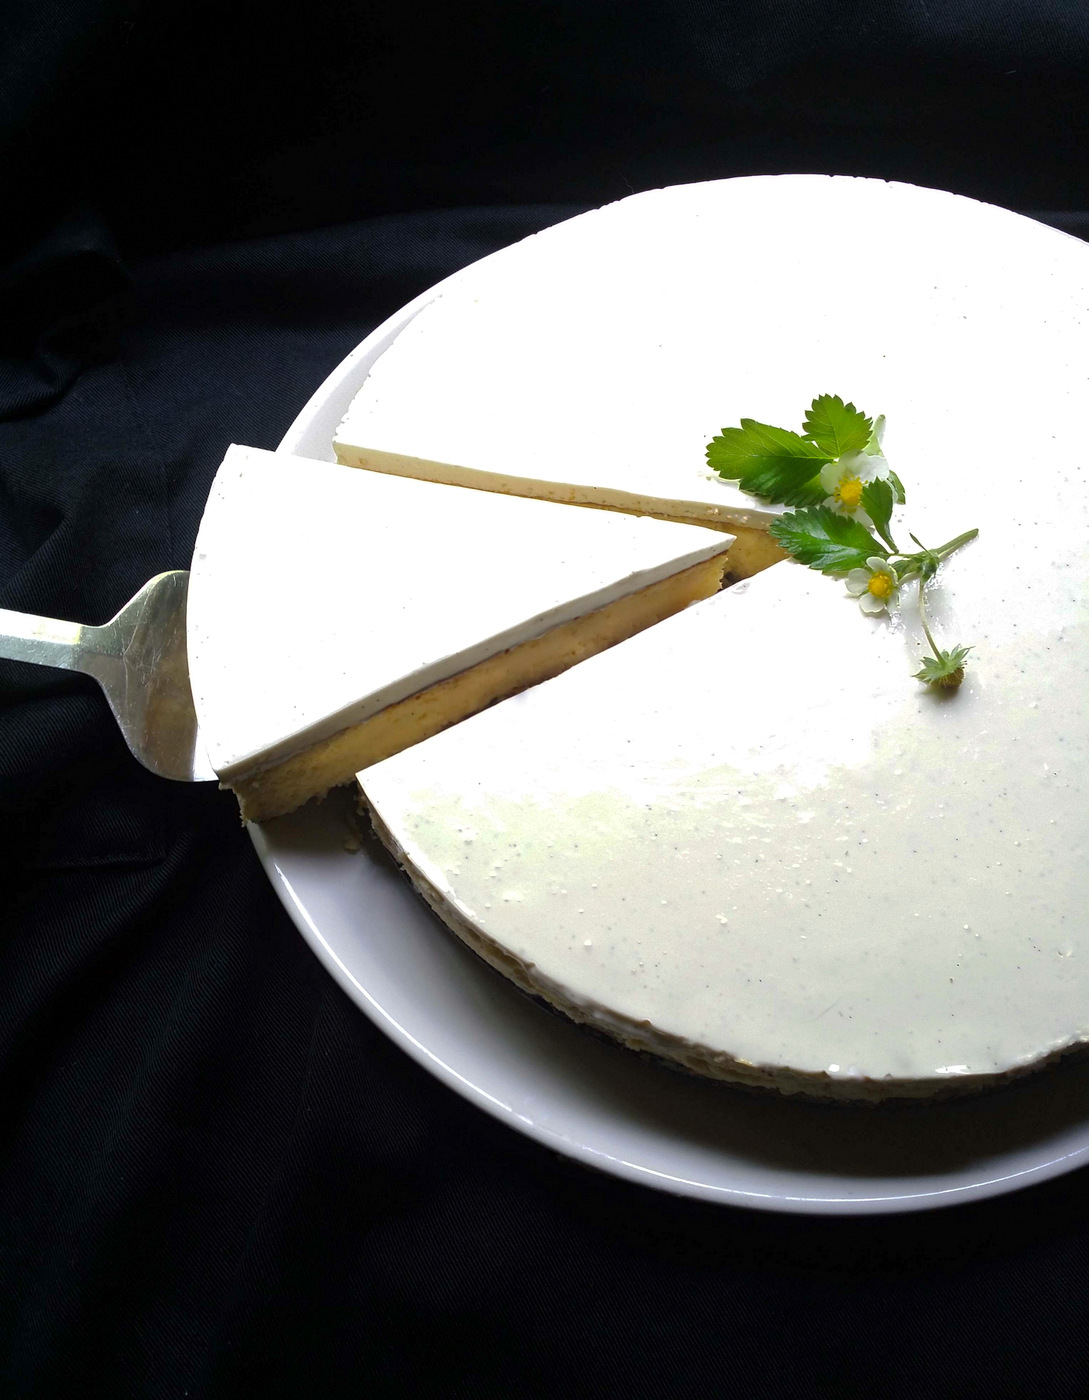
Luscious Low-Carb, Sugar-Free Vanilla Cheesecake with a Nut Crust

I have made many cheesecakes in my life and this one is, I think, the very best. The baked part is luscious, dense and creamy, with an almond-flavoured nut crust, while a top layer of barely jellied vanilla-scented sour cream adds a delicious final flourish. You won't believe, when you taste this, that it contains not a speck of sugar.

Luscious Low-Carb, Sugar-Free Vanilla Cheesecake with a Nut Crust. In this version I used
crème fraîche for the topping, which creates lovely swirls. 

Wine recommendation from Michael Olivier:  He says: "KWV Classic Collection Red Muscadel. We have the most underrated and under-priced sweet fortified wines in South Africa. This is pure Red Muscadel juice fortified with grape spirit and matured in large French oak barrels for a year. The most perfect wine for a rich and creamy cheesecake. You want something to cut through the cream and to make a statement. A wine that’s packed with flavour, and yet is not all about sweetness. The acidity offers contrast and the alcohol a little oomph. Do serve it chilled and in a wine glass, not a mean little liqueur glass. And pour it over ice if it takes your fancy."

It looks like: Gem bright like a ruby tinged amber. Pretty ‘cathedral windows’ appear on the side of the glass when you swirl the wine. 

It smells like: Berries and raisins and a whisper of oak. Begs you to go in and taste it. 

It tastes like: Phwoar! Big waves of fabulous fruit, raisins, red and black berries, a wash of the alcohol and oak, a little acid twist and an aftertaste that slowly rides off into the sunset.


For sweetening, this cheesecake relies on a little Xylitol, plus Canderel sweetener in powder form, which I find the least offensive of sugar substitutes. (I tried, while testing this recipe, using powdered stevia, but I found its bitterness impossible to disguise). The choice of sweetener is yours; please see my Cook's Notes at the end of this page. This recipe is ideal for anyone on a low-carb #LCHF regime, and suitable for diabetics.

Because this is an expensive cake, containing four tubs of cream cheese, I've provided detailed instructions so it turns out perfectly for you every time.

The most important thing is to use top-quality vanilla for the filling, and excellent almond extract for the nut base. I use this lovely vanilla paste from Yuppiechef, but if you can't find it, you can use good vanilla extract, plus the scraped-out seeds of a vanilla pod.

Also: don't over-cook the cheesecake, which will result in a somewhat dry and crumbly result. Baking the cheesecake nestled in crumpled foil, in a bain-marie, is crucial, as is judging when to take it out of the oven. Follow my instructions in the recipe closely, and you cannot go wrong.

I use low-fat Lancewood Cream Cheese for my cheesecakes, but you can choose any similar product.

In this version I used sour cream, which creates a perfectly smooth topping.


Luscious Low-Carb, Sugar-Free Vanilla Cheesecake with a Nut Crust

For the crust: 

¾ cup (180 ml) whole nuts of your choice - I use a mixture of almonds, walnuts, pecans and hazelnuts
1 cup (250 ml) almond flour
3 Tbsp (45 ml) melted butter
2 Tbsp (30 ml) Xylitol, or more, to taste
a few drops of good-quality almond extract

For the filling:

4 x 250 g tubs cream cheese, at room temperature (see Cook's Notes at the end)
1/3 cup (80 ml) Xylitol
2 tsp (10 ml) vanilla extract, or 1 Tbsp (15 ml) vanilla paste
1 Tbsp (15 ml) cornflour or flour
4 extra-large free-range eggs
3-5 paper 'sticks' Canderel sweetener, or a sweetener of your choice (see recipe)

For the topping:

1 Tbsp (15 ml) water
1 tsp (5 ml) gelatine
1 cup (250 ml) sour cream or crème fraîche
1 tsp (5 ml) vanilla extract, or 2 tsp (10 ml) vanilla paste
1 'stick' Canderel powder, or a sweetener of your choice (see recipe)

First prepare your tin. Generously butter the sides and bottom of a non-stick 24-cm springform cake tin, or similar. Cut a long strip of baking paper to roughly the same width as the height of the tin, and use it to line the sides of the tin.  Now butter the baking paper, or varnish it well with cooking spray.

Heat the oven to 180 ºC.

Put the nuts into a dry frying pan and toast them gently over a medium-low heat for a few minutes, tossing frequently and watching them closely. Chop into small bits, tip into a mixing bowl and add the almond flour, melted butter, Xylitol and almond extract.

Stir well, then press evenly onto the base of the tin.  My top tip for an even crust is to put a small drinking glass (such as a shot glass) on its side, rim pointing towards the edges of the tin, and roll it around in a circular fashion.
Press the crust into a springform pan lined with baking paper.
Bake the crust at 180 ºC for about 10 minutes, or until it's just beginning to turn golden at the edges. Watch it like a hawk, as it burns in an instant. Take the tin out of the oven and set aside to cool. Turn down the oven to 170 ºC.

In the meantime, make the filling. Put the softened cream cheese - see Cook's Notes, below - in a large mixing bowl. (I make this in a jiffy using my faithful Kenwood mixer, but if you don't have a similar gadget you will need to whisk this by hand, or use a rotary beater).

Add the Xylitol, vanilla and cornflour, and whisk till smooth and combined. Now add the eggs, one at a time, beating hard.  The mixture might take a while to come together, but if you work patiently, it will soon form a beautiful smooth cream. Now sweeten the mixture to taste, with a sweetener of your choice.  I find that four sticks of Canderel are enough.

Pour the cheesecake mixture over the crust, aiming at the centre so it spreads evenly to the edges.

Make a foil 'nest' for your cheesecake. This image
comes from my recipe for Cinnamon-Stencilled
Cheesecake
, where I did  not line the tin with
baking paper. 
Place the tin on two large squares of tin foil, then bring up & crumple the foil to create a 'nest' that will keep the water from seeping into the base.

Fill a large roasting pan to about the half-way mark with hot water, and place in the oven.  Slide your foil-wrapped baking tin into the water bath, and bake at 170 ºC for about an hour, or until the cheesecake is lightly freckled with brown, set at the edges, and has the slightest wobble in the middle.

Turn off the heat, open the oven door a crack and leave the cake to cool completely in the oven.

Refrigerate, in its tin, for 4 hours (or overnight), until very cold.

To make the topping, put the water in a teacup or similar small bowl and sprinkle the gelatine over it. Set aside for a minute or two to sponge.

Place the cup in a pot of simmering water (the water should come half-way up the sides) and stir occasionally as the gelatine melts. When the liquid is clear, set the cup aside to cool slightly.

Whisk the sour cream or crème fraîche in a bowl to loosen it, then whisk in the gelatine, vanilla paste (or extract) and sweetener. Pour the mixture over the top of the chilled cheesecake and smooth the top (see Cook's Notes if your cheesecake has shrunk away from the sides of the pan).  Cover and refrigerate for at least 4 hours.

Release the cheesecake from the tin by briefly pressing a hot cloth against the outside rim  (I do this by wetting a dishcloth, and microwaving it until very hot.)

To serve, cut into thin slices using a big knife dipped for 45 seconds in a jug of boiling water.

Makes 1 cheesecake; serves 8-10. 

Cook's Notes
  • It really doesn't matter which non-nutritive sweetener you use in any of the three layers of this cheesecake, because the sweetener will not affect their textures.  
  • The cream cheese should be soft, or you will find it difficult to beat to a smooth mixture. Leave the tubs on your counter for at least 6 hours, so they can come up to room temperature. If you're in a hurry, take the lids and foils off the tubs, arrange them in a circle on your microwave's turntable, and blast on high for 45 seconds at a time, until the cheese has softened.
  • If you find your cheesecake has shrunk away from the edges of the pan, leaving a gap into which the topping will run, here is what to do:  ease the cake out of its ring. Wrap a long strip of acetate (available from stationers) around the cake to form a close-fitting collar, and secure with sticky tape. Pour over the topping and refrigerate. The acetate will peel away easily once the topping has set. 

MORE OF MY CHEESECAKES:

Cinnamon-Stencilled Cheesecake

Hazelnut and Chocolate Cheesecake

Buttermilk Cheesecake with a Strawberry Topping


Print Friendly and PDFPrint Friendly

Saturday, 11 October 2014

Seared Beef or Venison ‘Carpaccio’ with a Thai-Style Dressing

Carpaccio is a brilliant choice of starter or snack if you're on a low-carb or diabetic regime. I'm always astonished when people tell me they don't fancy carpaccio, because to my mind the combination of rosy leaves of beef fillet, sharp salty Parmesan shavings, fruity olive oil and a spritz of lemon juice is the food of the gods. It may seem like heresy to tinker with this formula by using a zippy Asian dressing, but the result is sensational. Follow my measurements to the letter, though, because the punchy ingredients will overpower the delicate meat if they're not used with restraint.

Seared Gemsbok 'Carpaccio' with a Thai-Style Dressing.
Plate by David Walters, Master Potter of Franschhoek


Wine recommendation from Michael Oliver. He says: "Du Toitskloof Tunnel White."
 Go to the end of this page for more detail about this wine pairing.

It’s impossible to produce paper-thin slices of carpaccio at home unless you have an industrial slicing machine, or you freeze the fillet first. I don’t have the former and won’t ruin the texture of the meat by doing the latter, so my solution is to flatten the leaves of fillet with a rolling pin.

I usually make this with beef, but it's also excellent with good-quality venison fillets. In this picture, I used gemsbok from the Gardens Continental Butchery in Kloof Street, which was as tender as a baby's cheek.

Strew the top of the dish with any tiny leaves or micro-herbs you can find - I used the tiniest flat-leaf parsley leaves, from the heart of a plant that cheekily seeded itself in a crack between two paving stones in my garden.

The recipe contains a very small amount of sugar (essential to create the perfect hot-sour-sweet-salty balance that characterises Thai food) but if you're on a punishing no-carb regime, you can leave this out. Or add a whisper of your favourite sugar substitute.

This recipe - which serves 6-8 as a starter - comes from my book Scrumptious: Food for Family and Friends, and is reproduced here courtesy of Random House Struik.

If you like this recipe, try my low-carb Halloumi and Beef Carpaccio Salad with Crisp-Fried Capers, and Low-Carb Seared Tuna with a Burnt Tomato & Caper Dressing


Seared Beef or Venison ‘Carpaccio’ with  a Thai-Style Dressing

750 g fillet steak, or the equivalent weight of venison fillet
a little olive oil, for rubbing
4 tsp (20 ml) oil, for frying
small herb leaves, for garnish
white and black sesame seeds, for garnish

For the dressing:

2 limes (see Cook's Notes, below)
1 tsp (5 ml) white sugar
3-cm piece of lemon grass, bruised, peeled and finely sliced
1 Tbsp (15 ml) finely grated fresh ginger
1 clove garlic, peeled and finely chopped
1 small green chilli, deseeded and finely sliced
2 Tbsp (30 ml) sunflower oil
1 tsp (5 ml) finely grated palm sugar (or ordinary sugar)
1 tsp (5 ml) soy sauce
1 tsp (5 ml) fish sauce
2 drops sesame oil

Rub a little olive oil all over the fillet. Wrap the meat lengthways in a large sheet of clingfilm and twist the ends in opposite directions to create a tight Christmas-cracker shape. Tuck the ends underneath and chill for at least 2 hours, or until needed.

Heat the oil in a large pan and, when it is blazing hot (but not yet smoking), quickly brown the meat on all sides. This should take no more than 2-3 minutes - less, if you have a slim venison fillet - and the meat should remain quite raw inside. Place in the fridge to cool for 15 minutes.

Cut the fillet into slices 3-4 mm thick. Place the slices between two sheets of clingfilm and use a rolling pin to thin and gently stretch the meat to the desired thickness. Alternatively, you can use the back of the blade of a heavy knife to stretch and flatten the slices.

To make the dressing, cut the limes in half and dip the cut end in the white sugar. Place them, sugar-side down, in a hot non-stick frying pan. Cook until the cut surface is nicely browned and caramelised. (If you're on a sugar-free regime, leave out this step and squeeze the lime juice directly into the dressing.)

Cool the limes for a few minutes, then squeeze the warm juice into the jug attachment of a stick blender. Add all the remaining dressing ingredients and whizz at high speed until well combined. The dressing should be slightly coarse, with tiny 'bits'.  If you don't have a blender, very finely slice the ingredients and pound everything together with a mortar and pestle before whisking in the liquid dressing ingredients.

Spread a little dressing on the base of a platter or several smaller plates. Arrange the meat slices on top and drizzle with the remaining dressing. Strew over the herb leaves, sprinkle with sesame seeds and serve immediately.

Serves 8 as a starter.

Cook’s Notes

The fillet can be seared, sliced and refrigerated, and the dressing made, up to 3 hours in advance, but put them together just before you serve the dish or the dressing will ‘cook’ the fillet. If you can’t find fresh limes, use lemons instead.

Wine pairing by Michael Olivier

It looks like: Very refreshing in a dew dropped bottle. Pale golden straw in colour with some lime green flashes around the rim of the glass.
It smells like: Grapey, fresh, yellow apples and a lime squirt.
It tastes like: Crisp off-dry fruity.

This is a non-vintage wine.

Print Friendly and PDFPrint Friendly

Friday, 30 May 2014

Low-Carb Double-Bacon Cheese & Herb Mini Quiches

I have called these cheesy puffs 'Double-Bacon' quiches because they contain two doses of what is arguably the world's most delicious ingredient. There are crisp bacon bits on the inside, and more strips to line the muffin pans. If you're a vegetarian, or don't eat bacon for whatever reason, you can use fine courgette 'leaves' as a casing for these easy quiches - please see my Cook's Notes at the end of this page. Serve these hot and puffed for breakfast, or warm as a light lunch, with crisp green leaves.

Low-Carb Double-Bacon Cheese & Herb Mini Quiches. The two at the
back of the platter have been lined with courgette slices (see above).

One of the things I miss on my  low-carb diet is quiche with feather-light pastry, so I've spent some time this past week dreaming up recipes that are satisfying and delicious, but that can be made without a pastry case.

This is a quick and easy recipe that will fill your tummy with joy if you're on a low-carb, #LCHF, banting or diabetic regime.


The ingredients for this easy dish: eggs, cream, fresh herbs and crisp bacon bits.

Use good-quality back bacon in this recipe, because it's perfect for tearing apart to line the bases and sides of the hollows in a muffin pan. The 'oyster' of each bacon strip goes on the bottom of each hollow, and the fattier strip is pressed around its edges.

Here are two more of my low-carb tart recipes you might enjoy: Double-Egged Crustless Spinach & Bacon Tart and Easy Crustless Courgette, Mint and Feta Tart.


Low-Carb Double-Bacon Cheese & Herb Mini Quiches


2 x 250 g packs back bacon
the juice of a lemon
7 extra-large free-range eggs
¾ cup (180 ml) cream
a small bunch of chives, finely chopped (about 3 Tbsp/45 ml)
a small bunch of parsley, finely chopped (about 3 Tbsp/45 ml)
1 cup (250 ml) grated Cheddar, and extra to top
salt & milled black pepper
small herb sprigs, to garnish (I used oregano from my garden)

Heat the oven to 200 °C, with the fan on, or 210 °C if your oven has no fan.

First prepare the bacon bits for the filling. Cut 8 rashers of bacon into a small dice, put them into a dry non-stick frying pan and crisp them up over a medium-high heat. Don't allow them to burn - the trick here is to take your time and keep a watchful eye, turning the heat down under the pan if the bacon is browning too quickly.

Drain all the fat from the pan, set it back on the heat and add the lemon juice. Stir briskly to dislodge any sticky golden bits, and when all the lemon juice has evaporated, remove from the heat and set aside.

Line the bottoms and sides of a non-stick muffin pan as follows:  pull away the big non-fatty 'oysters' of bacon from each rasher, and press them neatly to the bottoms of the depressions in your pan.

Now wrap the remaining strips of bacon - fatty side up - around the edges of the hollows, stretching and pressing them so they stick to the sides and form a cup.  If you find your rashers are curling inwards, make a few small vertical snips, using sharp scissors, around the uppermost edge of the fat.

Whisk together the eggs, cream, chives and parsley, and season to taste with salt and black pepper.  I usually whisk my quiche mixture by hand for at least a minute, because this helps to incorporate air and produce a puffy result.

Put the crispy bacon bits into the muffin pans, and divide the cup of grated Cheddar between them.   Gently pour over the egg mixture, filling each bacon 'cup' to about two-thirds of its depth.  Top each quiche with another little heap of Cheddar.

Bake at 200 °C for 10-12 minutes, or until the quiches are well risen, golden and just set in their middles.

Run the tip of a sharp knife around the edges of each quiche to remove it from the pan, and serve immediately.

Serves 4 as main meal with salad, or 12 as a starter or snack.  

Cook's Notes
  • If you don't fancy bacon, use courgette (baby marrow/zucchini) strips to line your muffin tins. Here's how: rinse the courgettes under cold running water to remove any grit, then slice them horizontally into thin (3 mm) 'leaves'.  I do this using a mandolin, which produces beautiful even slices. Place the slices in a hot pan - or on a very hot griddle - with a little olive oil and fry them until they are lightly brown and just pliable.  Line each of your muffin pans with two slices, pressing them firmly against their sides.
  • You can add any other ingredients you like to these quiches. How about finely sliced fried mushrooms, wilted spinach or nuggets of feta or blue cheese?

Print Friendly and PDFPrint Friendly

Sunday, 11 May 2014

Two Scrumptious Low-Carb Cheese, Nut & Herb Pestos

Feta, Blue Cheese, Herb & Toasted-Walnut Pesto with
Griddled Courgettes (recipe below). 
One of the things I miss most on my low-carb regime is glorious garlicky hummous.  Although hummous has a relatively low glycaemic-index ranking and load - depending on how much tahini it includes - it is still fairly packed with carbohydrates, so I avoid it these days.

Over the past few weeks I've been experimenting with combinations of cheese, nuts, herbs, garlic and olive oil to create vibrant low-carb pastes packed with singing flavours.

Because these pestos contain both nuts and cheese, they're crammed with calories, but all you need is a single dollop to add beautiful aroma and crunch to steamed fresh green beans or broccoli or griddled sliced courgettes.

You can also serve these as a dip with hot and cold crudités, or dobbled on flash-fried chicken or fish fillets If you're not on a low-carb regime, try tossing these through hot pasta, or spreading them over hot toasty ciabatta bread (with a topping of roasted tomatoes or some melty mozzarella) to make scrumptious bruschettas.

First, a gorgeous nutty pesto with fresh Mediterranean flavours.  I know this looks a bit like window putty, but I promise you won't be disappointed by the punchy flavours of this easy and versatile sauce.


Low-Carb Pesto of Roast Aubergine, Macadamia Nuts,
Feta, Lemon & Rosemary. This nutty pesto is delicious
 with steamed green beans lightly dressed with olive oil 
and lemon juice.
Low-Carb Pesto of Roast Aubergine, Macadamia Nuts, Feta, Lemon & Rosemary

1 large aubergine [eggplant or brinjal]
½ cup (125 ml) macadamia nuts
a big pinch of flaky sea salt
2 'wheels' (about 140 g) feta cheese, crumbled
1 Tbsp (15 ml) finely grated lemon zest
the juice of a medium lemon
1 tsp (5 ml) very finely chopped fresh rosemary needles
1 small clove garlic, peeled and finely grated
½ cup (125 ml) extra-virgin olive oil
salt and milled black pepper 
a pinch of smoked paprika or cayenne pepper, for dusting [optional; see Cook's Notes, below.]

Heat the oven to 200 ºC.  Put the whole aubergine directly onto a middle rack of the oven.  Let it bake for 40-50 minutes, or until it is very soft and slightly shrunken.  Remove and set aside to cool for 25 minutes.  

Now toast the macadamias. Heat a frying pan over a medium-low heat and dry-roast the nuts for three to four minutes, tossing and turning them frequently, until they are a light golden colour and freckled here and there with dark-brown spots. 

Put the macadamias, still warm, into the jug attachment of a stick blender, or into a food processor fitted with a metal blade. Add a big pinch of flaky sea salt and press the pulse button repeatedly to process the nuts to fairly big crumbs. Don't over-process them, or they may turn into an oily paste. Tip the crumbled macadamia nuts into a mixing bowl.  

When the aubergine has cooled, cut it in half lengthways and use the blade of a knife to scrape out all the flesh, seeds and all. Tip this flesh into your food processor, and discard the tough outer peel of the aubergine.

To the food processor, add the feta cheese, lemon zest, lemon juice, rosemary, garlic and seven tablespoons (105 ml) of olive oil.  Process until you have a fairly smooth paste.  If the blade is reluctant to turn, add a tablespoon or two of warm water. 

Scrape this mixture into the bowl containing the macadamia crumbs and stir well to combine.  Season to taste with salt and pepper.

Tip the pesto into a glass lidded jar and pour the remaining tablespoon of olive oil over the top to seal it and prevent oxidisation.

To serve, pile the pesto into a small pretty bowl, and drizzle with more olive oil.  Grind some pepper over the top, and dust with smoked paprika or cayenne pepper. 

Keeps for a week in the fridge, and freezes well.

Makes about 1½ cups. 

Cook's Notes: 
  • When I make this, I dust it very lightly with smoked paprika, which adds a final flavour flourish. Do use smoked paprika sparingly, though, as its pungency can overwhelm the other flavours.
  • I love the crunch and interesting meaty texture of macadamias, but if you can't find these where you live, try using blanched almonds instead.  
  • You can roast the aubergine a day or more in advance, and keep it in the fridge until you're ready to use it. 
  • If you'd like to add some extra colour to this pesto, whizz it up with 4 tablespoons (60 ml) of chopped fresh parsley.


Feta, Blue Cheese, Herb & Walnut Pesto with Griddled Courgettes

See picture at the top of this post. 

50 g (about 25) shelled walnuts
a small bunch (about 40 g) fresh flat-leaf parsley, roughly chopped
half a pillow-pack (about 40 g) fresh wild rocket, roughly chopped
1/3 cup (80 ml) extra-virgin olive oil
2 Tbsp (30 ml) fresh lemon juice
a small clove of garlic, peeled and finely chopped or grated
a small block (40 g) creamy blue cheese, crumbled
one 'wheel' (70 g) feta cheese
milled black pepper
24 young courgettes [zucchini or baby marrows], rinsed to remove any grit

To serve: 
olive oil and fresh lemon juice, for sprinkling
salt and milled black pepper

First toast the walnuts. Place them in a frying pan over a medium-low heat and dry-roast them for a minute or two, tossing frequently, and watching them like a hawk as they burn quickly.  When they are hot, and smelling pleasantly nutty, take the pan off the heat.  Remove 6 toasted walnuts and set them aside for your garnish.  Tip the remaining nuts into the jug attachment of a stick blender, or into a food processor fitted with a metal blade. Process the nuts to a rough crumb, and set aside.

Remove the stalks from the parsley and add the leaves to the food processor along with the rocket, olive oil, lemon juice and garlic. Process to a fairly fine paste. Don't worry if the blades won't whizz freely - the next step will sort this out.

Add the blue cheese bits and process the mixture till smooth. You will find that the mixture magically smooths out into a soft paste.  But if the blades still won't turn freely, add a few drops of warm water.  Now add the feta and process again.  Season with plenty of black pepper.  You shouldn't need to add any salt, but go ahead and add a pinch or two if necessary. If the mixture needs a little more acidity, add a drop or two more of lemon juice.

Scrape the mixture into a small serving bowl or glass jar and cover with a thin layer of olive oil. Seal with clingfilm and refrigerate.

To prepare the courgettes, slice them lengthways into 'leaves' 3 mm thick.  I do this using a mandolin, which produces perfect shavings. If you don't have a mandolin, you can use a very sharp knife, held with its blade horizontal to your chopping board.

Put a large griddle pan or a frying pan over a high flame until it's blazing hot, add a lick of olive oil and fry the courgettes slices for 2-3 minutes on each side, or until they are tiger-striped, toasty and just soft. Tip the slices into a bowl and sprinkle with olive oil and a squeeze of lemon juice, plus salt and pepper to taste.

Serve hot with spoonfuls of the pesto, and the crumbled toasted walnuts you set aside earlier.

Makes about ¾ cup of pesto. With the courgettes, serves 6. 

Cook's Notes: 
  • If you'd like to give this pesto even more fragrance, add a small handful of fresh basil. 
  • This is very good with pan-fried beef, lamb or ostrich steaks.
  • You can freeze this paste in a small lidded box.  Let it defrost overnight in the fridge. 


Print Friendly and PDFPrint Friendly

Tuesday, 25 March 2014

Low-Carb Pea, Spinach and Parsley Soup with Bacon Bows

Sequinned with olive oil, swirled with cream and flourished with a bacon bow, this fresh-flavoured soup is quick to make and tastes as lovely as a spring morning. The bacon bow is twee, I admit, but I added it to my soup as a personal reminder a) to have fun with food and b) that a bit o' bacon is SO allowed on my new diabetic regime.

Low-Carb Pea, Spinach and Parsley Soup with a Bacon Bow

What I love about this soup is that a fast cooking time allows its individual flavours - leeks, peas, baby spinach leaves and curly parsley - to sing in clean voices. I hesitated to use frozen peas as a thickener for this soup, believing them to be rather starchy (and thus verboten along with potatoes and cornflour), but was pleased to discover that they are not to be feared, having an average glycaemic index value of 48. All three of the South African frozen-pea brands I checked contain fewer than 6g of carbohydrate per 100 g, which is a piffling amount in the broader scheme of things.  However, as I'm not (yet) an expert on these matters, I advise you to read the nutrition labels on your pack of frozen peas if you're on a low-carb or diabetic diet.  

A dribble of fruity olive oil brings all the flavours to life.

In this recipe I've asked you to use proper chicken or veggie stock, but if you don't have a home-made stash in your freezer, you can feel no shame in using a good-quality jellied stockpot or fond (see my Cook's Notes at the end of the recipe). 

A dobbling of extra-virgin olive oil just before serving takes this soup to a new level, because the residual heat in the bowl releases lovely fruity aromas.  (But you need not stick to olive oil.  I don't want to own up to this for fear of sounding piggy, but today I stirred a big blob of Hellmann's mayonnaise into my mug of left-over soup, and it tasted like Christmas.)

Low-Carb Pea, Spinach and Parsley Soup with Bacon Bows

3 Tbsp (45 ml) olive or sunflower oil
2 large leeks, white parts only, finely sliced
1 plump clove garlic, peeled and finely chopped
1.5 litres chicken or vegetable stock (see Cook's Notes, below)
4 cups (250 ml x 4) frozen baby peas
1 x 400 g pack baby spinach leaves
a large bunch of curly parsley, de-stalked, well rinsed and coarsely chopped (about 3 cups, loosely packed)
a squeeze of fresh lemon juice
5 Tbsp (75 ml) cream
fruity extra-virgin olive oil, for sprinkling
salt and milled black pepper

For the bacon bows: 
8 rashers streaky bacon

Heat the oil in a large pot and fry the sliced leeks over a medium heat for 5 minutes, or until they are translucent.  Don't allow them to brown or catch.  Stir in the garlic, fry gently for one more minute, then pour in the stock.  Turn up the heat and bring to a rolling boil.  

Add the frozen peas, all in one go. Stir to break up any frozen lumps, and cover the pot with a lid. Turn down the heat and cook at a gentle burble for five minutes, or until all ice crystals have disappeared. Now add the baby spinach leaves and chopped parsley to the pot, pressing them down with a spoon so they're submerged in liquid. Simmer, uncovered, for a further 5-7 minutes, or until the spinach and parsley are tender, but still a lively bright green.

Bacon bows!
Whip the pot off the stove and blitz it to a fairly fine purée, using a stick blender or liquidiser.  Return the soup to the heat, stir in the lemon juice and season to taste with salt and pepper.  Now stir in the cream.  Serve hot, with bacon bows or crisp-fried crumbled bacon.

For the bacon bows: heat the oven to 200 ºC. Trim the bacon rashers so each one is perfectly straight and neat.  Cut off one quarter, crossways, of each rasher, and set aside: these will be the centres of the bows. Place the long strips of bacon on a baking sheet and fold them into bowtie-shapes by bringing their short edges together on the underside. Wrap the reserved short pieces around their middles to form neat bowties, and press out the bow ends using your fingertips.  Place in the oven and bake for 10-15 minutes, or until crisp.  Drain on kitchen paper and keep warm. 

Serves 8 as a starter or snack; 6 as a main course.   

Cook's Notes

An excellent chicken stock will add fine depth of flavour to this soup.  If you're in a hurry, you can use good boxed chicken stock, or boiling water plus a few teaspoonsful of a Nomu fond or a jellied Knorr Stock Pot.

If you can't find baby spinach leaves, you can use well-rinsed, finely chopped fresh chard instead.

Flat-leaf parsley will do for this dish, but I find that old-fashioned curly parsley has a distinctive perky flavour quite lacking in modern parsley hybrids.


Print Friendly and PDFPrint Friendly

Sunday, 8 December 2013

Amasi Cheese Pops with Herbs and Spices

This recipe has been loafing in my drafts folder for weeks, waiting for me to find a chance to blog it, but I whipped it out yesterday after receiving a call from the producer of Jenny Crwys-Williams' show on Talk Radio 702.  Could I, the producer asked, suggest an iconic dish that might be adopted by South Africans in memory of Nelson Mandela?  And could I talk about this on the radio in 50 minutes' time?


Amasi Cheese Pops with Herbs and Spices
Amasi Cheese Pops with Herbs and Spices. Plate by David Walters.

After yet another outburst of weeping (I'm still, like many South Africans, swollen-eyed about the passing of this extraordinary soul) I applied my mind, and this idea popped up.  As I sifted through the pictures I took a few weeks ago, it occurred to me that these little bites contain ingredients that could symbolise many aspects of the life and spirit of one of the greatest leaders of modern times.

To be honest, I felt a bit silly telling Jenny about my idea on air, not least because chattering about a snacky little recipe seemed irrelevant, even inappropriate, at such a sombre time. Then again, there are scenes of jubilation, dancing and singing all over the country as South Africans honour the life of their beloved leader, so why not celebrate his legacy with food?

And, besides, I felt most honoured to be asked to contribute.  I never met Nelson Mandela, but I feel  privileged to have stood as a young woman in front of Cape Town's City Hall on 10 February 1990 to hear his historic speech, delivered hours after his release from prison.

So, I mused, the amasi cheese in this recipe (made from drained, soured milk) represents Madiba's humble beginnings and his happy childhood in rural Qunu, where he became a herd boy at an early age, looking after his father's cattle.

The lemon represents his great zest for life, and the smoked paprika the dust of Africa, from which all humankind arose. The black pepper recalls his struggle on behalf of the black majority in South African, and his warmth and spicy sense of humour.

The chillies represent his verve and fiery revolutionary spirit, while the white pepper recalls the limestone dust from Madiba's years of back-breaking work in a quarry on Robben Island.

Amasi Cheese Pops with Herbs and Spices
Sprinkle the spices on a piece of paper and roll
the balls around so they are lightly coated.
Parsley is is a symbol of renewal, rebirth and redemption (especially on the Jewish Passover Seder plate, where it is dipped in salt water, recalling the tears shed during Egyptian enslavement).  This, I thought, was a fitting nod to his close relationships with many Jewish activists of the apartheid era.  The aromatic cumin is a nod to his love of Indian food and his fellow Indian-South African activists.

And the cake glitter? Well, I had to scratch my head about that, but then it came to me: the playful spangles refer to his twinkling sense of humour, his profound love of children, and the global celebrities who attached themselves to him like homesick limpets.

One flavour missing here - oh, so missing - is sweetness, but you could make a dessert version of these pops by sweetening the cheese with honey, then dipping them in crushed pistachios or almonds.

Or perhaps fresh pomegranate seeds, which symbolise prosperity, abundance, fruitfulness and, in ancient Israel, the fertility of the promised land.

Amasi Cheese Pops with Herbs and Spice

For the pops:
  • 250 g amasi cheese (click here for the recipe), or a good, dense cream cheese if you don't have access to amasi
  • the finely grated zest of a small lemon
  • salt and white pepper, to taste

For the coatings: 
  • smoked paprika
  • cake glitter
  • finely chopped fresh parsley
  • crushed pink peppercorns
  • coarsely cracked black pepper
  • finely chopped fresh red chillies
  • cumin

Lightly knead the fresh cheese on a board together with the lemon zest, salt and white pepper. Go easy on the white pepper, as it has a powerful taste.

Cover your chopping board with a sheet of non-stick baking paper or clingfilm.

Pull the cheese into pieces and roll them between your palms to create neat balls.  Lightly roll each ball in the coatings for your choice, push a lolly stick or slim wooden ice-cream stick into each one, then refrigerate until firm.

Serve with a sweet chilli dipping sauce, or a fruity chutney, or pomegranate syrup.

Makes about 12 cheese pops. 


Print Friendly and PDFPrint Friendly

Monday, 18 November 2013

Glittery Christmas-Tree Bread with Garlic & Rosemary

Here's the first of my Christmas recipes for 2013: an easy flat-bread made with supermarket dough, cherry tomatoes, olives and caperberries. And for a funky festive finish, a snowstorm of edible glitter.  (Cake glitter is normally associated with cupcakes and other dreadful instances of kitchen juvenility, but even so I keep a stash of it in my baking drawer for strewing over savoury dishes, such as Home-Made Glitzers.)

Glittery Christmas-Tree Bread with Garlic & Rosemary
I sketched this on my iPad while I was plotting Christmas recipes.

I hope this festive flatbread will draw gasps from your guests as you carry it triumphantly to the table. The hot bread smells gorgeous with its lashings of fresh garlic and olive oil, and looks so pretty all bedecked with rosemary and glitter. Even the fussiest kids will, I hope, show an interest.  Sure, they may pick out the pimento-stuffed olives and caperberries, but they'll wolf down the hot bread.

Glittery Christmas-Tree Bread with Garlic & Rosemary
This is so quick and easy to make if you use supermarket dough.

You can ring the changes by adding any ingredients you fancy: pork chipolatas, bacon bits, shaved vegetables, nuggets of feta, and so on.

Glittery Christmas-Tree Bread with Garlic & Rosemary
Puffed up and crusty, and studded with edible decorations.

If you can't find packets of fresh dough in your supermarket, make your own by using one kilogram of bread flour to one 10-gram sachet of instant dry yeast, plus a teaspoon of salt, another of olive oil, and just enough warm water to bind the mixture into a pliable dough.

 Knead it well, let it rise until doubled in size, punch it down in the usual fashion and continue with the recipe.  Here are good basic instructions for bread dough.


Glittery Christmas-Tree Bread with Garlic & Rosemary

1 kg ready-made white or wholewheat bread dough
500 g cherry tomatoes (about 24)
16 pimento-stuffed green olives
a few sprigs of fresh rosemary
½ cup (125 ml) olive oil
3 cloves garlic, peeled and finely grated
flaky sea salt
freshly milled black pepper
12 caperberries, well drained [optional]
edible cake glitter

Heat the oven to 200 ºC.

Lightly dampen a large baking tray and cover with a sheet of baking paper.  The water on the baking tray will help the paper to stick.

Dust some flour over the top of the paper, then pull and push the dough into a rough tree-shaped triangle. You will find that the dough creeps back, but if you persist with pulling and stretching, you'll eventually have an acceptable shape.

Glittery Christmas-Tree Bread with Garlic & Rosemary
Use a pair of sharp scissors to snip the dough.
Using a pair of kitchen scissors or a sharp knife, cut diagonal slits in the dough to form the 'branches' of the tree.

Don't worry if these aren't perfectly symmetrical - the bread will do its own thing in the oven as it rises and crisps up, and there really is no point in faffing about when you should be relaxing on the lawn with with a gin and tonic.

Press the cherry tomatoes deep into the dough.  Cut the olives in half crossways and push them into the dough between the tomatoes. Strip the leaves off the rosemary sprigs and scatter them between the tomatoes and olives.

Glittery Christmas-Tree Bread with Garlic & Rosemary
A flurry of edible glitter goes over the bread as
it comes out of the oven. 
Now, using your fingertips, make deep dimples all over the bread.

Mix the olive oil and garlic together in a bowl and paint this all over the bread, using a pastry brush or your fingertips.

Generously scatter the bread with flaky salt, grind over plenty of fresh pepper and bake at 200 ºC for about 30 minutes, or until the bread is well risen, golden brown and crisp on top.

Remove the bread from the oven, let it cool for 5 minutes, then arrange the caperberries on top.

Trickle a little more olive oil over the top, and dust lavishly with cake glitter.

Serves 6-8 as a snack. 


Print Friendly and PDFPrint Friendly

Thursday, 5 September 2013

Low-Carb Slow-Cooked Courgettes & Cherry Tomatoes with Melty Feta

Vegetables cooked to a tender mush are frowned upon these days, and I have to agree with the general sentiment that bright, fresh and tender-crisp is the way to go. I very seldom cook any plant to the point of disintegration but, then again, there are a handful of vegetables that are sublime when subjected to long, slow seething, among them aubergines, fennel, leeks, onions, waterblommetjies and tomatoes. And - as you will see in this this recipe - courgettes!

Slow-Cooked Courgettes & Cherry Tomatoes with Melty Feta Wheels
Slow-Cooked Courgettes & Cherry Tomatoes with Melty Feta Wheels.


Courgettes are meek veggies packing very little punch in the flavour department, but I love them in all forms - shaved raw into salads, grated and tangled into fritters and quiches, pencilled into stir-fries, and pan-fried in thick coins, all ready for a simple dressing of olive oil, lemon and salt.

They're also gorgeous when carefully cooked to a state of silken collapse: just think of the best ratatouilles of your life!  In this recipe, I've added cherry tomatoes, which are blistered in a very hot pan before they go into the oven.

This is good piping hot, with wheels of peppered feta, and it's also delicious cold as a snack or starter: see my Cook's Notes at the end of this blog post for further tips.


Slow-Cooked Courgettes & Cherry Tomatoes with Melty Feta Wheels
A simple but intense baked tomato sauce. Try this with halloumi cheese
instead of feta!


Slow-Cooked Courgettes & Cherry Tomatoes with Melty Feta 

3 Tbsp (45 ml) olive oil
1 kg cherry tomatoes
a large sprig of thyme
2 fat cloves of garlic, peeled and finely chopped or grated
5 Tbsp (75 ml) dry white wine
1 kg courgettes [baby marrows/zucchini]
salt and milled black pepper
3 'wheels' or squares (about 220 g in total) of feta cheese, patted dry on kitchen paper
baby mint or basil leaves, or fronds of fresh dill (see Cook's Notes)
extra olive oil, for sprinkling


Slow-Cooked Courgettes & Cherry Tomatoes with Melty Feta Wheels
The tomatoes are first blistered in a
frying pan, then roasted with the
courgettes.
Heat the oven to 180 ºC. Place a large roasting tray over a fierce heat on your hob and add the olive oil. When the oil is very hot - but not yet smoking -  add the cherry tomatoes and cook them, tossing the pan energetically, for a few minutes, or until their skins begin to blister and peel. Add the thyme, garlic and wine, stir well, and cook for another minute or two. Remove the tray and set aside.

Rinse the courgettes to get rid of any grit, top and tail them and cut them into 5-cm lengths. Add them to the roasting pan and mix everything together. Season to taste with salt and pepper. Cover the pan tightly with tin foil and bake at 180 ºC for 30 minutes. Now remove the foil, give the veggies a good stir and turn the heat down to 160 ºC, fan on (or to 170 ºC if your oven has no fan).

Cook uncovered for another 65-75 minutes, or until the tomato sauce has reduced and slightly thickened (see Cook's Notes, below). Add the feta to the tray, turn the heat up to 220 ºC, fan on, and blast for another 5-10 minutes, or until the feta is soft and bubbling. Drizzle with a little fruity olive oil, scatter over the mint or basil leaves, and serve immediately, with hunks of bread.

Serves 6 as a side dish; 4 as a main course. 

Cook's Notes
  • The tomatoes need to cook down slowly to a deep, intense sauce. If the sauce seems watery, leave the veggies to bake for a little longer.
  • This dish needs a topping of young herb leaves, but I advise that you choose just one type of herb, because clean, simple flavours are important here. Mint and basil are good, and it's also lovely with small snippings of fresh dill.  
  • You can bake the dish well ahead of time and keep it, covered, on your counter top. Add the feta wheels when you reheat the tray in a very hot oven. 
  • This is a great served cold as a topping for bruschetta: dollop it onto toasted ciabatta slices and add cheese: nuggets of goat's milk cream cheese, or Parmesan shavings, or milky slices of excellent mozzarella.    


Print Friendly and PDFPrint Friendly

Friday, 26 July 2013

My Epic Chicken Soup with Nutmeg, Thyme & Cream

I can't think of a recipe that stirs more emotion among cooks than home-made chicken soup. I reckon that's because it's one of the world's favourite comfort foods, and a jealously guarded childhood memory for anyone with the slightest sense of nostalgia.

My Epic Chicken Soup with Nutmeg, Thyme & Cream
A silken chicken soup with nutmeg, cream, thyme and parsley.

How you like your chicken soup is likely to have everything to do with the dish tenderly handed to you by your mother in your most miserable, tired and sick moments as a youngster.

If you're Jewish, for example, you might fall to the floor in a dead faint at the thought of an intensely flavoured broth with bobbing little kneidlach. Restorative clear broths with noodles, lime, lemon grass and fish sauce may be your idea of heaven if you were raised in many places in Asia, while lemon and rice are essential ingredients for Greeks (and other children of the eastern Mediterranean) who grew up inhaling their mothers' avgolemono-style soups.  Or you might have a passion for creamy Mexican-style soups with sweetcorn and abundant toppings of avocado, grated cheese, chilli, lime and coriander.

My Epic Chicken Soup with Nutmeg, Thyme & Cream
A little cornflour gives this chicken soup a silky texture.

I've made countless pots of chicken soup for my family over the past two decades, and this recipe is the result. It's is a homely, creamy soup, crammed with vegetables. It's thick and silken, but not at all gloopy, and it has a lovely intense chickeny taste, which can only be achieved by patiently making a good stock from the bones of the bird.

I admit this is a long recipe, that it has a lot of ingredients, and that it takes time to make, but I promise you won't be disappointed by the result. (If you just don't have time to faff around, you might like to try my Quick, Thick Chicken Soup, Using the Remains of the Roast.)

Potatoes and other veggies are the thickening agents in my chicken soup, but I always add a little slaked cornflour towards the end because I find that this - quite magically - gives the soup an agreeable silken texture.  Nutmeg is an essential ingredient, and so is fresh cream.

Like most soups and stews, this tastes better the next day, after its flavours have had a chance to mingle and deepen. I'd recommend, if you're making this for a special occasion, that you prepare it a day ahead, but please refrigerate it overnight during the summer months.  Chicken soup left out in the heat can turn in a flash into a vile witch's cauldron.

You can make this with a whole chicken, or use the remains of your roast (see my Cook's Notes, below, about freezing chicken carcasses).  If you are using a fresh chicken, you need not add the poached chicken breasts, because you will use the meat you've stripped away from the whole bird.

The stock below appears in the 'Basic Recipes' section of my cookbook Scrumptious Food for Family and Friends, and is reproduced here courtesy of Random House Struik.

I always add a packet of chicken wings to my stock pot, as they help to create a good rich stock (and by that I mean one that jellies overnight in the fridge).

My Epic Chicken Soup with Nutmeg, Thyme & Cream

For the stock:
a large free-range chicken, trimmed of excess fat, OR the remains of your roasts (see Cook's Notes, below)
8 chicken wings
3 litres water, or enough to cover the chicken to a depth of 7 cm
1 cup (250 ml) white wine
1½ tsp (7.5 ml) sea salt
1 large onion, skin on, quartered
2 leeks, trimmed, rinsed and sliced
3 large carrots, peeled and roughly chopped
2 stalks celery, thickly sliced
6 stalks flat-leaf parsley
3 whole cloves
2 bay leaves
1 tsp (5 ml) black peppercorns

For the soup:
2 Tbsp (30 ml) butter
1 Tbsp (15 ml) olive oil
3 onions, peeled and sliced
3 leeks, white and pale green parts only, sliced
3 large carrots, peeled and sliced
2 sticks celery, sliced
a large sprig of thyme
2 cloves garlic, peeled and finely chopped
salt and milled black pepper
6 large potatoes, peeled and cubed
1½ cups (375 ml) milk
5 skinless chicken breasts (omit these if you've used a whole fresh chicken for your stock; see recipe)
1 Tbsp (15 ml) cornflour, or more, if necessary (see recipe)
1 cup (250 ml) cream
freshly grated nutmeg, to taste
a little lemon juice
freshly chopped curly-leaf parsley, to serve

Begin with the stock. Place the whole chicken (or carcasses) and the wings into a large stock pot and add the water, wine and salt. Bring gently to the boil, then turn down the heat and simmer for 10 minutes. Skim off all the grey foam as it rises.

Now add all the remaining stock ingredients and bring back up to the boil. Cover with a tilted lid, turn down the heat and simmer gently – the water should remain at a calm burble – for two hours, topping up with more water if necessary.

NB: If you've used a whole fresh chicken to make your stock, fish it out of the pot after about 45 minutes and cut away the chicken breasts, using a sharp knife. Set these to one side. Return the chicken to the pot, wait 20 minutes or so, then take it out again and cut off the thighs and drumsticks. Let these cool, strip off all the cooked flesh and set aside. Put the leg bones and skin, and what's left of the chicken, back into the pot and carry on simmering the stock. These steps prevent the chicken flesh from cooking to a mush.

Let the stock cool a little, then strain it into a large clean bowl through a sieve lined with a fine cloth (a laundered napkin or a brand-new kitchen cloth is ideal). Discard the solids. Skim the fat off the top of the stock, or refrigerate it overnight and then lift off the fat.

My Epic Chicken Soup with Nutmeg, Thyme & Cream
.
In the meantime, get started on the vegetables. Heat the butter and olive oil in a large pot (I use my wok, because it is so good for frying veggies) and add the onions, leeks, carrots, celery and thyme sprig. Cook over a medium heat until just softened (about 6-7 minutes), then add the garlic and cook for another minute, without letting the garlic brown. Add the potatoes, milk and a few ladles of hot stock - it doesn't matter if the stock hasn't finished boiling. The liquid should just cover the vegetables.

NB: If you used chicken carcasses and not a whole chicken to make your stock, push the deboned chicken breasts into the bed of vegetables (after you've added the liquid) so they can poach gently. Once they're just cooked through, remove them and set them aside, covered, on a plate.

Season with a little salt and pepper, and turn the heat down to a gentle bubble. Cook gently for 20 minutes, or until the potatoes and carrots are just soft.

Transfer the vegetables and liquid to your rinsed-out stock pot and top up with more hot stock. How much you add depends on the volume of vegetables, but as a rule of thumb, the amount of liquid in the pot should be about double the volume of vegetables. Simmer the soup for a further 10 minutes, or until the potato cubes are on the point of collapse.

Remove the sprig of thyme and, using a stick blender or liquidiser, whizz the soup until it's beautifully smooth and fine. Patiently skim any foam off the top, then add the cream. Now mix the cornflour to a thinnish paste with a little water, and gently whisk this into the soup. Cook, stirring constantly, over a medium heat, for a few minutes. If the soup seems too thick, thin it down with more stock or milk. If it is too thin for your liking, mix up another batch of cornflour paste and dribble it into the pot until the soup if of the consistency you desire.

Shred the chicken meat you've set aside and add it to the soup pot. (Don't be tempted to liquidise any of the chicken bits, as this will ruin the soup's texture). Season generously with salt and plenty of milled pepper.

Simmer the soup for a few more minutes, or until the shredded chicken has heated through. Now, using the fine teeth of a grater, rasp the nutmeg into the soup. I usually use about a third of a whole nutmeg, but this is up to you.  If you're using powdered nutmeg, add it just a pinch at a time, or until you're happy with the taste.

Immediately before you serve the soup, add a spritz or two of fresh lemon juice, to taste. This puts a little spring in its step!

Pour into warmed bowls, scatter with parsley and serve with bread or rolls.

Makes about 3 litres of soup.

Cook’s Notes, and stock tips:
  • If you often roast chickens, or buy ready-roasted ones, save their carcasses for an epic chicken soup by freezing them in a large plastic bag. I often make a stock with four carcasses I've 'saved' over a fortnight. There's no need to defrost them before you put them into the stock. 
  • Another way to create a really deep-flavoured stock (and tender poached chicken to use in another dish) is to simmer a carcass and wings for two hours, as described in the recipe, then add a whole, new chicken, and let that simmer for another hour, or until cooked through.
  • For an extra-rich stock, you can lightly fry all the vegetables, herbs, spices and carcass bones in a mixture of hot olive oil and butter before you add the water and whole chicken. For warm colour, add a few roughly chopped tomatoes.
  • A good way to clarify and de-fat a stock is to use chef Heston Blumenthal’s method: freeze the stock in a round bowl, then place it in a big sieve or colander lined with several layers of kitchen paper. Set the sieve over a large bowl. As the stock thaws and drips into the bowl, the fat and impurities stay behind on the paper.
  • If you’d like a really intense-tasting stock, put the pot back on the stove and simmer, uncovered, until the liquid has reduced by half. Store, covered, in the fridge for up to 3 days, or freeze in lidded plastic containers or clingfilm-covered ice trays for up to 3 months.
Print Friendly and PDFPrint Friendly

Wednesday, 10 July 2013

Peppercorn Chicken with Chilli & Mint

Here's my latest MasterChef recipe, the second in a series of four recipes I've developed for Woolworths, food sponsors of the latest South African series.

Peppercorn Chicken with Chilli & Mint
Tender, mint-infused chicken breasts with a sticky-sweet honey and soy glaze
I was stumped by this week’s mystery-box ingredients (see the list at the bottom of this page). The spices in the list hinted loudly at a home-made Chinese five-spice powder, while coconut and soy sauce confirmed the Asian theme. But, oddly, there was no acidifying agent (such as lime or rice vinegar) in the ingredients list, and my first three recipe attempts were disappointing flops.

Peppercorn Chicken with Chilli & Mint
These are some of the ingredients I had to work with.
Picture courtesy of Woolworths.
In the end, I decided to focus on my favourite flavours in the list, and to combine them in a simple dish of succulent chicken breasts infused with fresh mint and chilli, and coated with rainbow peppercorns and a honey/soy sauce glaze.  Mint, peppercorns and chicken are an unusual combination – but why not?

The only tricky part about this recipe is making sure the chicken is perfectly cooked. This is not as easy as it sounds, because the one end of a bone-in chicken breast is considerably thicker than the other. How long your chicken will take to cook depends, of course, on the size of the pieces.  I always cut a deep slit into the thickest part of the breast, then prise it open to check that it's cooked to the bone.  Any sign of pinkness in the juices, and I put it back in the oven for another few minutes.

Finally, this year, it’s not just bloggers getting the chance to get creative in the kitchen along with MasterChef and Woolies. Create a recipe with the same ingredients used each week by the Woolworths Masterchef Competition bloggers and you could win one of fourteen R1000 Woolies gift cards, or the (very!) grand prize of a R10 000 gift card. Head over to the Woolworths Masterchef Hub for more info and T&Cs.

My first recipe for Woolies/Masterchef:  Slow-Roasted Leg of Lamb with a Basil Walnut Sauce 


Peppercorn Chicken with Chilli & Mint

4 large free-range chicken breasts, on the bone
flaky sea salt
20g (half a cup, closely packed) fresh mint leaves
2 fresh red chillies, deseeded and finely chopped
4 Tbsp (60 ml) olive oil
4 Tbsp  (60 ml) honey
2 Tbsp (30 ml) light soy sauce
2 tsp (10 ml) rainbow peppercorns, coarsely crushed


Heat the oven to 180 ºC. Put the mint leaves, chillies and olive oil in the jug attachment of a stick blender and whizz to a fairly fine pesto.

Season the breasts lightly with salt. Slide your fingertips under the skin on top of the breasts, breaking the fine membrane as you go to create a pouch. Take half the mint paste and spread it evenly under the breast skin (reserve the remaining mixture). Pull the breast skin back into place.

Cut a deep horizontal slash into the fleshiest part of each breast, and rub the remaining paste into the slashes. Set aside for an hour, or until you’re ready to cook the breasts.

Place the breasts skin-side up in a roasting pan, cover them lightly with tin foil or baking paper and roast for 25-30 minutes, or until they are just cooked through. Drain any excess fat from the pan.

Warm the honey until it’s runny, then stir in the soy sauce.  Drizzle this mixture all over the chicken breasts – and don’t worry if it slides off into the pan. Press the crushed peppercorns onto the skin of the breast.

Peppercorn Chicken with Chilli & Mint
Drizzle the glaze over the partly cooked breasts before  returning them to the oven.
Turn the oven grill on to its highest setting and place the roasting pan on a middle shelf, not too close to the element.  Grill the breasts for 5-8 minutes, basting them every few minutes with the honey-soy glaze.  Watch them like a hawk, as the honey burns quickly.

When the skin is golden and beginning to blister, remove the chicken breasts from oven and let them rest for 5 minutes.

Cut the breasts into pieces and drizzle over any pan juices.

Serve hot, with wedges of lemon.

Serves 4.

Here is the list of ingredients I was given to work with (I was also allowed to add salt, pepper and oil to my 'mystery box'):

Chicken
Honey
Light soy sauce
Star anise
Fennel seeds
Three colour peppercorns
Cloves
Cinnamon
Coconut
Chilli
Mint


Print Friendly and PDFPrint Friendly

Tuesday, 2 July 2013

Warm Duck Salad with Crackly-Topped Beetroot

There are not many surprises in a domestic kitchen when you've spent several decades cooking the same thing over and over. This one, however, astonished and delighted me: if you roast small par-cooked beetroot that are still attached to thumb-length leaf stalks, those stalks will dry out over an hour or so into lovely, sweet twigs with a most satisfying crunch.


Here, I've combined the crackly-topped beetroot with warm slices of rosy duck, some dark salad leaves and a scattering of dried cranberries to make a winter salad of great simplicity.

Duck breasts are eye-wateringly expensive, so I don't often buy them, but this recipe won't ruin your budget because you can stretch just two breasts between four people.

I never boil beetroot because I don't like the way all the ruby-red goodness leaches into the water, but I have to admit that I'm often infuriated at how long it takes to roast even small beetroot to a state of tender, sweet and slightly shrunken deliciousness.

When I was making this salad, I took a shortcut and blasted them in the microwave oven before roasting them.  I've never tried this before, but it worked very well, and it slashed the roasting time by at least an hour. (Thank you to my friends Mark and Julie Stevenson for showing me their method!)

You could make a complicated dressing, perhaps with some spicy or citrussy or sweet element (such as pomegranate syrup) to drizzle over this salad, but I think a spritz of lemon juice and a lick of grassy olive oil is all that is needed to bring out the earthy, metallic flavours of duck, rocket, watercress, spinach and beetroot.

Dried cranberries are available at most supermarkets and health shops; this is also good with a mixture of dried cherries and goji berries.


Warm Duck Salad with Crackly-Topped Beetroot

8 young beetroot, leaves still attached
extra-virgin olive oil, for sprinkling and dressing
flaky sea salt and milled black pepper
2 large boneless duck breasts, skin on
mixed dark salad leaves - rocket, watercress and baby spinach (enough for four people)
1/3 cup (80 ml) soft dried cranberries
6 spring onions, white and pale green parts only, finely sliced
a large lemon

Heat the oven to 190 ºC and switch on the fan.  Trim off the leafy tops of the beetroot, leaving stalks 6 cm long attached to each one. Place them in a small ovenproof dish and cover loosely with clingfilm.  Microwave the beetroot on high for 12 minutes. Drain off any liquid, drizzle with two or three tablespoons of olive oil and season generously with salt and milled black pepper. Toss well so everything is coated.

Roast the beetroot, uncovered, for 45 to 60 minutes, or until they are very tender and somewhat shrunken, and the stalks are crisp.

In the meantime, lightly season the duck skin with salt and pepper. Place the duck breasts, skin side down, in a cold frying pan. Turn on the flame under the pan to its lowest setting, and cook the breasts slowly and gently for 10 minutes, without disturbing them. This long heating process will help to render the fat.

Drain off most of the fat (keep it for roasting potatoes!), turn up the heat under the pan to medium high and fry the duck breasts skin-side down for another 4-5 minutes, or until the skin is very crisp and golden.  Flip the breasts over in the pan, turn down the heat a little and fry them for another 4-6 minutes, or until they are cooked, but still slightly rosy in the middle. Don't be afraid to cut a sneaky slit into the thickest part of the breast to check for doneness - you will lose a little juice this way, but this is a lesser evil than tough, overdone duck.

Remove the breasts from the heat, put them on a plate, cover them loosely with tin foil and let them rest for five minutes.

Make a bed of salad leaves on a large platter. Cut the duck into slices and slice the beetroot in half lengthways.  Arrange the duck slices and beetroot on top of the greens and scatter with the dried cranberries and spring onion slices

Squeeze the lemon over the salad and drizzle lightly with olive oil. Season the salad with salt and milled black pepper, to taste, and serve immediately.

Serves 4. 


Print Friendly and PDFPrint Friendly