Friday 30 April 2010

Pot-roasted Chicken "Stewp" with Herbs, Garlic and Bacon; and the food blogger's lament

First the chicken, then the lament. I love stews, and I adore soups, so why not a "stewp", I thought? Why not pot-roast whole chickens and vegetables with a lot of liquid, so you end up with fall-apart chicken pieces in a lake of rich aromatic gravy?

Pot-roasted Chicken "Stewp" with Herbs, Garlic and Bacon
Flavoured with wine, garlic and good smoked bacon cubes, this makes an excellent one-dish family meal. There are a couple of steps in this recipe that require a bit of effort: One, pushing some fragrant herby stuffing under the breast skin and, two, browning the chickens on all sides before they go into the oven. After that, all you need do is kick the dish into the oven and forget about it.

Now the moan. (I called it a 'lament' in the title of this post only because I'm trying to cover my dainty behind: recently, in a presentation at the South African Food Bloggers' Conference, I advised bloggers never, ever to complain or whinge in a blog post.)

Anyway: many food bloggers will agree that having to take photographs of food can be  pain in the neck. It's not that styling and photographing your own food isn't fun - it can be hugely rewarding, especially when you've learned a few basic tricks (necessary if you have an elderly camera, as I do), and the winning picture looks just beautiful.

The problem is finding the time - and getting the time of day right.

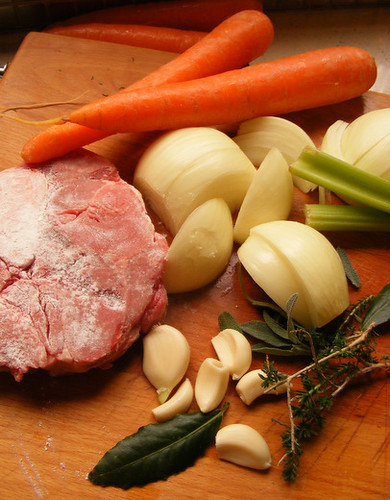
Here's why: food needs to be photographed in natural light (a flash is the kiss-of-death to a plate of food), and that usually means taking the picture in cool morning light, or at the very least before noon. If you're going to photograph really freshly cooked food, you have to get up early in the morning to cook it. And who has time to do that? Not I, said the little red hen. This blog isn't my job, and my early mornings are gobbled up by school lifts and making of lunch boxes. It's only once I've done a morning's work, and all the afternoon's school lifts and child-admin stuff, that I can hit the kitchen, and by that time the light is too yellow and low-slanting to take a good photograph (the photograph on this page is a good example). So, a few choices: keep some of the food aside to reheat and photograph the next morning, or cook-and-snap on Saturday and Sunday mornings. Neither approach is ideal: the former results in sulky-looking food, and the latter in sulky-looking family members.

And, having said that, I'm actually one of the lucky ones, living as I do in the southern hemisphere where the light is clear and brilliant for most months of the year. At the Food Bloggers' Conference, my pal Jeanne Horak-Druiff of Cooksister! (a South African living in London) had us in stitches as she described her frustration at having to take photographs of her beautiful food on dismal winter evenings. Jeanne set up a special mini-light-box-cum-studio in her conservatory, but was repeatedly defeated by air so arctic that the hot food steamed up her lens.

Why, you may ask, bother to post a photograph at all? Well, the truth is that a food blog without photographs is like a cartoon without illustrations. No matter how original and mouth-watering your recipes, and how brilliant your writing, no one will pay your blog much attention unless it is lavishly illustrated with food photographs. Okay, they don't need to be as perfect as food-magazine pictures (the food-blogging community, competitive as it is, can be very forgiving), but they do, at the very least, need to be sharp, bright and good-looking.

So what's the point of my moan? Nothing, really, except to commiserate with all those other food bloggers who labour in their kitchens to produce excellent recipes, and then decline to post them because they haven't had a chance to take a photograph, or because they took a pic that looks like something the cat sicked up.

If it's any consolation: none of the world's most esteemed food writers take publishable pictures of their own food. I've never seen Gordon, Nigella, Jamie or Nigel with a camera in their hands. They have professional photographers to do this, expert cooks to make the actual dish, and stylists to scatter the parsley and toast the pine nuts. They have home economists to work out the measurements, and editors to tweak the grammar. You, my dears, do this all on your own, and that's what makes your blogs amazing.

On the subject of food photography, please take a look at the work of Nina Timm of My Easy Cooking, who is the reigning queen among South African food bloggers when it comes to photography and food styling. This is the standard of food photography that I aspire to.

But back to the stewp.

This recipe uses two chickens, but you can easily halve the recipe. Do take the trouble to drain off excess fat, as instructed in the recipe, or you will end up with a greasy gravy. You need nice, thick, smoked pork rashers for this dish - watery supermarket bacon will not do. Ask your butcher.

Pot-roasted Chicken "Stewp" with Herbs, Garlic and Bacon

2 large free-range chickens
salt and milled black pepper
a small bunch of mixed fresh herbs of your choice: sage, oregano, basil, parsley and thyme
8 cloves fresh garlic, peeled and finely chopped
the zest and juice of 2 small lemons
6 Tbsp (90 ml) olive oil
6 smoked pork rashers (about 180 g; each about 7 mm thick), cubed
3 onions, peeled and cut vertically into eighths
2 sticks  celery, sliced
24 peeled baby carrots (or 10 medium carrots, peeled and cut in half crossways)
3 Tbsp (45 ml) cake flour
2 cups (500 ml) dry white wine
2 thumb-length sprigs fresh rosemary
8 large potatoes, peeled and halved crossways

Heat the oven to 150°C.  Using the flat of your hand, press down firmly on the breasts of the chickens until you hear the breast bones snap. Season inside and out with salt and black pepper.

Strip the herb leaves from their stalks and chop the leaves fairly finely. Place in a bowl and add the chopped garlic, the lemon zest and 2 Tbsp (30 ml) of the olive oil. Season with salt and pepper and mix well. Now make a 'pocket' at the top of the chickens by very gently separating the breast skin from the flesh: slide your fingertips under the skin on top of the breasts, breaking the fine membrane as you go to create a pouch. Take half of the herb paste and spread it evenly under the breast skin of both chickens (reserve the remaining mixture). Pull the breast skin back into place.

Heat another 2 Tbsp (30 ml) of olive oil over a brisk flame flame in a large ovenproof dish (a big cast-iron pot is ideal; a sturdy roasting pan will also do). Brown the chickens all over in the hot oil, turning frequently: this should take between 12 and 15 minutes. Don't worry if they're not evenly golden brown: what's important is that there's a sticky honey-coloured residue on the bottom of the pan.

Remove the chickens from the pan and set aside. Add the cubed pork rashers to the pan and fry for 3 minutes, or until just crisp and golden brown. Remove from the pan using a slotted spoon and set aside.  Drain all the chicken and bacon fat from the pan, but don't wipe it out.

Put the remaining 2 Tbsp (30 ml) olive oil into the pan, add the onions, celery and carrots and fry over  a medium-high heat for 4-5 minutes, or until the onions begin to colour. Sprinkle the flour over the vegetables and cook for two minutes, stirring. Add the wine and lemon juice to the bowl containing the left-over herb paste, stir well, then pour the mixture over the vegetables, stirring briskly to release any sediment and to prevent lumps forming.  Cook the sauce gently for a two minutes, or until thickened.

Place a sprig of rosemary inside the cavity of each chicken. Rest the chickens, breast-side up, on top of the vegetables in the pan, and arrange the potato halves around them. Using a large spoon, baste the chickens and potatoes with the winy liquid. Cover with a lid, or a tight layer of tin foil, and cook at 150°C for an hour and 45 minutes, or until the potatoes are very tender, and the chicken is falling off the bone. Give the pan a shake now and then, and baste the chicken with the juices. Pull the chicken to joints, and serve immediately, in deep bowls, with hunks of bread.

Serves 8.
Print Friendly and PDFPrint Friendly

Wednesday 28 April 2010

Roast Pork Belly with Pomegranate-Glazed Cape Quinces

Roasted to a melting softness with fennel, orange zest and bay leaves, this pork belly is served with sweet-sharp quinces that have been oven-stewed in a syrup of sugar, water and pomegranate concentrate. Every flavour and ingredient in this recipe makes me jump for joy - I love pork belly cooked with punchy aromatics - but it's the quinces that really make my tastebuds sing.

A few years ago, a quince was rarely to be seen on a supermarket shelf in South Africa, but these days you can find them, during the autumn months, piled in fuzzy yellow pyramids, in selected greengrocers, and in bigger retailers such as Checkers and Pick 'n Pay.

I've mentioned quinces often on this blog (see Quince Jelly, Moulded Quince Jelly, and Old-Fashioned Quince Paste) not only because I love them, but also because I think they're one of those old-fashioned fruits that are in danger fading away into history, along with all those gnarled staples that have become too troublesome to grow, peel or eat on the hoof:  among them prickly pears, celeriac, turnips, loquats and mulberries. Quinces might take a while to prepare, but, like sharp apples, are lovely with roast pork.

And slow-cooked, inexpensive pork cuts have become very popular in the last year or so, as the recession has bitten deep into consumers' pockets: you might be interested to know that the most-searched-for recipes on this blog are ones for pork neck.


Roast Pork Belly with Pomegranate-Glazed Cape Quinces
Pork belly is a dish for devoted carnivores:  it's fatty, unctuous, and utterly delicious, with its melting fork-tender flesh and crispy layer of crackling.  Look, this artery-blocker isn't something you could - or should - eat every day, but as an occasional treat, for a Sunday roast perhaps, it cannot be matched.  It's also dead-easy to make, unlike lamb or beef roasts, which demand split-second timing to reach perfect pinkness.

If you can't find pork belly in your local supermarket, ask the in-house butcher to cut a piece for you. If he  won't, phone your local butcher and order a piece. You can ask for your pork belly to be boned, but I find that it has a better flavour if the rib bones are left in.  Do ask the butcher to score the fat for you, because this is really difficult to do with even the sharpest kitchen knife (but a sharp craft blade or Stanley knife will do the trick).

Roast Pork Belly with Pomegranate-Glazed Cape QuincesIn this recipe, I've glazed the quinces with delicious pomegranate concentrate, which is available, under the Verlaque brand, from Woolworths and selected food shops  in South Africa.  If you can't find pomegranate concentrate, use the equivalent amount of cranberry jelly,  plus two tablespoons of fresh lemon juice.  You can add  warming spices -  such as cinnamon, cloves and star anise - to the cooking syrup, but I like the quince flavour just as it is.


Roast Pork Belly with Pomegranate-Glazed Cape Quinces

For the quinces:
1 cup (250 ml) white sugar
3 cups (750 ml) water
a slice of fresh lemon
3 large quinces
3 T (45 ml) pomegranate concentrate (or 3 T redcurrant jelly, plus 2 T - 30ml - lemon juice)

For the pork belly:
1.5 kg pork belly, fat scored
boiling water
1 onion, unpeeled, roughly sliced
6 stalks of fresh fennel
4 thick slices of a fresh orange
2 tsp (10 ml) cumin seeds
2 tsp (10 ml) fennel seeds
1 tsp (5 ml) whole black peppercorns
1 tsp (5 ml) flaky sea salt
2 bay leaves, fresh or dried
finely grated zest of a large orange

Pre-heat the oven to 160°C. Put the sugar and water into a medium-size saucepan, and add the lemon slice.  Bring gently to the boil, stirring occasionally to help the sugar dissolve. Wipe the quinces with a clean cloth to remove any fuzz. Quarter the quinces, using a sharp knife, and then cut each quarter in half again.  (Quinces are rock-hard, and the best way to do this is as follows: place the fruit, stalk-side up, on a chopping board. Slam the knife down hard on the top of the quince, and hammer the blunt upper surface of the knife with your fist a few times. Alternatively, a heavy cleaver will do the trick, as will a potato-wedging device.)   Using a small, sharp knife, carve out the hard pith of each wedge. Drop the quince pieces into the sugar syrup, turn down the heat and simmer for 25-30 minutes, or until the quince wedges are just tender when poked with a knife-point. Set aside.

In the meantime, prepare the pork belly.  Fill a kettle with water and bring to the boil. Pour the boiling water, in a continuous stream, over the fatty side of the belly: this will help create good crackling.  Set the belly aside. aside. Cover a deep roasting pan with a long length of greaseproof/parchment paper or tin foil - at least long enough to wrap the belly entirely.  Make a little bed - the same size as the pork belly - of sliced onions, fennel stalks, orange slices and garlic. Put the pork belly, fat side up, on its bed.

Heat a frying pan over a moderate heat and tip in the cumin and fennel seeds.  Toss, for a minute, until the seeds are hot and lightly toasted.  Tip them into a mortar (or similar) along with the peppercorns, bay leaves and salt, and grind, using a pestle, to a rough powder. Stir in the grated orange zest.  Rub this mixture over the top and sides of the pork belly, working it deep into the scorings in the fat.  Pull up the sides of the baking paper or tin foil and pleat together make a loose parcel.  Bake at 160°C for one hour.

In the meantime, remove the cooled quinces from their cooking syrup, using a slotted spoon, and place in an ovenproof dish just big enough to hold the wedges in a single layer .  Measure out 150 ml of the cooking syrup, place in a small bowl and stir in the pomegranate concentrate.  Drizzle this mixture over the quinces, and turn them over a few times so that they are well coated.  Cover loosely with a piece of paper or tin foil.

Turn the the oven up to 200°C. Remove the pork belly from the oven and open up the parcel just wide enough to expose the fat, but not so wide that the juices escape. Put the belly back in the oven, on the top shelf, and place the quinces on the bottom shelf.  Cook the pork and the quinces for an hour or so, basting the quinces every now and then with their syrup juices.  When the pork crackling is golden and very crunchy, and the syrup around the quinces has reduced to a sticky glaze, dinner is ready!

Carve the belly into thick slices and serve with the quinces and some stir-fried greens.

Serves 4.  Print Friendly and PDFPrint Friendly

Wednesday 21 April 2010

Elizabeth Moxon's Lemon Posset, but with Hanepoot & Glitter

A generous glug of South African Hanepoot adds sweetness and sunshine to this delicate lemony cream. Hanepoot (pronouned 'ha-nah-poort') is a much-loved sweet wine made from the ancient Muscat d'Alexandrie grape, believed by wine experts to be the one of the oldest genetically unmodified vines still in existence.  You can, of course, use any sweet dessert wine in its place, as long as it's not so old and noble that its perfume overpowers the lemon.

Elizabeth Moxon's Lemon Posset, but with Hanepoot and edible glitter.

I came across this recipe while browsing a cookbook that's become one of my favourites in recent years: Robert Carrier's Entertaining, published in 1977. It's not really old enough to be called a vintage cookbook, but enough years have gone by to make the book seem rather quaint, at least in comparison to the lavishly illustrated, self-congratulatory extravaganzas of the Nigella-Nigel-Jamie era (I'm not knocking these icons, but don't you loathe the way they drool, in print, over their own recipes?).

Still, this is a book worth hunting down, as are all of Carrier's books: it's packed with excellent recipes that deserve to be revisited.

'He was as influential as Elizabeth David or Delia Smith, and some argued that he was the link between them,' was what The Times had to say in his obituary. 'He became the leading populariser of the appeal of good cooking and helped to bring about a domestic revolution in imaginative, adventurous cooking.'

Until I saw this recipe, I hadn't heard of  Elizabeth Moxon - and found no trace online of a biography of this English cookery writer.  I was very pleased, then, to find that her 1764 cookbook, English Housewifry: Exemplified in Above Four Hundred and Fifty Receipts, has been digitised and is available in plain text format at Project Gutenberg, or in its original form at Google Books.


Elizabeth Moxon's Lemon Posset, with Hanepoot
From English Housewifry by Elizabeth Moxen.

Elizabeth's Georgian recipe (which is not, strictly speaking, a posset; it's more like a syllabub) calls for 'a jack' of white wine, and advises that you sweeten the cream with sugar, 'to your taste'.  Robert Carrier calls for dry white wine, and an unspecified amount of icing sugar. I compromised by using half a cup each of hanepoot and  icing sugar. Feel free to adjust these quantities, but take care not to add too much wine - your dessert will become too runny and won't set to a perfect, fluffy cream.

I have frivolously decorated the tops of these creams with edible pink cake glitter, in keeping with the Elizabethan taste for bedecking food with comfits, fruit-paste shapes, spun sugar and all manner of fancies.

Serve this dessert within an hour of making it, or it will separate.

Please note that this recipe contains raw egg white.

Elizabeth Moxon's Lemon Posset, but with Hanepoot & Glitter

300 ml cream
the finely grated zest of a lemon
the juice of a lemon
½ cup (125 ml) icing sugar
½ cup (125 ml) Hanepoot, or any similar sweet white dessert wine
the white of a large egg
finely grated orange zest
edible glitter

Put the cream and lemon zest into a bowl and, using a whisk or an electric beater, whip until the cream is thick and fluffy. Sift the icing sugar over the top of the cream, and then pour in the dessert wine and lemon juice.

Using a spatula or wooden spoon, gently fold the mixture until well combined.  In a separate bowl, whisk the egg white to a soft peak and fold into the lemon cream.

Pile the posset into stemmed glasses (a piping bag is the only way to do this without messing the edges) and top with a little orange zest.  Place in the fridge. Just before serving, sprinkle with glitter. Serve within an hour.

Serves 4


Print Friendly and PDFPrint Friendly

Monday 19 April 2010

Leaf-Wrapped Wine-Soused Camembert, over the coals

Soaked in wine overnight, then flavoured with herbs and garlic, these little cheeses are wrapped in green leaves, tied with string and grilled over hot coals until the cheese has liquefied. This is a great warm-up snack for a braai [barbeque]: put them on at the same time as the meat (they take only a few minutes to cook) and then pass them around with a pile of crisps or salty crackers while you finish cooking the steaks.
Leaf-Wrapped Wine-Soused Camembert, over the coals
You can flavour these cheeses with anything you like - I used thyme and garlic - and any large, fresh, flexible leaf will do as a wrapping: fig leaves, spinach leaves, banana leaves, beetroot greens, or even a robust lettuce leaf. (Here I used mustard greens, which grow like weeds in containers in my garden). Don't worry about the leaves catching fire: their moisture prevents them from charring too quickly.  By the time they've blackened at the edges, the cheese will have collapsed into a herby goo.

Leaf-Wrapped Wine-Soused Camembert, over the coals 
This, I might add, is the only dish that I've so far managed to cook successfully on my brand-new, super-duper, Taj Mahal of a braai-and-pizza oven.  I fired up the new braai on Sunday for the first time, partly because I'd laid my hands on a beautiful slab of fresh tuna, straight off a fishing boat, but also because I wanted to road-test my new grid. This grid, which I asked a local ironsmith to make, has a cunning feature: a third of the total space is covered by a removable double-decker section. This is designed, first, to keep food hot, and second to allow slow-cooking meat (such as chicken) to finish off at its own pace. The grid and its upper storey worked very well; the tuna steaks, on the other hand, were... um.... well,  they were deliciously, spankingly fresh, but they overcooked in a matter of minutes, welding themselves so resolutely to the new and shining grid that I started hunting for a crowbar.

Clearly, there is a long way to go before I get this outdoor cooking arena working perfectly.  (And the pizza oven?  Oh, please don't mention the bloody pizza oven.  I fired it up once, and the results were dismal.  The wood burned out too quickly, the oven didn't get hot enough, and the pizzas were floppy, stodgy and riddled with concrete dust. Certain members of my family were so disgusted with their 'pizzas' that they dumped them in the bin. Some gave scornful snorts at my bourgeois efforts to own a pizza oven. But that's another story.)

Thank goodness for the cheese.

Leaf-Wrapped Wine-Soused Camembert, Cooked over the Coals
4 small, just-ripe Camembert cheeses
250 ml (1 cup) white wine
2 T (30 ml) olive oil
2 cloves garlic, peeled and crushed
12 large, fresh green leaves (see notes above)
a few sprigs of fresh thyme, or herbs of your choice
salt and milled black pepper

The day before you want to braai the cheeses (or at least six hours in advance), use a sharp knife to slice off the top layer of rind, removing about 2mm.  Put the cheeses, and the sliced-off rinds, into a shallow dish. Prick holes, using a fork, all over the soft upper surfaces of the cheeses. Mix together the wine, olive oil and crushed garlic, and pour the mixture over the cheeses.  Cover with cling film and set aside in a cool place.  Turn the cheeses once or twice while they marinate.

Soak 1.5 metres of string in cold water ten minutes.  Remove any large, stiff stalks from the leaves.  Place two leaves, crosswise, on your counter top.  Place a wheel of cheese on top.  Drizzle some of the marinade over the cheese, top with a few sprigs of thyme, season with salt and pepper, and cover with the sliced-off 'lid' of rind.
Leaf-Wrapped Wine-Soused Camembert, over the coals 
Place another leaf on top. Cut off a 40-cm length of wet string and slide it under the bottom-most leaf.  Gather the edges of the leaves up into a parcel, pleating and tucking as you go, and secure it by knotting the string around it in six 'spokes'  (see picture, left.) Don't worry if the parcel is scruffy: as long as there are no gaping holes, your cheese is safe. Repeat the process with the remaining cheeses.

Place the parcels over hot coals, face down, for about three minutes, or until the top of the parcel is browned. Before the cheese melts completely, flip over the parcel, using a spatula, and allow the underside to cook for another three to five minutes  (depending on the heat of your coals). The very instant you see cheese seeping from the parcel, it's ready. Serve immediately.

Serves 8. http://whatsforsupper-juno.blogspot.com/2009/08/spring-salad-of-edamane-beans-fennel.html
Print Friendly and PDFPrint Friendly

Friday 16 April 2010

South African Tomato and Onion Soup with Roast-Garlic and Camembert Toast

Tomato and Onion Soup with Roast-Garlic and Camembert Toasts
Spend any time in South Africa, and sooner or later you'll come across the nation's
favourite sauce: chopped onions and tomatoes, slowly cooked to an unctuous rust-coloured gravy. The sauce is served with mieliepap [maize porridge], with samp and with bread; it's dolloped over sizzling boerewors rolls, served alongside curries and stews, and is an essential side-dish with braaied [barbecued] meat.

 There are as many variations of this sauce in South Africa as there are cooks: some purists insist on just tomatoes, onions, oil and salt and pepper; others add garlic, wine, herbs and spices. Chakalaka, said to have been invented by Johannesburg's migrant mine-workers, is a highly spiced African relish that includes chillies, peppers and curry spices, plus - depending on who's making it - carrots, beans, cabbage, and so on.

I can't enjoy bangers and mash (my last-meal-on-earth dish) without a tomato-and-onion gravy, well thickened with Bisto, because this is they way I ate them as a teenager. I'd arrive home at 4 o' clock, bone-tired and cold, on a Highveld winter afternoon, to find a foil-covered dish of hot Eskort pork bangers and golden-crusted mash in the oven, plus - oh joy! - a saucepan of gloopy gravy on the stovetop.

In its most basic form, a tomato-and-onion sauce is just that: you cook the onions to a melting softness in olive oil or butter, tip in the tomatoes, season with salt and pepper, and cook with a little water or wine until it's ready. I've tried to reproduce the simple, sunny flavours of this sauce in this soup, using only the essential ingredients. The first time I made this soup, frying the ingredients and then diluting them with stock, it was tasty, but lacked body, and had no depth of flavour. The second time round, I lightly caramelised the onions on the stove-top, added the tomatoes and then put the whole lot into the oven to slow-bake for an hour, and this intensifying of the flavours did the trick.

This is a slightly chunky soup, because the tomatoes are not peeled. Peel them if you have to, but it won't taste the same. Please use a good chicken or vegetable stock - see my notes at the end of the recipe - and not a stock cube, which will ruin the clean flavours of this soup .

Tomato and Onion Soup with Roast-Garlic and Camembert Toasts
16 small (plum-sized) onions, or 8 large onions, peeled
3 T (45 ml) olive oil
2 T (30 ml) butter
1 T (15 ml) white sugar
2 T (30 ml) white wine vinegar
16 ripe, juicy tomatoes
salt and milled black pepper
1 litre chicken or vegetable stock
100 ml cream
1 T (15 ml) Tabasco sauce (or more, to taste)

For the toasts:
1 full head of garlic
a baguette, or some rolls, sliced
2 tsp (10 ml) olive oil
1 medium-sized ripe camembert cheese

Pre-heat the oven to 170°C. Peel the onions and cut them in half, vertically (if you're using large onions, cut them into quarters). Heat the oil and butter on your stove-top, in a heavy roasting pan. Add the onions and sugar and fry, over a medium heat, tossing frequently, for four to five minutes, or until the onions are a rich golden colour. Don't allow them to catch or burn. Stir in the vinegar and allow to bubble for a minute. Add the tomatoes, season with salt and pepper, and toss well. Place in the oven and bake for an hour and a quarter, or until the tomatoes have collapsed and the onions are very tender.

Half-way through the cooking time, wrap the whole head of garlic in tin foil, and place it in the oven.

Remove the tray, and the head of garlic, from the oven (don't switch off the oven; turn it up to 200 C). Set the garlic packet aside to cool. Pour the stock over the tomatoes and onions, stirring well to release any sediment. Pour the mixture into a saucepan and purée, using a stick blender (or tip the whole lot into a liquidizer). If the mixture seems too chunky, add a little more stock or water. Gently reheat the soup on your stovetop. Stir in the cream and the Tabasco sauce and adjust the seasoning.

To make the toasts, slice the baguette or rolls and place them, two at a time, in a toaster. Pile the slices on a plate while you prepare the topping. While the bread's toasting, cut off the top of the head of garlic with a pair of sharp scissors or a knife. Squeeze the soft garlic pulp into a little bowl, mash in the olive oil and season with salt and pepper. Cut the Camembert into 5mm slices. Spread each slice with a little mashed garlic, and top with a slice of cheese. Place the slices on a baking sheet and place in the hot oven for a few minutes, or until the cheese has melted and is bubbling.

Serve the soup piping hot, with the cheesy toast.

Serves 6.

Note about stock:  The difference between a nice soup and a truly delicious one is the stock, so here's how to make a quick, easy, inexpensive chicken stock (if you're a vegetarian, here is a recipe for a good vegetable stock).   Buy a packet of chicken wings, which usually come in sixes or eights.  If your supermarket doesn't have them, ask the butcher for a chicken carcass.  Place the wings or carcass in a saucepan and cover with a litre of cold water.  Add any or all of the following flavourings: two carrots, a halved onion, a stick of celery, a few stalks of parsley,  a chopped tomato, a handful of mushrooms, a bay leaf, two whole cloves, a sprig of thyme and six peppercorns.  Bring slowly to the boil.  Turn down the heat and allow to simmer for an hour,  skimming off any grey scum as it rises. Strain through a colander into a bowl, and use, as directed, in the recipe. Print Friendly and PDFPrint Friendly

Monday 12 April 2010

Roast Baby Aubergines with Rocket and Peppered Cream Cheese, and a Tahini Dressing

A scattering of toasted pumpkin seeds gives this autumn salad a satisfying crunch and a good nutritional kick in the pants: they, along with the sesame seeds in the tahini dressing, are among the most wholesome plant foods on earth.  Not that I'm counting vitamins here: what I like about the warming middle-eastern flavours in this salad is that they are so well suited to days that are getting shorter and cooler, but aren't quite chilly enough to break out the mulled wine and the woollen vests.

Roast Baby Aubergines with Rocket and Peppered Cream
 Cheese, and a Tahini Dressing
I'm fortunate to live close to a little supermarket (Hout Bay's Oakhurst Spar) that has a very good vegetable section (my previous local Spar was just dismal; not only was it grimy, but I couldn't go near the meat section, with its lavish displays of yellow-toenailed chickens' feet).

My new Spar always has a nice selection of organic veggies, and on Saturday I picked up these plump, litchi-sized eggplants. I haven't had much luck with wee eggplanties in the past - they are sometimes terribly bitter, and no amount of salting and draining will help.

These ones had a slight bitterness, but a good one, which is perfectly offset by the creaminess of the cheese.

I've used a peppered, crumbly Jersey milk cream cheese from Fairview (available at Woolies and supermarkets in South Africa), but you could use any peppered feta or goat's milk cheese in this recipe.

If you can't find baby aubergines, cut some adult ones into cubes.

This is a low-carb salad, suitable for diabetics.

Roast Baby Aubergines with Rocket and Peppered Cream Cheese, and a Tahini Dressing

16 baby aubergines [eggplants or brinjals]
3 cloves garlic
3 Tbsp (45 ml) olive oil
salt and milled papper
a bag of rocket
100 g peppered cream cheese, or similar
a handful of green pumpkin seeds

For the dressing:
1½ tsp (7.5 ml) tahini
4 Tbsp (60 ml) olive oil
the juice of a lemon
1 tsp (5 ml) cumin
salt

Preheat the oven to 180°C.  Put the aubergines and unpeeled garlic cloves on a baking sheet, pour over the olive oil and toss. Season with salt and pepper. Bake at 180°C  for 25 minutes, or until the aubergines are quite tender, but not charred.  Set aside. Now make the dressing. Squeeze the softened garlic cloves out of their papery cases and place in a small bowl.  Whisk in the tahini, olive oil, lemon juice and cumin, and season with salt.

Put the pumpkin seeds in a dry frying pan and toss over a medium heat for a minute or so, or until they are lightly toasted. To assemble the salad, put the rocket on a platter and arrange the warm roasted aubergines on top. Crumble the cream cheese and scatter it over the salad, along with the toasted pumpkin seeds.   Pour the dressing over and toss gently to combine.

Serves 4. Print Friendly and PDFPrint Friendly

Saturday 10 April 2010

Oven-Cooked Hearty Beef and Carrot Stew

Oven-Cooked Hearty Beef and Carrot StewA rich, herby, gooey gravy makes this simple beef stew ideal for a family dinner on a chilly evening. It takes only 15 minutes to prepare, after which it's kicked into the oven and left to burble for a good three hours, or more.

Browning cubes of meat is tedious, but this caramelising of the meat's surface does help to give the sauce a lovely depth of flavour.

However, I've found that you don't need to brown the whole lot: you can get away with browning just a third of the beef cubes (or enough of them to create a sticky brown layer on the bottom of the pan).

Any good stewing beef will do for this recipe - chuck, blade or skirt - but I like it best using boneless shin, which doesn't go stringy after a long cooking time.

Oven-Cooked Hearty Beef and Carrot StewThe gremolata of finely minced lemon peel, garlic and parsley adds a final sparkle to the stew, but do prepare it - and sprinkle it on - at the very last moment, so that the heat of the stew releases a billowing cloud of zesty aromas.  The carrots are added in two stages: if you put the baby carrots in at the beginning, they'll turn mushy and brown.


This stew contains a quite lot of flour (I can't bear a stew with watery gravy); if the sauce is too thick, thin it down with extra wine or water.  You can prepare this dish in advance, and reheat it at supper time (in fact, like all stews, it's better the day after).

Oven-Cooked Hearty Beef and Carrot Stew
1.5 kg boneless shin, or similar stewing beef
3 T (45 ml) olive oil
½ cup (125 ml) white flour
salt and milled black pepper
2 red onions, peeled and quartered
2 large carrots, scraped and cubed
a stick of celery, finely sliced
3 cloves garlic, peeled and chopped
1 cup (250 ml) red wine
1 tin Italian tomatoes, chopped
3 T (45 ml) tomato paste
2 T (30 ml) dark soy sauce
4 fresh sage leaves, sliced
3 sprigs of thyme, leaves stripped
2 bay leaves
a small sprig of rosemary
about 750 ml hot water
18 baby carrots

For the gremolata:
a lemon
2 fat cloves garlic, peeled
a small bunch of parsley

Preheat the oven to 160°C. Remove any stringy bits from the beef and cut into large cubes. Heat the oil over a brisk flame in a large, shallow oven-proof dish or casserole. Put the flour in a bowl and season with salt and pepper. Add the beef and, using your hands, toss well so that every cube is coated.  When the oil is hot, add a third of the beef cubes and cook, over a brisk heat, until they are crusty and golden brown. (You can brown all the meat in this way, if you have the patience.) Remove from the heat and set aside. Turn down the heat slightly and add the onion, carrot, celery and garlic. Cook for a few minutes -  without allowing the garlic to brown - or until the vegetables are slightly softened.

Now add the red wine, tomatoes, tomato paste, soy sauce and all the herbs. Stir well to combine, scraping to release any sediment on the bottom of the pan.  Return the browned beef and its juices to the pan, along with the rest of the meat and flour, and cook for a minute, stirring well to prevent lumps forming. Add just enough hot water to cover the beef and vegetables to a depth of 5mm. Check the seasoning and bring to the boil, stirring well.  Cover the pot with its lid (or a double layer of tin foil) and place in the middle of the oven. Cook for an hour, then turn the heat down to 150°C and cook for another hour.  Remove the pot from the oven, stir in the baby carrots, cover and return to the oven for another hour, or longer (your cooking time will depend on your oven and the cut of beef you're using; the stew is ready when the meat is fork-tender, and the carrots are tender).

To make the gremolata, finely grate the lemon zest and the garlic (a microplane is perfect for this job) and finely chop the parsley. Combine in a small bowl. Just before serving, sprinkle the gremolata over the hot stew.   Lovely with hunks of bread or mashed potato.

Serves 6. Print Friendly and PDFPrint Friendly

Thursday 8 April 2010

Fresh-Plum and Almond Cake, and a bitter taste in one's mouth

Made in a jiffy in a food-processor, this cake involves no more effort than measuring out the ingredients  and stoning the plums. The result? A light, almond-scented cake concealing hot nuggets of sweet-sour plum. Like all my recent fruit-plus-cake experiments, this is really a cross between a cake and a hot pudding, and it's best eaten warm, on a cold night, in your bed, with lashings of cream or custard.  Or both.

Fresh-Plum and Almond Cake
The cake, before it's baked
Plums are in full glut in South Africa now, as they are every autumn, and so ridiculously cheap and luscious that I just can't resist buying them by the basketful.  I can rely on my kids to demolish most of the plums I buy, but there are often a few left-overs rolling around in the fruit bowl, getting softer, sweeter and juicier as they  begin to wrinkle.

Turfing them into a cake for my pudding-crazed family was all I could think of (although I had to make this cake twice before it was just right).

On the subject of 'inventing' a cake: someone emailed me the other day to ask how I make up cake recipes from scratch.  The answer?  Of course I bloody well don't:  I'm not a Delia or a Nigella (the verrry thought!), and I'm certainly not a natural baker. What I do is to take an existing cake recipe - and there are really only four or five good basic formulas for cake - and adapt it.  Most times I use a tried-and-tested recipe from my mum's hand-written cookbook (Jack's Granadilla Cake is a good example); sometimes I refer to my collection of vintage recipe books and pamphlets from the 50s and  60s, which are packed with precise and delicious cake recipes.  You can find books like these in heaps in second-hand bookshops and charity shops - nobody wants them any more.

Fresh-Plum and Almond Cake
This is a cake for eating in bed.
Before I give you this recipe, an interesting story about having a bitter taste in one's mouth.  No, I'm not annoyed or feeling sour!  Last week, as we were about to embark on a family camping trip, and bickering as we packed the car and made the padkos, my husband complained that his mouth was filled with a bitter, sour taste.  'I'm not surprised, given your attitude', I snarled, wrestling some sausages into a blikkie. 'Thanks for that, darling,' he growled, shoving the moth-eaten sleeping bags in the boot. 'You'll be so sorry when you find out I've got a brain tumour.'

By the time we were seated around a crackling campfire a few hours later, and with the help of some nice cold white wine and sizzling boerewors, we were all feeling less grumpy, but the bitter taste in Flip's mouth had worsened. No amount of tooth-brushing or rinsing or Coca-Cola-swigging helped, and the foul taste persisted for a full 48 hours. When we got back to Cape Town, he googled the problem, and an extraordinary culprit emerged.

Pine nuts. According to a recent report, eating pine nuts can leave a foul, acrid taste in your mouth for up to three days. This has been dubbed 'pine mouth', says the always-sensational Daily Mail: 'Increasing numbers of people have reported that after eating pine nuts, typically as a snack or in a pesto sauce, they have developed a foul, metallic taste in their mouth lasting for up to two weeks, making practically all food and drink unpalatable.'  

Postscript, February 2013:  Scientists have not yet figured out what chemical compound causes this foul taste; more about this in a 2012 report >  Cause Of Foul Pine Nut Taste Befuddles Scientists.

I was relieved, naturally, that there was no brain tumour (a 'brain tuna', my son called this when he was three), but I was also infuriated that my stash of extremely expensive pine nuts - which I'd hidden in a door compartment in the fridge - had been discovered and demolished.  I was tempted to bliksem him with a rolling pin - but, then again, I reckoned he'd suffered enough.  

It's only today that the bitter taste has finally disappeared. And this plum cake was the first thing that my beloved got to taste, after almost a week of  living with deadened tastebuds. He loved it - well, of course he would!

Fresh-Plum and Almond Cake

6 large ripe plums
2 cups (500 ml) white cake flour
2½ tsp (12.5 ml) baking powder 
a pinch of salt
180 g soft butter
1½ cups (375 ml) caster sugar
4 eggs
1 cup (250 ml) ground almonds
1 tsp (5 ml) almond extract, or essence
1 cup (250 ml) milk

To serve:
100 ml flaked almonds
icing sugar
whipped cream

Heat the oven to 160°C. Line the bottom of a 23-cm non-stick cake tin (preferably a spring-form tin) with a circle of greased baking paper.

Cut the plums in half, along their seams. Remove the pips, using the point of a sharp knife, and set aside.

Sift the flour, baking powder and salt on to a plate. Put the butter, caster sugar, eggs, almonds, almond extract and milk into a food processor fitted with a metal blade. Turn on the processor, and whizz the mixture together for a minute.  Now open the top of the food processor and tip in the sifted flour/baking powder/salt mixture. Whizz, on a high speed, for another minute.  Don't worry if the mixture looks slightly curdled: all will come right in the baking.

(If you don't have a food-processor, simply combine all the ingredients in a large mixing bowl, using a large balloon whisk.)

Pour the batter into the prepared baking tin.  Press the halved plums, cut side up, into the batter. It doesn't matter how far you sink them in - they will all end up at the bottom of the pan.  Tap the cake tin sharply on the counter a few times to pop any air bubbles.  Place in an oven heated to 160°C and bake for an hour and twenty minutes, or until the cake is pulling away from the sides of the tin, and an inserted skewer comes out dry.

In the meantime, put the flaked almonds into a dry frying pan and toast, over a medium heat, until they're just beginning to turn golden brown. (Or toast them on a baking sheet in a moderate oven.) Remove from the heat and set aside.

Take the cake out of the oven, allow to cool for five minutes, and then run a sharp knife around the edges of the tin to release the cake.  Invert the cake onto a plate, flip off the metal bottom of the cake tin, and peel off the baking powder.  Turn the cake the right side up again.  Put the icing sugar into a tea-strainer (or sieve), and generously dust the top of the cake with it.  Sprinkle the toasted almonds over the cake.

Serve warm, with whipped cream.

Makes one 22-cm cake. 

Print Friendly and PDFPrint Friendly

Tuesday 6 April 2010

Curry in a Hurry: Spicy Prawns with Paprika and Coconut Milk

A perky sauce made with fresh spices and coconut milk can work wonders with prawns that have come straight from the freezer. It can also perform miracles with defrosted prawns that have been abandoned - by a gin-giddy cook - in their lemon-garlic marinade for a full 36 hours.

Spicy Prawns with Paprika and Coconut Cream
Plate by David Walters
I was intending to flash-fry these prawns as a late-night snack for guests at my husband's 50th birthday party last week, but lost all interest in the idea once the party was in full swing (and - okay - once I had a number of beetroot-and-gin shots under my belt).

It was hardly a great surprise that  no one felt like eating prawns the day after the party ('Don't point your fokken tentacles at me!' growled my husband when he found them in the fridge, quoting his favourite line from the movie District Nine). But I certainly was not going to throw away two boxes of plump Italian prawns -  which I'd bought on a special at Woolworths -  no matter how sulky they might have felt at being left to languish in the fridge. I'm not going to pretend that they had the bounce of fresh prawns harvested at dawn from limpid waters, but I was surprised to find that they were still sweet and succulent, and as springy between the teeth as any prawn that's done time in a deep-freeze

You could use prawn tails for this recipe, but your sauce won't have the rich flavour that comes from the juicy heads and other whiskery bits.

Note: my prawns were still okay to use after 36 hours because of the preserving qualities of the lemon juice and salt.  If you're defrosting prawns, I recommend you use them within 4 hours.

Curry in a Hurry: Spicy Prawns with Paprika and Coconut Milk

1.5 kg whole frozen prawns, defrosted for 1 hour

For the marinade:
3 cloves garlic, peeled and crushed
juice of 2 lemons
2 T (30 ml) olive oil
1 tsp (5 ml) salt

For the sauce:
3 T (45 ml) olive oil
1 thumb-length cinnamon quill
2 tsp (10 ml) black mustard seeds
10 curry leaves
340 ml coconut milk
1 T (15 ml) freshly ground cumin
1½  tsp (7.5 ml) paprika [smoked paprika if you can find it]
1½  tsp (7.5 ml) red chilli powder or chilli flakes [to taste]
1 tsp (5 ml) turmeric
milled black pepper and salt
the juice of a lemon

To serve:
6 spring onions
a small bunch of fresh coriander
paprika

Devein the prawns and place them in a bowl.  Add the garlic, lemon juice, olive oil and salt and, using your hands, toss well so that every prawn is lightly coated. Cover and place in the fridge for an hour or two. Heat the olive oil in a large frying pan or a paella pan. Add the cinnamon quill, mustard seeds and curry leaves and fry, over a brisk heat, until the mustard seeds begin to pop and crackle.  Add the prawns and cook, tossing frequently, for a few minutes, or until the prawns have turned to a rich coral colour.  Turn down the heat and stir in the coconut milk, cumin, paprika, chilli powder and turmeric. Cook gently - a slow bubble is just right -  for 5 minutes.  In the meantime, finely slice the spring onions (all the white parts, and some of the green) and chop the coriander. Season the prawns with pepper and add a little more salt if necessary. Squeeze the lemon juice over the prawns and toss to coat.  Tip the prawns onto a heated platter and sprinkle with the spring onions and coriander, and a dusting of paprika.

Serves 4. Print Friendly and PDFPrint Friendly

Thursday 1 April 2010

Borscht in Small Glasses: Iced Beetroot and Gin Shots

Beetroot and Gin Shots
Iced Beetroot and Gin Shots
Here's an idea for a zinging cocktail: cool, earthy beetroot soup, spiked with gin and served in smoking-cold shot glasses. I made this, last weekend, for my husband's 50th birthday party. I laughed my pants off when a guest (my sister, I think it was) said: 'What's good about this recipe is that it contains Vitamin C, and Vitamin G.'

Vitamin G being, of course, neat gin, a nutritious basic foodstuff for anyone over the age of 40. Or fifty.

Earlier that morning, in a pre-party kitchen frenzy, I'd wrapped six tennis-ball-sized beetroot in foil and put them in the oven, with a view to making my beetroot hummous. When I took the parcel out of the oven at noon, I was feeling grumpy, footsore and frazzled, and wondering how the hell I'd feed the 40 people expected at the party, considering I'd made only three trays of  hors d'Å“uvres (or horse-da-oovrays, as they are known in my family).

But my mood improved when I opened the foil and inhaled the glorious scents of earth, water, stone and blood: what I craved, I realised on the spot, was a borscht (of corscht!); very cold, with ginsk. And spring onionsk.

If you've read this far down, you must be a lover of beetroot.  And, if so, I don't think I need to sing its praises to you.

Here's what Tom Robbins had to say about beetroot in his novel Jitterbug Perfume:  "The beet is the most intense of vegetables. The radish, admittedly, is more feverish, but the fire of the radish is a cold fire, the fire of discontent, not of passion. Tomatoes are lusty enough, yet there runs through tomatoes an undercurrent of frivolity. Beets are deadly serious." 

You do need a good vegetable stock to give this soup some depth. In this recipe, the peelings of the baked beetroot are combined with basic vegetable flavourings to make a tasty broth.

A big mistake I made, on the eve of this party, was that I didn't chill the soup for long enough. It needs to be very cold (but, then again, not so icy that it numbs your tastebuds).  Next time, I'll chill the shot glasses in the freezer before I serve it.

Beetroot and Gin Shots
6 large beetroot, or 12 smaller ones

For the stock:
1 stick celery, chopped
3 stalks parsley
a large carrot, scraped and roughly chopped
1 onion, peeled and quartered
1 clove
1  bay leaf
6 peppercorns
½ tsp (2.5 ml) caraway seeds
1 tsp (5 ml) salt
1.2  litres water
beetroot trimmings [see recipe]

To serve:
white pepper
1 tsp (5 ml) Tabasco sauce
300 ml gin, or more, to taste
small spring onions, trimmed

Preheat the oven to 180°C. Trim the leafy tops off the beetroot, leaving 5 cm of stalk intact. Wipe the beetroot with a cloth, but don't wash, peel or cut them. Wrap them in a double layer of foil and place in the oven.  Bake until completely tender when pierced with a sharp knife (how long this will take will depend on the size and age of the beetroot; for baby beetroot, an hour is enough. Very elderly beets can take up to 3 hours.)  Remove the packet from the oven and allow to cool.

Put a piece of newspaper or greaseproof paper on your kitchen counter. Trim the beetroot of stalks and roots, slip off their skins, and set all these trimmings to one side. Quarter the peeled beetroot and place in the goblet of a liquidiser.  Blitz until you have a fine purée (if the mixture is too thick for the blades to turn, add a little water).  Pour into a large bowl and refrigerate.  Now make the stock:  put the reserved beetroot trimmings into a saucepan and add the remaining stock ingredients. Bring to the boil, then turn down the heat and simmer for an hour, topping up with water every now and then if necessary, and skimming off any foam.

Strain the stock through a colander onto the chilled beetroot purée.  Add the Tabasco sauce and season with white pepper, and a little more salt, to taste. Stir well.

Now pass the soup through a fine sieve. Place in the fridge again and chill for two to three hours. An hour before serving, place the shot glasses and the gin in the freezer.  Remove the soup from the fridge and stir in the cold gin.  Put the soup into a jug with a sharp pouring nozzle and fill each glass almost to the brim.  Add a spring onion to each glass. Serve immediately.

This recipe makes 36 shots of 60 ml (4 T) each, or two litres of soup (which will serve 8 people, as a starter). Print Friendly and PDFPrint Friendly