Showing posts with label South African cuisine. Show all posts

Saturday, 24 August 2013

Easy Maas (Amasi) Drained Cheese with Capers, Radishes & Herbs

A creamy, delicate white cheese that's incredibly easy and inexpensive to make. I'm excited to share my recipe with you, and hope you'll try it, because it's so versatile and delicious. I've used a beloved Southern African staple ingredient - amasi, or maas, a soured/fermented milk - to create this drained cheese, and combined it here with some spiky contrasting flavours.


Easy Maas (Amasi) Drained Cheese with Capers, Radishes & Herbs
Radishes, capers, lemon zest, olive oil and salt contrast with the
delicate milky flavours of the maas cheese.  I've used rocket and parsley
 seedling leaves from my garden to strew over the cheese. 

If you're fed up with paying through the nose for cream and cottage cheeses, you'll love this method of making your own soft white cheese at home. A two-litre bottle of amasi retails for around R25, so the cheese shown in the picture above, made from a one-litre bottle of maas, will set you back about ten rand.

I can't understand why amasi doesn't feature more prominently in restaurant dishes or, for that matter, in workaday South African recipes. Full-fat maas is a superb local ingredient: it has a light, tangy taste, it's pleasingly creamy, and it has many well-documented health benefits. 


Easy Maas (Amasi) Drained Cheese with Capers, Radishes & Herbs
The shiny slick visible at the top of this beautiful plate is not
 olive oil, but a brush-mark of fired-on, glassy glaze, placed there for a
 specific reason by my uncle, master ceramicist David Walters. More about
 this towards the end of this blogpost!  

Amasi also has multiple uses in the kitchen. You can use it in place of natural yoghurt (my obsession this year!) in many dishes: it's a good tenderising agent in marinades for chicken and red meat, it's lovely in raitas, salad dressings and creamy dips, and it's useful for dolloping at the last minute into curries and similar spicy stews. I always add maas to fruit smoothies, and often whizz it up with frozen cubes of fruit to make instant ice cream.

It's also an excellent alternative to buttermilk and/or yoghurt in scones and quick breads: the best scones I've ever tasted are made with maas: you can find the recipe for Irene Ngcobo's legendary feather-light scones here, on my Scrumptious Facebook page.

If you're wary of maas because it sometimes has a slightly lumpy texture, don't worry! The long draining process produces a beautifully creamy, smooth-textured cheese, all on its own, without any need for stirring.

You can lightly knead this cheese (once it has finished draining) with salt, pepper, garlic, herbs and any other zippy flavours you fancy, but I think it's best just as it is, with all the bells and whistles served on the side of the plate. I love the contrast of the delicate milky-bland flavours and a few crunchy/sour accompaniments, mashed together under a fork with plenty of fruity olive oil and flaky sea salt.

Try it, also, with ribbons of honey and a scattering of toasted flaked almonds or pistachios, or with stewed grapes or baked figs.  Or roll the cheese into balls, coat them with pepper and marinate them in olive oil, rosemary, garlic and similar sunny Mediterranean flavours (see picture below).

Easy Maas (Amasi) Drained Cheese with Capers, Radishes & Herbs
Maas-cheese balls rolled in pepper and smoked
paprika, and marinated in olive oil, garlic and rosemary.
  Plate by David Walters. 

There's nothing mysterious about this recipe: it's a basic drained cheese, similar to a Middle-Eastern labneh. If you're not in Southern Africa, you can make this using Greek yoghurt (here's my recipe for a garlicky, herby yoghurt cheese).

Finally, a note about the beautiful black plates in the pictures above. My uncle David Walters, master potter of Franschhoek, works closely with some of South Africa's top chefs to produce bespoke dinnerware for their restaurants. He's designed these matte black plates with great care and attention, brushing a slick of shiny glaze right across its middle  Why? Because he doesn't want your fork to make a nasty scraping fingernails-on-blackboard noise as you clear the plate.

Which brings me to a little grumble. As I may have mentioned on this blog before, I can't bear good food served on rough slate roof tiles, a gimmick that has spread like a black fungus all over the restaurant world. (I was annoyed to see this fad eagerly reproduced by contestants on the latest series of South African Masterchef, along with the ubiquitous spoon-dragged 'swoosh' of sauce, or what I like to call a Plate Skidmark.) There are many studio potters in South Africa producing the most beautiful hand-made dinnerware, and I wish restaurateurs would support them, instead of buying their 'crockery' at builders' yards.

My feeling is this: if you're going to spend a lot of time and effort making exquisite, flavoursome food, please dish it up on a spotlessly clean, unchipped, smooth piece of porcelain, preferably a shining white or black plate with a lip  - or crafty concave surface - to prevent your jus from sliding off the edge.

Easy Amasi Drained Cheese with Capers, Radishes & Herbs

a litre of full-cream maas (I use Inkomazi brand)
baby herb leaves, to garnish
finely grated zest of half a lemon
Maldon flaky sea salt
freshly milled black pepper
1 cup (250 ml) small radishes, halved
4 Tbsp (60 ml) baby capers
4 Tbsp (60 ml) fruity extra-virgin olive oil
a squeeze of lemon juice, to taste

Line a large sieve with a closely woven cloth. I use a fine, clean cotton dinner napkin, but a brand-new J-Cloth (one of these) or a laundered dish cloth/tea towel will do just as well. Avoid waffle-textured cloths, however.

Place the cloth-lined sieve over a big bowl and pour in the maas.  Let it sit, undisturbed, for about 10 hours, or overnight.

The clear whey will drip into the bowl below, and it will also soak right to the edges of the cloth. Don't stir or scrape at the cheese: let it drain at its leisure.

Gather up the edges of the cloth, twist them tightly together and secure with an elastic band.

Hang the bundle over a bowl, or suspend it from a tap over the sink, for another 12-16 hours, or longer, if you'd like a firmer cheese. The longer you leave it, the dryer and denser it will become. If you don't have a tap like the one shown in the picture below, hang your cheese from a broomstick placed across the backs of two facing chairs, or a similar rig.

Easy Maas (Amasi) Drained Cheese with Capers, Radishes & Herbs
Hang the cheese up until you're
 satisfied with its texture.  
If you're going to hang it for longer than two days, or the weather is very hot, it's best to finish the draining process in the fridge. If your fridge has wire racks, clip the knot of the cloth to the rack with clothes pegs, and place a bowl underneath. If your fridge has glass shelves, you will have to hang the cheese in the coolest place in your house.

Tip the cheese out of its cloth onto a plate. Alternatively, you can press it firmly into a mould of some sort - a little bowl, or perhaps two small ramekins - a few hours before you serve it, and then unmould it onto a plate.

Scatter over the baby herb leaves and lemon zest, and season generously with salt and pepper. Arrange the radishes, capers and any other accompaniments around the cheese. Generously douse the cheese with olive oil, and finish off with a good spritz of lemon juice.

Serve with melba toast or crackers, or with celery and carrot sticks if you're on a low-carb eating plan.

Serves 4-6 as a snack.


Print Friendly and PDFPrint Friendly

Tuesday, 18 June 2013

Waterblommetjie and Pepper-Feta Quiche

I didn't grow up in the Cape, so I'm not a big buyer of waterblommetjies, and nor am I a keen eater of waterblommetjie bredie. This traditional mutton stew, a treasured winter dish here in the Cape and a great classic of South African cuisine, has as one of its chief ingredients Aponogeton distachyos, a pretty aquatic plant also known as Cape Pond Weed and Water Hawthorn (see pictures below).

I'm not mad about them in stews because they tend to collapse into a muddy green heap when cooked for any length of time, but they are lovely stir-fried, with an intriguing crunchy texture and a taste that has been described as reminiscent of young green beans and asparagus.  (If you'd like to try a traditional waterblommetjie bredie, you cannot go wrong with my friend Michael Olivier's authentic recipe.)

There isn't much you can do to prevent waterblommetjies from losing their vibrant green colour after you've heated them - even plunging them into iced water, which I have tried, has little effect.

But please don't be put off trying them, because I think you will like them a lot.

With the pack of very fresh buds I bought at Woolies this week, I made a simple quiche, adding plenty of peppery, creamy feta, which I thought would contrast well with the slight astringency of the waterblommetjies.

The sweetly scented flower of Aponogeton distachyos.
Photo by J.F. Gaffard, via Wikimedia Commons 
Usually I test recipes a few times in order to improve the dish, but I don't think this recipe needs any tweaking.  It's substantial, yet light in texture, and the waterblommetjies add a most interesting and pleasant crunch.  Some little sautéed cubes of smoky bacon might add an extra layer of luxury, should you wish to go the whole hog.

I have given quite detailed instructions for making an easy, light and crumbly shortcrust pastry, because a good pastry can make the difference between an okay quiche and one that knocks your socks off.  If you're a dab hand at pastry, skip these paragraphs.

Here are some of my top tips for making shortcrust pastry.

If you're not in South Africa, try this recipe with fresh asparagus or broccoli.

And if you can't find peppered feta cheese, add plenty of extra freshly ground pepper to the quiche filling.


This quantity of pastry and filling is suitable for a 20 x 30 cm rectangular non-stick metal quiche pan.

As you probably don't have one of these beauties (I bought three at my local Chinese supermarket for a paltry R35 each) I asked the maths boffins in my house to figure out the equivalent sizes in other shapes:  this is enough for a shallow 25 x 25 cm square dish, or a shallow circular quiche pan with a 28-cm diameter.


Waterblommetjie and Pepper-Feta Quiche

For the pastry shell:
300 g white flour, sifted
180 g cold butter, cut into cubes
½ tsp (1.25 ml) salt
1 egg yolk from an extra-large free range egg
a few tablespoons of ice-cold water (see recipe)

For the filling:
300 g fresh waterblommetjies
2 Tbsp (30 ml) olive oil
the juice of half a lemon
150 g peppered feta cheese, roughly crumbled
1 cup (250 ml, fairly loosely packed) grated Cheddar
4 extra-large free-range eggs
½ cup (125 ml) milk
½ cup (125 ml) cream
1 tsp (5 ml) Hot English Mustard Powder or prepared Dijon mustard
salt and milled black pepper

Heat the oven to 190 °C, fan on,  and put a large metal baking sheet in it to heat.

First make the pastry.  If you have a food processor with a metal blade, place the sifted flour, butter and salt into the processor jug and whizz until the mixture resembles fine breadcrumbs.  Add the egg yolk, then trickle ice-cold water - a teaspoon or two at a time - into the chute of the jug, pressing the pulse button in short bursts until the mixture just comes together in a ball.

Once it's formed a ball, press the pulse button again once or twice so that the ball makes five or six turns around the processor jug, but no more.

If you don't have a food processor, put the sifted flour into a large bowl and add the salt and butter cubes. Using your fingertips, lightly rub the butter into the flour until the mixture resembles fine breadcrumbs. Add the egg yolk and iced water, as described above, and very lightly knead the mixture for a minute or two until it holds together. Tip the ball of dough on to a sheet of clingfilm, wrap it up and place in the fridge for 15-20 minutes to rest.

Roll the dough out on a floured board (or between sheets of clingfilm, which makes the whole process so easy) to a thickness of 3 mm.  It should be about 5 cm larger than your quiche dish, all the way round.

Use the pastry to line a quiche dish (again, tips here).  Let the pastry drape generously over the edges of dish - you'll trim it off later once you've baked it blind.  Prick the base of the pastry all over with a fork, cover it with a sheet of kitchen paper and weigh that down with dried beans or baking beans. Slide the dish onto the heated baking sheet and bake at 190 °C for 10 minutes.

Remove the paper and beans, and put the dish back into the oven for a further 10-15 minutes, or until the base feels dry to the fingertips and is a light golden colour all over.  Remove the pastry shell from the oven, on its baking sheet, and turn the heat down to 180 °C.

In the meantime, prepare the filling. Roughly slice the waterblommetjies, leaving any smaller buds whole.  Heat the olive oil in a wok and stir-fry them over a high flame for 3-5 minutes, or until they are bright green and just tender-crisp. This is a critical stage of this recipe, because the buds must be cooked, yet still retain a slight crunch.  Splash in the lemon juice and cook for another 30 seconds, or until the juice has evaporated.  Season with a pinch of salt and set aside to cool for a few minutes.

Arrange the cooked waterblommetjies all over the pastry base, and scatter over the crumbled feta and grated Cheddar. Firmly run a rolling pin over the edges of the quiche pan, to remove any overhanging pastry.

Put the eggs, milk, cream and mustard in a bowl and, using a balloon whisk, beat together for a minute or two, until well combined and slightly aerated. Season to taste with salt and pepper.

Pour the egg mixture into the prepared pastry shell and bake at 180 °C for 30-40 minutes, or until the filling is puffed and golden.  If the pastry edges look as if they're browning too quickly, cover them lightly with strips of tin foil.

Serve warm (I don't know why this is, but to me all quiches seem best warm, while they're still wobbling gently) with rocket or watercress leaves dressed with lemon juice and olive oil.

Makes 1 x 28 cm quiche; serves 6. 

Knock the overhanging edges off the quiche by
running a rolling pin all over the edges of the pan.

Print Friendly and PDFPrint Friendly

Thursday, 16 May 2013

Rolled Shoulder of Venison, from Sydda Essop's book 'Karoo Kitchen'

I was sent a copy of this book because I'll be part of a panel discussion with the book's author, Sydda Essop, at the Franschhoek Literary Festival on Friday 17th May (along with Hilary Biller of the Sunday Times, and chaired by Abigail Donnelly).

Rolled Shoulder of Venison, from Sydda Essop's book Karoo Kitchen
Elsa Olivier's Rolled Shoulder of Venison. Photograph by © Craig Fraser, courtesy of Quivertree Publications.  

I have never met Sydda Essop, but I'm very much looking forward to shaking her  vigorously by the  hand; possibly flinging myself into her arms with cries of joy and appreciation. This is a remarkable book, and in my opinion one of the best to come out of South Africa for decades. I've no doubt it will become one of the classics of South African cookery writing, not least because it so skilfully records the complexities of this country's culinary heritage.

This is so much more than a cookbook: it's a piece of social history; a rich and nuanced weaving that has as its weft the resonant stories of South African families, and its warp the workaday recipes - several of them previously unrecorded in print, to my knowledge -  passed down through many generations.

Cover of Sydda Essop's book 'Karoo Kitchen'
Image courtesy of Quivertree Publications.
Linking these stories of hardship, deprivation, resilience, courage and triumph is the harsh and inexpressibly beautiful Karoo landscape. Essop could lazily have based her book on the simple farm fare of the Afrikaner land-owners and their workers, but she's cleverly cast her net much wider than that to include a fascinating assortment of people who've washed up in Noupoort or Beaufort West or Loxton or Hopetown for one reason or another, each one of them with a host of traditional recipes tucked into their knapsacks.

Their tales of derring-do and heartbreak are fascinating, sure, but it's the way the lives of ordinary people are expressed in recipes that really made me love this book.

You will find neither a speck of sumac nor a flurry of foam in this book. There is no big deal made about sourcing organic produce or foraging from the veld, because this is the way people have sustained themselves for generations. The recipes are utterly without pretension, and feel no shame in including those store-cupboard packets and powders that have to be relied upon when you live hundreds of kilometres from the nearest supermarket.

The venison recipe below, for example, by Elsa Olivier of Victoria West, unapologetically features a beef stock cube, a packet of oxtail soup powder and a seasoning of Aromat - ingredients much loved by South African cooks, although you'd be hard-pressed to find a food writer who'd admit ever to eating such packetstuff.

From Francina Nolsapho Blow of Beaufort West, we have a recipe for dombeling (dumplings) cooked, like ujeqe (steam bread), in a plastic supermarket bag submerged in water. Horiya Mohamed arrived in the same town in 1997 as a young bride fleeing the civil war in Somalia; she's contributed four recipes, including anjera (traditional pancakes) and shaah, a spiced Somalian tea.

A pellucid bowl of Chicken Soup with Kneidlach is a recipe from the collection of Dr Debbie Anstey of Courlandskloof, the granddaughter of Lithuanian and Polish Jews. Her father-in-law Isaac Antezorsky and his brother arrived in Biesiespoort in 1920 to set up as traders, eventually owning 100 000 hectares of farmland. We have slow-roasted Greek lamb from Elpida Iakovidis, and Baked Porcupine Backbone from Lena Oktober, both of Beautfort West, while Anna Vermeurlen of Victoria West contributes a heavenly dish of baked orange pudding, and another for pomegranate syrup.

I don't want to spoil the book for you by listing each one of its recipes (did I mention the venison pie, quince atjar and Prize-Winning Springbok Tongues?) and I hope you derive as much pleasure as I did from discovering these treasures yourself.

The book has been beautifully photographed by Quivertree's Craig Fraser, and I particularly appreciate the honesty and simplicity of the food styling. Each of the dishes is lovingly laid out on a selection of old china and lace and embroidered linen, with no scatterings of microherbs or ghastly skidmarks of sauce.  There are many compelling historical photographs drawn from family archives, and at the back of the book a few pages of home remedies - one for chilblains, another for earache, plus Bettie Jaftha's treatments for a Baby Born with a Caul and Mothers Whose Afterbirth Will Not Come Out.

As I said, no ordinary cookbook.

Elsa Olivier's Rolled Shoulder of Venison

1 shoulder of venison, deboned
½ packet (125g) bacon
1 container (500ml) buttermilk
2 tbsp butter
2 onions, chopped
1 beef stock cube, dissolved in 1 cup water

For the sauce:

½ packet oxtail soup powder
2 tbsp dry white wine
salt and/or Aromat seasoning to taste
1 tsp black pepper
1 packet (250g) fruit-cake mix

Arrange the bacon strips to cover the inside of the shoulder,roll and secure with kitchen string. Marinate overnight in buttermilk and pat dry with a paper towel the next day.

Heat the butter in a heavy-based saucepan and fry the onions until golden brown. Remove, add more butter to the saucepan, if necessary, and brown the meat.

Add the beef stock and fried onions and simmer slowly for 2 hours until the meat is tender. Allow to cool slightly before carving the meat into slices.

To make the sauce, dissolve the oxtail soup powder in 2 cups of water and add the wine, salt and/or Aromat, pepper and fruit-cake mix. Simmer slowly until the sauce is thick and creamy. Layer the sliced meat and sauce, and bake at 180°C until golden brown. Serve hot.

Serves 2-4


Print Friendly and PDFPrint Friendly

Sunday, 9 May 2010

Scrumptious Soccer Snacks: Mini Bunny Chow with Butter Chicken

A classic of South African cuisine, the splendidly named bunny chow is a hollowed-out half- or quarter-loaf of white bread, filled to the brim with a hot, spicy curry of mutton, beef, chicken, beans, vegetables, or a combination of the above. Welcome to the second in my series of delicious, easy football snacks with a South African flavour!

Scrumptious Soccer Snacks: Mini Bunny Chow with Butter Chicken
Little rolls stuffed with butter chicken.
Durban is the home of bunny chow: a hot 'bunny' is a favourite lunch-time meal for labourers, office workers and surfers, and for late-night revellers.  And tourists too: if you're planning on visiting Durban during the Fifa World Cup, please don't leave without trying this delicious, inexpensive rib-sticker of a meal.  You'll have no problem finding where to buy one: ask any local, and you'll be pointed in the direction of a curry outlet claiming to make 'the best bunny in Durbs'.

There is much debate about the etymology of the name 'bunny chow'; you can learn more about this at Wikipedia, which has an interesting entry on the topic. What is certain is that the dish originated among Indian indentured labours, mostly Hindus, who came to South Africa in the 19th century to work on the sugar-cane fields.

Scrumptious Soccer Snacks: Mini Bunny Chow with Butter Chicken
An authentic bunny chow must use a white Government loaf (that is, an inexpensive, fluffy square loaf), and should be filled to the brim with a Durban-style curry which - whether meaty or vegetarian - is generally highly spiced and very hot.

In this recipe, I've taken the idea of a bunny chow and adapted it (or, okay, corrupted it) to create a light, bite-sized snack that I think will blow your socks off.  I've used one of my all-time favourite curries, based on the classic butter chicken formula.  There are many variations of butter chicken (in a nutshell, tandoori chicken tossed in a rich tomato-based sauce, enriched at the last minute with butter), but this formula is one that I've settled on after many attempts at coming up with the perfect taste and texture.

 This recipe is delicately spiced, which is the way I like it, but you are free to add more heat to it - some fresh chopped green chilli, perhaps, or red chilli flakes -  if you prefer a tongue-blisterer of a curry.

I've miniaturized this recipe to make the bunnies easy to pop into your mouth, but there is no reason you should not use normal sized breadrolls or, indeed, cut a loaf of white bread in half and fill it to the brim with the mixture.

 This is a complicated and long recipe, I admit.  The chicken is marinated twice, and the same spices are added at different times. But follow the recipe to the letter, and I promise you won't be disappointed by the succulence and subtle spicing of this lovely dish.

You can make the chicken and its sauce in advance (see recipe) but the cold butter must be added to the hot gravy at the very last moment, and cooked for no longer than three minutes, or it will separate into a greasy muddle.

All the spices in this recipe can be bought from an Indian spice shop. Butter chicken is usually made with powdered dried fenugreek leaves (methi), but as these aren't that easy to find, I've used whole fenugreek seeds in this recipe.  If you can lay your hands on ground methi, used 2 tsp (10 ml) in place of the teaspoon of seeds.

For this recipe in Afrikaans, see: Maklik en eg Suid-Afrikaanse 'bunny chow'

Mini Bunny Chow with Butter Chicken

8 deboned, skinned chicken breasts

Marinade 1:
2 fat cloves garlic, peeled
2 T (30 ml) grated fresh ginger
the juice of a large lemon
1 tsp (5 ml) chilli powder
½ tsp (2.5 ml) salt

Marinade 2:
1 cup (250 ml) thick white yoghurt
1 tsp (5 ml) powdered cumin
1 tsp (5 ml) garam masala
½ tsp (2.5 ml) powdered coriander
½ tsp (2.5 ml) cinnamon
½ tsp (2.5 ml) turmeric
½ tsp (2.5 ml) salt
1 T (30 ml) vegetable oil

Sauce:
750 g ripe, juicy tomatoes
1 tsp (5 ml) fenugreek seeds
2 T (30 ml) vegetable oil
2 T (30 ml) tomato paste
1 tsp (5 ml) ground cumin
1 tsp (5 ml) chilli powder
1 tsp (5 ml) garam masala
½ tsp (2.5 ml) turmeric
1 cup (250 ml) cream
50 g cold butter
salt and milled black pepper

To serve:
30 cocktail rolls
melted butter
sprigs of fresh coriander [cilantro]

Cut three or four deep slashes into the chicken breasts and place in a bowl. Crush the garlic and add it to the bowl along with the ginger, lemon juice and chilli powder. Using your hands, rub the marinade into the chicken, pressing it well into the slashes. Set aside for 20 minutes.

 In a separate bowl, combine all the ingredients for the second marinade. Pour this mixture over the chicken breasts, mix well, cover and place in the fridge for one to two hours. Don't allow it to marinate for more than 3 hours, which will make the chicken mushy.

Preheat the oven to 200°C. Remove the breasts from their marinade and, without wiping off the marinade, place in a flat ceramic dish. Discard any marinade left in the bowl. Bake at 200°C for seven minutes, then turn down the heat to 170°C and bake for a further 10-12 minutes, or until there is no trace of pinkness when you cut into the flesh of the chicken. Set aside.

In the meantime, make the gravy. Cut the tomatoes in half and grate by pressing the cut side of the tomato against the coarse teeth of a grater and vigorously grating until the skin flattens out under your palm. Discard the skin. (Alternatively, you can dip the tomatoes in boiling water for a few moments, peel of the skin, and then chop them finely). Coarsely crush the fenugreek seeds using a mortar and pestle. Heat the oil in a large saucepan and add the tomato pulp, tomato paste, crushed fenugreek seeds, cumin, garam masala, turmeric and salt. Cook over a brisk heat for about seven minutes, or until the pulp has thickened slightly (when you pull a wooden spoon through the pulp, it should leave a gap that closes reluctantly). Stir in the cream, reduce the heat, and simmer for another five minutes. (At this point, the sauce can be set aside for reheating later).

Heat the oven to 200°C. Cut the tops off the rolls and hollow out the insides, leaving a 5mm 'wall'. Brush the cut edges, lids and sides of the rolls with a little melted butter. Place the rolls and their lids on a baking sheet and bake for a few minutes - watch them like a hawk - or until the edges are golden and beginning to crisp. Keep warm.

Cut or pull the chicken breasts into bite-sized pieces and add to the tomato sauce. Stir well to combine. Heat, over a medium flame, and allow to bubble gently so the chicken is heated right through. Cut the cold butter into little pieces, add it to the sauce and cook, for no more than three minutes, stirring gently. Add the pepper, and more salt, if necessary.

Pile the butter chicken into the warm rolls, top each one with its lid, garnish with a sprig of fresh coriander and serve immediately.

Makes about 30, depending on the size of your cocktail rolls, or 8-10 servings if served in normal bread rolls.

Like this soccer snack? Try my Mini Pita Breads with Spicy Meatballs and Hoummous. Coming soon: mini South African Lamb Sosaties, marinated in a spicy sauce and cooked with apricots and lemon leaves. Print Friendly and PDFPrint Friendly

Monday, 3 May 2010

Mini Pita Breads with Spicy Meatballs and Hummous

With the kick-off to the 2010 World Cup less than 39 days away, my home town Cape Town is all abuzz, and South Africa is polishing her biggie boots and laying out the welcome mat for the hundreds of thousands of visitors who'll soon be winging our way. 

Mini Pita Breads with Spicy Meatballs and Hummous
My thoughts have naturally turned to soccer food, and so for the next couple of weeks I'll be focusing on fan fodder: delicious snacks with a South African flavour, ideal for stadium food, or for serving to your mates as you gather round the TV set to enjoy the greatest show on earth. ('What do you mean by soccer food?' snorted my husband when I told him about this project. 'The only soccer food you need is beer.' )

South African cuisine is often dubbed 'rainbow food' because of its myriad cultural influences, but I imagine it as a many-textured crazy-patchwork quilt, stitched together with shining thread that is anchored in the soil and unfurls northwards through Africa to Europe, and west to the Middle East and Asia.

There's no space here to give justice to the diversity of dishes you'll find in South Africa: if you're interested, take a look at Wikipedia's entry on the subject, which is a reasonable (though disappointingly incomplete) summing-up of what we 'Saffers' eat, and why.  Suffice to say that you will find delicious indigenous food in South African villages, towns and cities, and that the culinary heritage of various immigrant communities - from Greece to Ghana, from Mozambique to Malaysia, Nigeria to the Netherlands, India to Israel to Italy - bubbles with great vigour in kitchens all over our country.

So, where to start?

Among South Africa's most beloved snack foods are meatballs, also known as frikkadels or - enchantingly -   'frikkies'. These spicy nuggets are quintessential padkos (this means, literally, 'road food', but is so much more than that) and no car, bus, train or taxi journey is the same without them. The best ones are home-made, always to grandma's secret recipe, and are eaten cold out of a lidded plastic container (known, in Afrikaans, as a blikkie), or from a crumpled nest of tin foil. Finding a decent frikkadel in a shop is not easy: I'd rather chew a gallstone than one of the gnarled, over-peppered bullets produced, for example, by our swankiest food retailer, Woolworths.

Frikkies are easy and inexpensive to make, and are great for feeding a crowd. Here, I've made marble-sized frikkadels, and stuffed them into toasted mini-pita breads with lashings of hummous and some fresh coriander. If you like, you can add a lick of garlicky tzatziki to the inside of each pita bread. If you can't find mini pita breads, cut big ones in half.  And if almost-raw onion isn't your thing, you can fry the onion in a little olive oil before you add it to the mixture, but I just love the crunchy onioniness of these frikkies. My instructions presume that you have such a food processor, or a similar appliance: if you don't, you'll need to chop everything finely by hand (or grate the ingredients).

The dusting of chickpea (channa) flour and turmeric gives the meatballs a lovely golden crust, but you can use ordinary flour instead. The yoghurt helps prevent the meatballs from toughening as they cook.

Mini Pita-Breads with Spicy Meatballs and Hummous

For the meatballs:
3 slices fresh bread, white or brown
a large handful of fresh coriander leaves (125 ml, loosely packed)
1 small onion, peeled and roughly chopped
1 clove garlic, sliced
2 large free-range eggs
4 Tbsp (60 ml) thick natural yoghurt
750 g minced beef (or half-and-half beef and pork)
1½ tsp (7.5 ml) cumin
1 tsp (5 ml) ground coriander
a finely minced green chilli (optional, and to taste)
1½ tsp (7.5 ml) salt
milled black pepper
½ cup (125 ml) chickpea [channa] flour (ordinary flour will do)
1 tsp (5 ml) turmeric
3 Tbsp (45 ml) vegetable oil

To serve:
pita breads (40 mini ones, or 10 big ones)
a tub (about 250 ml) hummous
sprigs of fresh coriander
1 tsp (5 ml) paprika
lemon wedges

Tear up the bread, place the pieces in a food processor fitted with a metal blade and whizz to a fine crumb. Add the fresh coriander and press the pulse button a few times, until the coriander is finely chopped. Tip the mixture into a large mixing bowl and set aside. Now put the chopped onion, garlic, eggs and yoghurt in the food processor and blitz until you have a gritty slush. Tip this mixture into the bowl containing the breadcrumbs and add the minced beef, cumin, coriander, chilli, salt and several generous grinds of the peppermill. Using your hands, squish and squeeze all the ingredients until well combined. Now test the seasoning: take small piece of the mixture, flatten it to a disc and fry it quickly in a lick of oil. Add more salt or spices, if necessary. Once you're satisfied with the taste of your mixture, pinch off pieces the size of a large marble and roll them into balls. Place on plate, cover with clingfilm and put them in the fridge for 30 minutes so they can firm up.

Heat the oven to 100°C. Put the chickpea flour on a plate, season with a little salt and pepper and stir in the turmeric. Heat the oil in a frying pan over a medium-high flame. Dust the meatballs, eight or ten at a time, with the seasoned chickpea flour. Fry the meatballs in batches in the hot oil, turning them often, until they are golden brown and crusty on the outside and cooked through inside. Place the cooked meatballs in the warm oven while you fry the rest.

When you've cooked all the meatballs, heat the pita breads on a baking sheet in the oven. Using a pair of scissors or a sharp knife, cut a 5 mm slice off the top edge of each pita bread. Use a knife blade to open a pocket in the bread (this has to be done while they are piping hot: if you allow them to cool off, they will tear). Add a generous dollop of hummous to each pita, then fill the pocket with a hot meatball. Tuck in a sprig of fresh coriander. Pile into a bowl and serve immediately, with lemon wedges.

Serves 10 as a snack. Makes about 40 marble-sized meatballs. Print Friendly and PDFPrint Friendly

Tuesday, 30 March 2010

Extra-Lemony Cape-Malay-Style Pickled Fish

Cape Pickled Fish
If you're not a lover of seafood, your nose may well wrinkle at the thought of eating pickled fish. I concede that, when put together, the words 'pickled' and 'fish' are unpleasantly redolent of pale things floating in jars of vinegar.

But this dish, properly made with good, fresh ingredients, is quite delicious, and I urge you to give the recipe a bash.

Consisting of  firm-fleshed white line fish soaked in a turmeric-yellow, oniony, lightly curried pickle, this dish has a long and noteworthy history as one of the classic staples of 'Cape Malay' cooking. The basic recipe has remained largely unchanged over at least two centuries; its pedigree is doubtless older than that, because the dish was bought to the Cape from the East during the earliest days of the slave trade.

There isn't space on this blog to do justice to the long and painful saga of slavery at the Cape, or to the culinary heritage of the descendants of slaves.  If you're interested, do please visit the Cape Slavery Heritage blog, an encyclopaedic site packed with fascinating stories and many compelling images.

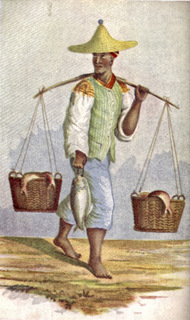
Cape Slave Fisherman.
Image courtesy of Patric Tariq Mellét
The earliest written reference I know of to Cape pickled fish comes from Lady Anne Barnard (picture below) who, after visiting Meerlust farm in 1798, wrote that she was served 'fish of the nature of cod, pickled with Turmarick'.

Hildagonda J. Duckitt, one of South Africa's most esteemed historical cookbook authors, provided a recipe for sole pickled with mango relish, onions, 12 small chillies and a full quart of vinegar in her famous Hilda's 'Where Is It?' Of Recipes (1891).

Although the key ingredients of this well-loved staple have remained unchanged over time, there are hundreds of different recipes: each family has its own particular favourite, often a closely guarded formula.  In their brilliantly instructive book Cookery in Southern Africa: Traditional and Today (1970), Lesley Faull and Vida Heard give no fewer than four different recipes, of varying complexity, for 'ingelegde' [pickled] fish.  Faldela Williams, author of the definitive reference The Cape Malay Cookbook (1988), remembers this recipe from her childhood in District Six as a festive dish, reserved for high days and holidays.  Her recipe is a rather pared-down one, containing only nine pickling ingredients, while esteemed local foodie and wine writer Michael Olivier provides a more complex recipe for kerrievis [curried fish], containing 15 picking ingredients.

What all these recipes have in common is fish, onions, turmeric, salt, curry powder and the all-important vinegar.  Important, of course, because this is the acidifying agent that prevents bacterial growth and preserves the fish. In older recipes for pickled fish, the fried fillets are packed into jars, liberally doused with a very vinegary pickling solution and set aside in a cool place to keep for many weeks, or even months.

I find most ready-bought pickled fish (which is available in many supermarkets and delis in Cape Town) too aggressively vinegary and oily, so here is my version, which uses just a little vinegar and oil, and several pungent lemony ingredients. This pickle will not, of course, last for months in a jar, but you can keep it in the fridge for four to five days. This is lovely with fresh brown bread and butter, and crisp finely sliced iceberg lettuce.


Extra-Lemony Cape-Malay-Style Pickled Fish

For the fish:

1 kg firm-fleshed white fish, skinned and thoroughly boned (I used sustainable yellowtail)
½ cup (125 ml) flour, for dusting
salt and white pepper
3 Tbsp (45 ml) vegetable oil

For the pickle: 

4 Tbsp (60 ml) flavourless oil (sunflower or canola)
2 onions, peeled and sliced in rings (not too finely)
2 cloves garlic, peeled and finely chopped
a thumb-size piece of ginger, peeled and grated
4 bay leaves
6 fresh lemon leaves
3 whole white cardamom pods
1 tsp (5 ml) cumin seeds
1 large red chilli, deseeded and finely chopped
2 tsp (10 ml)  turmeric
1 tsp (5 ml) mild curry powder
1 Tbsp (15 ml) brown sugar
4 Tbsp (60 ml) white wine vinegar
1 tsp (5 ml) finely grated lemon zest
8 black peppercorns
1 tsp (5 ml) salt
the juice of 3 lemons
½ cup (125 ml) water

To top:
extra fresh lemon leaves

Cut the fish into portions each about the size of a deck of cards. Put the flour onto a plate and season with salt and white pepper. Heat the oil over a brisk flame in a frying pan. Dust each slice of fish in the seasoned flour, shake to remove the excess, place in the hot oil and fry, in batches, for 2-3 minutes on each side, or until golden brown on both sides and just cooked through.  Remove from the heat and set aside.

Now make the pickling mixture. Wipe the pan clean of oil and residue using a piece of kitchen paper. Heat the vegetable oil in the pan, over a medium-high flame. When the oil's good and hot, add the onion rings and fry for three minutes, or until they beginning to colour, but still retain a good crunch.  Add the garlic, ginger, bay leaves, lemon leaves, cardamom and cumin seeds and cook, stirring gently, for another minute or two, taking care not to let the garlic brown.

Now add the chilli, turmeric, curry powder, sugar, vinegar, lemon zest, peppercorns and salt. Turn down the heat and bubble gently for two minutes, or until the mixture has reduced slightly, and the strong vinegary flavour has cooked away.

Stir in the lemon juice and water. Simmer for another minute, then remove from the heat.

Tip half of this mixture into the bottom of a ceramic or plastic dish just big enough to hold all the fish in a single layer. Pour the remaining mixture on top, making sure every piece of fish is well coated with the pickling liquid.  Top with a few extra lemon leaves, cover the dish tightly with clingfilm or a lid, and refrigerate for at least 12 hours - preferably 24 - turning the fish now and then in its pickle.  Serve cold, with buttered brown bread.

Makes 1 kg pickled fish Print Friendly and PDFPrint Friendly